CLIMB-ON MAPS
  • Home
  • Buy!
  • Maps
    • Hiking
    • City of Rocks, ID - Climber's Map
    • Joshua Tree, CA - Climber's Map
    • Red Rock Canyon, NV - Climber's Map
    • Smith Rock, OR - Climber's Map
  • Map Details
    • Quality
    • Map Elements
    • Methodology
    • Environment
  • About
  • Blog
    • The 15-minutes from Red Rock Restaurant Tour >
      • Indian
      • Sushi
      • Vietnamese
    • WTF 5..7 Tour - Red Rock >
      • General >
        • The Plan
        • Managing the Desert Heat
      • Black Velvet Canyon >
        • Lazy Buttress/Whisky Peak E >
          • Day 79: Schaeffer's Delight
          • Day 83: Ballantine Blast
          • Day 86: Lazy Buttress (Climb)
      • Calico 1 (1st Pullout) >
        • Amusement Park
        • Day 17: Civilization
        • Day 20: Panty Wall
        • Day 14: The Slab
        • Day 21: Wall of Death & Hamlet
        • Day 24: Child's Play
        • Day 49: Ultraman
        • Day 50: Dog Wall & Fixx Cliff
        • Day 51: Tuna and Chips
        • Day 53: Viagra Towers
        • Day 59 Iron Man - Necco Waif
        • Day 80 - Tuna Cookies
        • Day 80 - Diamond Dance - The Oasis
        • Day 81 - CarlyQuinn Crag
      • Calico 2 (2nd Pullout) >
        • Day 13: Meetup & Black Corridor
        • Day 28: Retirement Plan
        • Day 52: The Walrus, Running Man, & Sweet Pain
        • Day 54: USS Crag & Tsunami
        • Day 56: Great Red Book Wall
        • Day 66: The Gallery
      • First Creek Canyon >
        • First Creek Slabs >
          • Day 40: Falling Stars & Bad Moon Arising
          • Day 67: Smiley Face
        • Lotta Balls Wall >
          • Lotta Brews
        • Romper Room >
          • Day 42: Algae on Parade
          • Day 67: Romper Room 2
        • Schoolyard >
          • Day 44: School Yard 1 - Deja Vu & Short Subject
          • Day 77: School Yard -Sunday School & Dunce's Corner
          • Day 89: Schoolyard Bully
        • Slot Club Area >
          • Day 78: Escondite
        • Strawberry Hill >
          • Day 43: This Ain't the F'n Way!
      • Icebox Canyon >
        • Day 12: Sunnyside & Frigid Air
        • Day 39: Necromancer - Hop Route
        • Day 57: Tarkus Crack (Tiki Cliff)
      • Juniper Canyon >
        • Jackrabbit Buttress >
          • Day 16: Myster Z
          • Day 35: Mz. Why
        • Rose Tower >
          • Day 64: Canola Cracks
          • Day 87: Olive Oil
      • Kraft Mountain >
        • Day 6: Conundrum Crag
        • Day 7: Caligula Crag
        • Day 4: Three Peaks and Yin & Yang
        • Day 10: Winter Heat
      • Mt. Wilson >
        • Day 41: Limon
        • Day 72: Gentleman's Club - Silicone Sag
      • Oak Creek Canyon >
        • Day 37: Johnny Vegas
        • Day 65: Tan Line
        • Day 68: Byrd Pinnacle
      • Pine Creek Canyon >
        • Day 22: Mescalito E - Too Many Tantrums
        • Day 23: Mescalito E - Pauligk Pillar
        • Day 27: Straight Shooter Wall
        • Day 31: Robin Trowel (Abutment) & Stick Gully 1
        • Day 32-34: Flight Path
        • Day 34: Stick Gully 2 - Prelude
        • Day 36: Birdland
        • Day 38: Diarrhea Dialect (Bullnose Wall)
        • Day 48: Cat in the Hat
        • Day 62: Stick Gully - Box of Rain
        • Day 63: Cookie Monster
        • Day 69: Soloist Crack
      • Red Springs >
        • Day 2: Cowlick and Cannibal
        • Day 1: Cut Your Teeth, Hide & Seek, Happy Acres
        • Day 3: Dickies (Seems Like a Butt)
        • Day 8: Fringe
        • Day 5: Moderate Mecca
        • Day 9: Reptile & Fox Walls
        • Day 45: Gnat Man
        • Day 55: Coco Crag
        • Day 58: Ridinghood - In Through the Out Door
      • Sandstone Quarry >
        • Day 29: High Scalin'
        • Day 47: Man's Best Friend & Americrag
        • Day 66: Hall of Fame - Ms. Adventure
      • Southern Outcrops >
        • Day 70 & 71: Chocolate Rocks
        • Day 82: Illusion Crag - Part 1
      • White Rock Springs - Angel Food Wall >
        • Day 11: Group Therapy
        • Day 25: The Ledger
      • Willow Springs >
        • Day 15: Mother's and Outhouse
        • Day 18: Mossy Ledges - Pussy Nuts
        • Day 19: Mossy Ledges 2
        • Day 26: Graduate Cliff - Pre Skool Part 1 >
          • Day 46: Pre Skool Part Deux
        • Day 60 & 61: Graduate Cliff 2
        • Day 30 - Gold Digger
        • Day 61: Ragged Edges - Footloose
        • Day 62: Case Face - Space Case
        • Day 73: Ragged Edges Area
        • Day 74 Peaches (Children's Wall)
        • Day 75 N' Plus Ultra 1 - Geezer Face & Lucky Charms
        • Day 76: N'Plus Ultra 2 - Pillar Talk & Chocolate Tranquility Fountain
        • Day 84: N'Plus Ultra Part 3 - Cereal Killer
        • Day 84: Lost Creek Canyon - Grey Matter
        • Day 85: Communist Plan at Lost & Found
    • Meet Our Tools >
      • GPS Units
      • Lifeproof Phone Cases
      • Van Life: Tankenstein >
        • Tankenstein Gets Gutted
        • Van Life: Rebuilding Tankenstein >
          • Glowing Disco Counter Top
          • Cold Food Storage
          • Bouldering-pad-bench
          • Insulation and Vent Fan
          • Quick Fixes
          • Kingsized Pullout Bed
      • Ultralight Exposure Protection Gear
    • For the Ladies >
      • Cry
      • Getting Women Climbing Outside
      • Women's Resources
    • Red Rock Canyon, NV >
      • Camper Van Epic in Vegas
      • Mapping with Lady Lockoff
      • Vegas-epic-2
      • Vegas Mini-epic 3: Really?!?
    • Joshua Tree, CA >
      • Caterpillars! Van Rescue!
      • Gram Parsons' Logbook
      • Oh Shi*! Bees!
    • Hmmm or Haha >
      • Althea Crag & Mapping Dog
      • Exposure!
      • Realities
      • Silliness
      • Utterly Heinous Approaches
      • Podcast Interview: Ogden OUtdoor Adventure
  • Contact
    • Feedback
  • Retail Stores
  • Media Coverage
  • Calendar

First Creek Canyon

Wall: Romper Room
Climb: Algae on Parade
SUMMARY HAIKU

Now, which bush is it?
Seventy-meter rope best
​And two-rope rappel
Picture
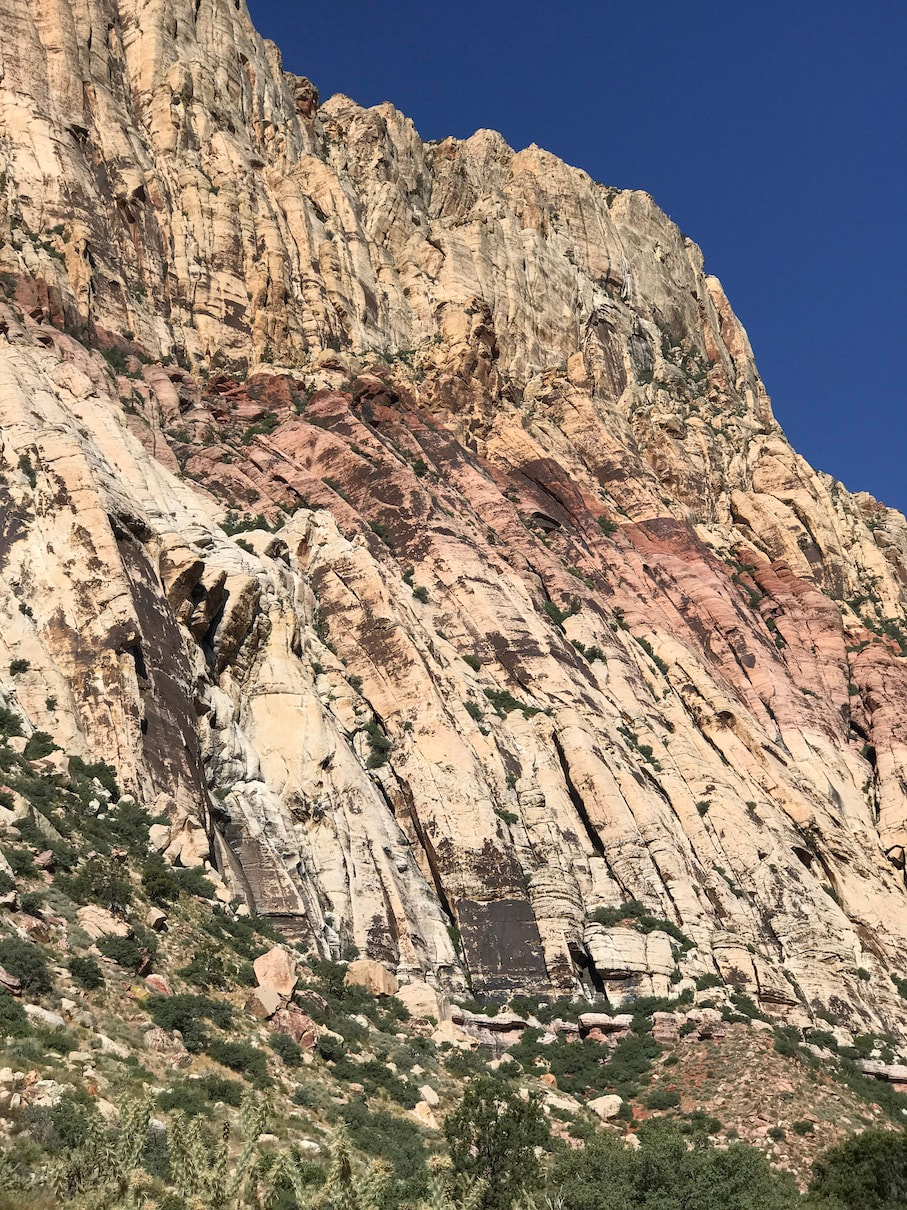
First Creek Slabs and Romper Room (Romper Room is the extra dark square face in the lower center of the photo and Algae on Parade is the crack on the far right edge of that face).
CLIMB: Algae on Parade (Trad, 5.7) (3/4 pitches)(I calculated ~665', Handren says 550' and MP says 600')
WALL: Romper Room
PROTECTION: You can get away with doubles to 4" + nuts, we brought a #5 and used it a few times (though you can probably find alternatives if you don't have a #5)
BEGINNER LEAD: Not pitch 1. The rest of the pitches, yes, but you may want to shorten the pitches. Rope drag on long pitches can be stressful and exhausting. 
Conclusion WTF? What the FUN!
The key features of this climb are:
  • Algae on Parade is a super fun climb! Pitch 1 does have a little spice, but it is well protected. The remaining pitches are long but pretty cruiser. (Be prepared for a rope-drag-work-out if you do the full rope-stretcher pitches.)
  • If you read through the Mountain Project posts there are discussions about using a 70m rope versus a 60m versus bringing two ropes for the rappel. Here is what we strongly recommend:
    • ​At the very least bring two ropes to rappel or you will be doing some nasty, exposed down climbing. By having two ropes you can get down in two rappels (60m ropes work - they just barely reach the bottom on rappel two with rope stretch.)
    • To do the climb in three pitches using the belays in the topo (& mentioned in most of the other guide resources), you need a 70m or you will be simulclimbing to reach those belays (We had to simulclimb for about a total of 40 feet even though we did the climb in 4 pitches - but our pitches were broken up weird because of confusion - which we try to clear up for you here.) If you have a 60m, I'd recommend planning for four pitches and do hanging belays at spots in between the belays marked in the topo above. The "standard belay spots" don't work that well for a 60m rope. 
    • The best rope combo would be to use a 70m and have a tag line to do the two-rope rappel. You can get away with a 60m tag line if you want to save weight. 
    • In the other guides, there's lots of talk about bushes, and it's unclear which bush is which... I clarify that below under pitch 1. 
Picture

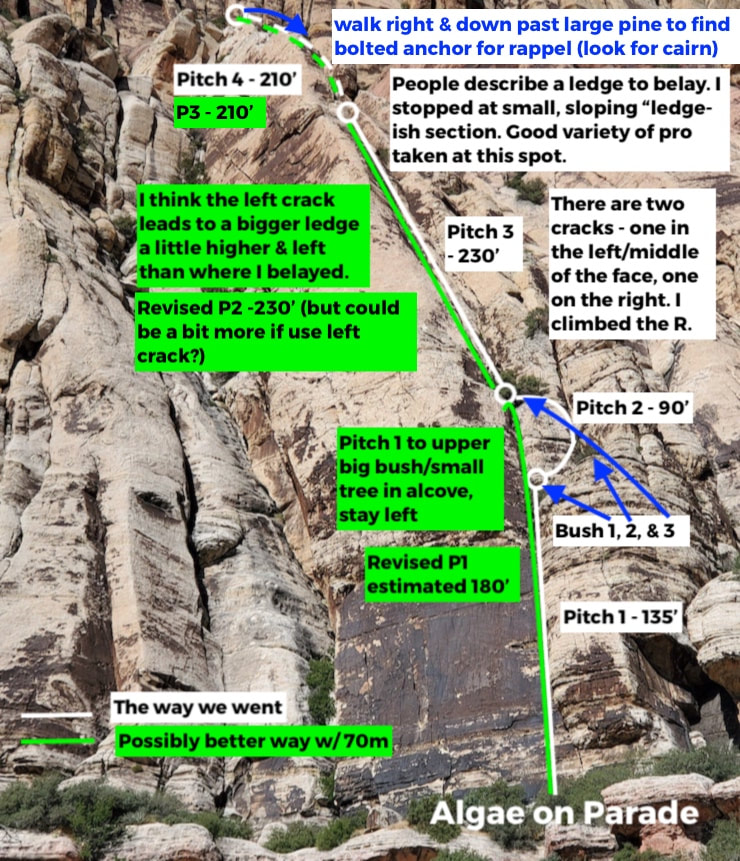
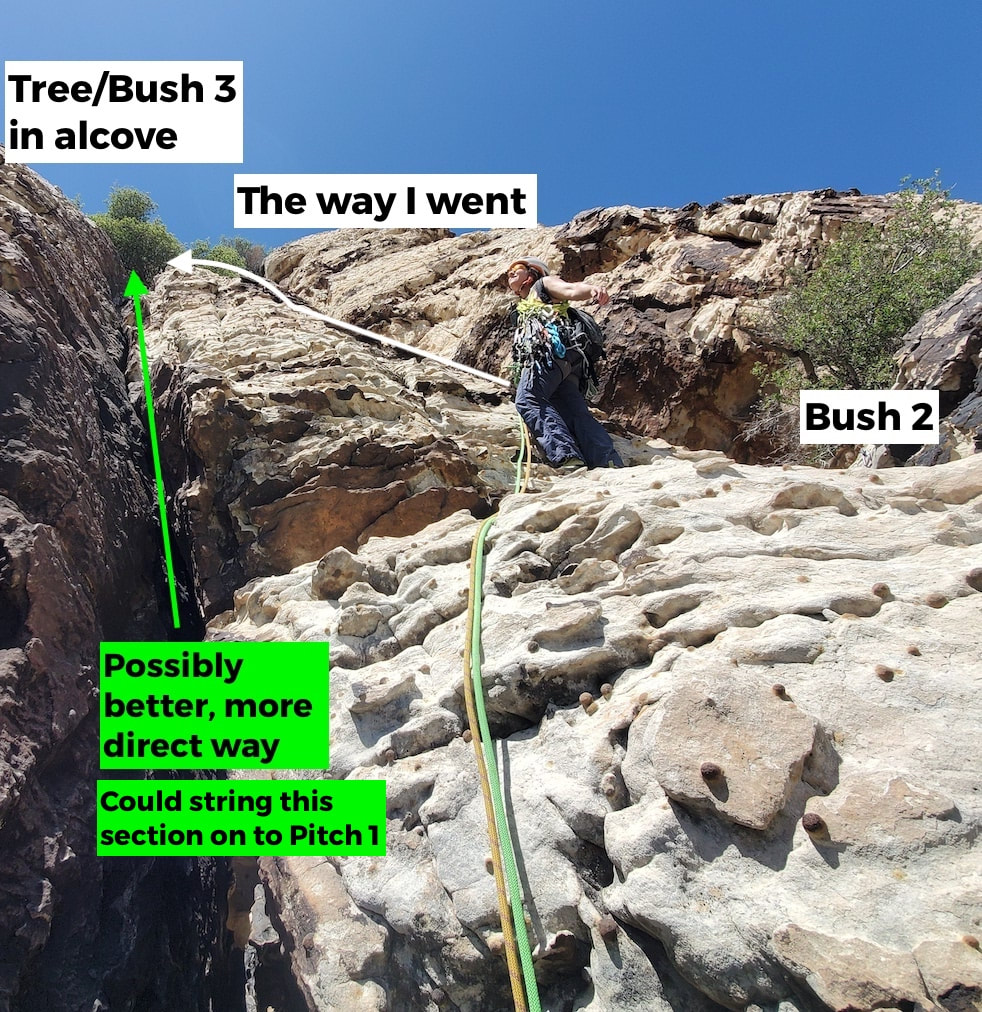
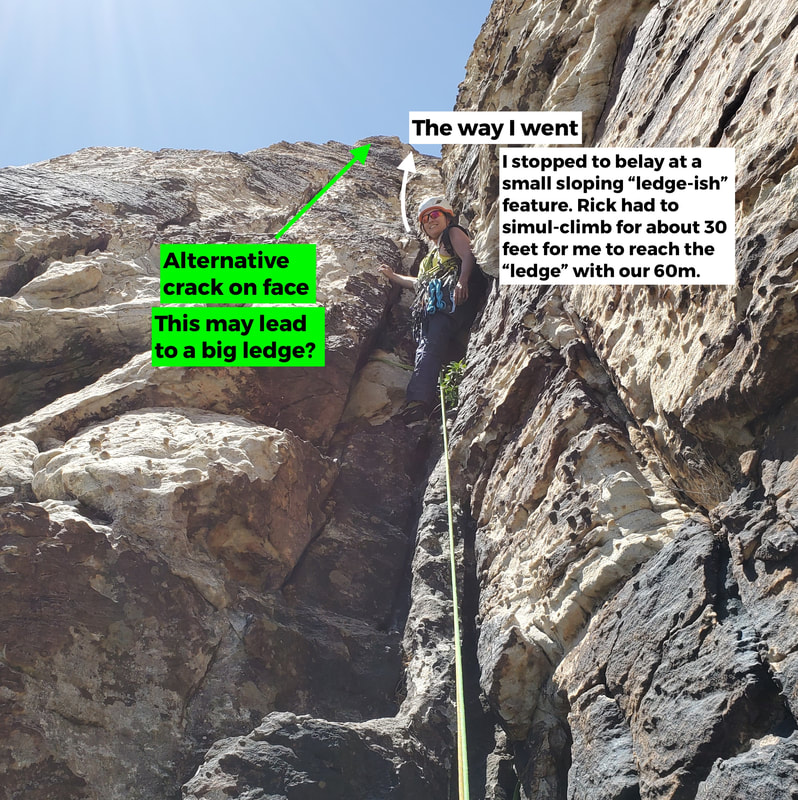
Pitch 1 (~135' the way we did it, estimate 180' for recommended way)
​

  • Pitch 1 is the hardest pitch and it gets a little thin on holds in a couple spots lower down (but the pro is good). Probably not best for a new leader. But it is fun and has nice rock.
  • Seems like nearly every Mountain Project post mentions whether or not the bees are there at the base - yes, I think they are a permanent addition. If you start to the left they won't bother you. I was wearing a bright yellow top and although I could hear them buzzing, I was never visited. 
  • Where this pitch ends was a little confusing to us from the guidebook and Mountain Project beta. In various guide resources multiple bushes are mentioned and we were like, "which one is it?!" since there are three bushes basically within view of each other. To top it off, when you arrive at each bush there is also tat. Rick stopped at the first bush and belayed me up.
  • I think the best option is to skip the lower two bushes and head for the larger bush/tree (refer to the green line which goes to the second open circle in the topo). This sets you up nicely for the next pitch.
    • Because we did not do the climb this way, the pitch length is an estimate. We are guessing it's about 180' (you will see my Pitch 2 went in an arch, so it's longer - I explain why under Pitch 2). The terrain looks featured, but I can't truly comment on the difficulty or protection. 
Picture
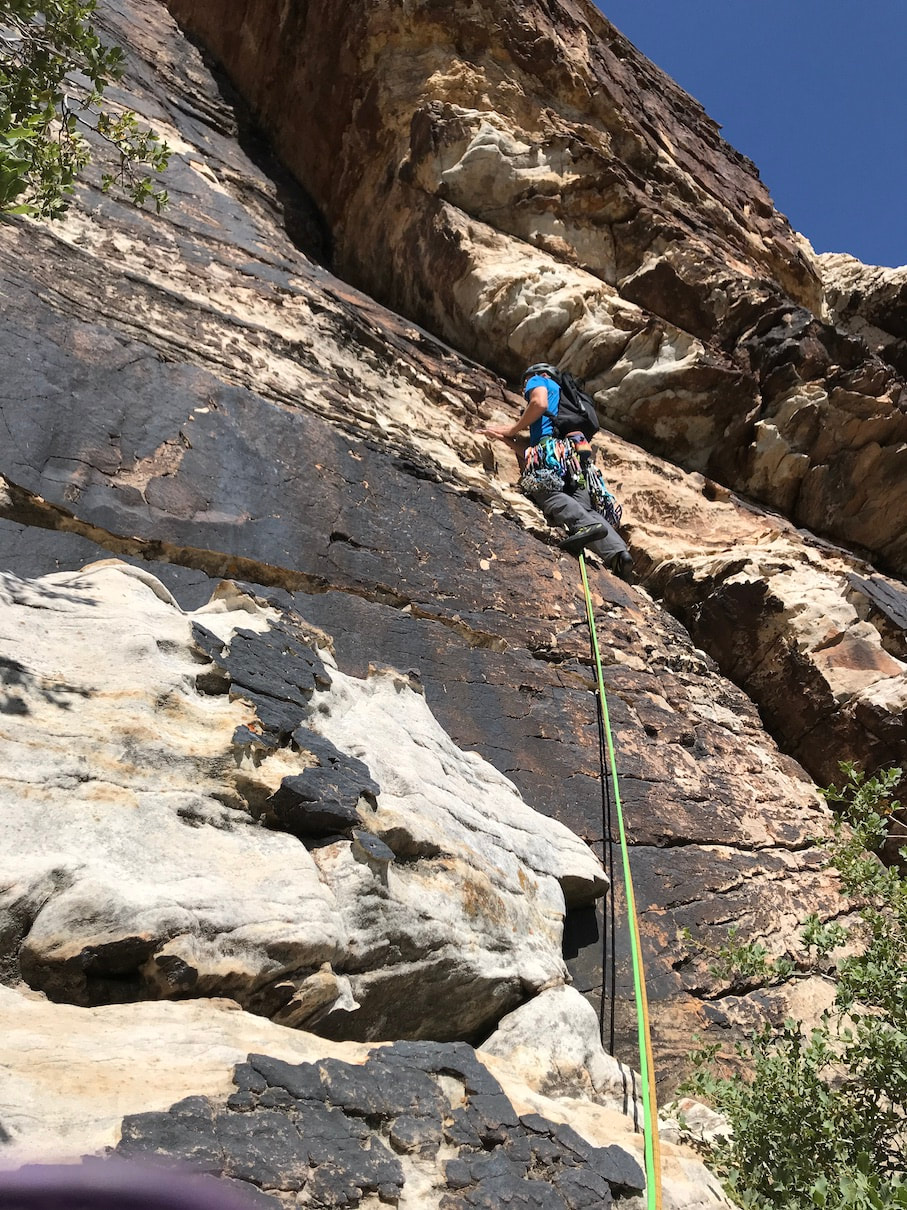
Rick, Pitch 1, Algae on Parade

Pitch 2  (our P2 was about 90' but I'm not sure I went the "best way," alternative P2 is our P3, ~230, possibly a bit more if you do the L crack to what looks like a ledge)

​
  • From the first bush where Rick was belaying, it was unclear exactly where the route went (this was our first time doing this climb). I saw the tat/anchor set up on the second bush (up and right) and I thought, "oh that must be where P2 starts and then I go up the crack corner." So that's what I did. But then as I neared the larger bush tree (above and left" I could begin to see the wall above it with two cracks. It then became clear to me that big bush/ tree was where I needed to be headed. So I angled left towards the tree. This "arch" I made (going right up then left) created bad rope drag, so I knew I needed to stop and build an anchor at the tree. I think I had climbed around 90'.
    • Approaching from the right, near the tree, there is a single bolt. Mountain project posts mention a "single bolt" as orientation references. There are several (odd) single bolts at various spots on this route - so I'd just ignore those references, because, well, they are confusing.
  • This good sized tree is located in a nice shady alcove (well, nice when someone doesn't take a dump in it - please bring emergency wag bags for multipitch climbs! We make ours from dog poop bags and ziplocks.)
  • If you do the "possibly better way" (green lines in the topo) this tree will be your first belay spot. 
Picture
Stef's Pitch 2, Algae on Parade.
Picture
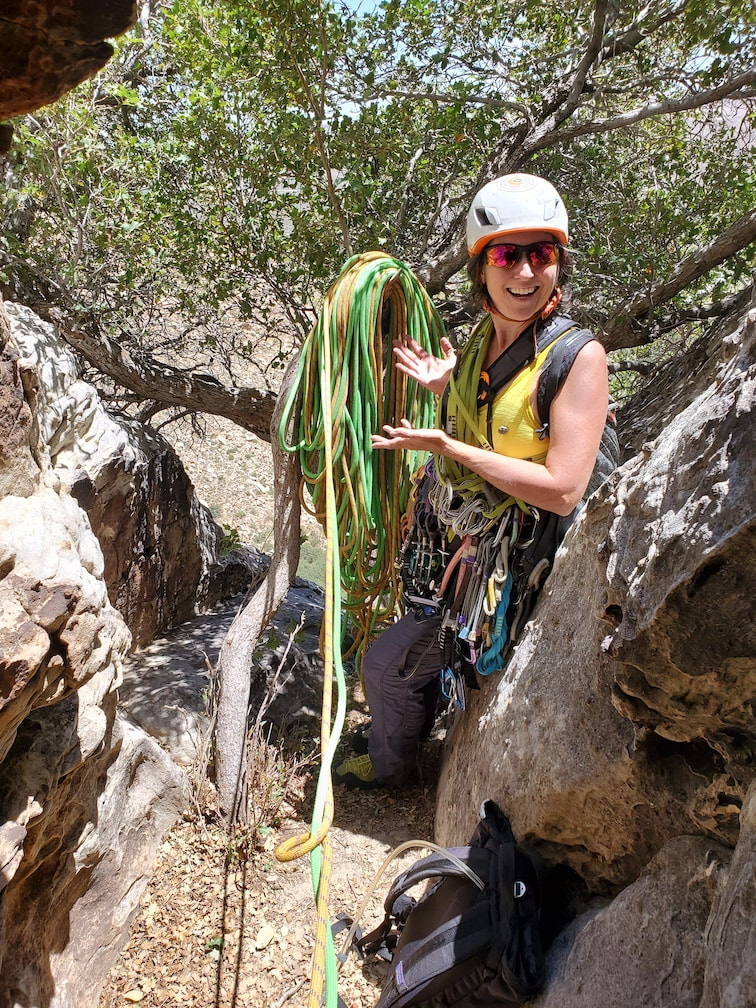
The amazing tree alcove (sans the poop smell... puhleeeezze bring emergency poop bags with you!). There is a handy dead branch for the rope coil!

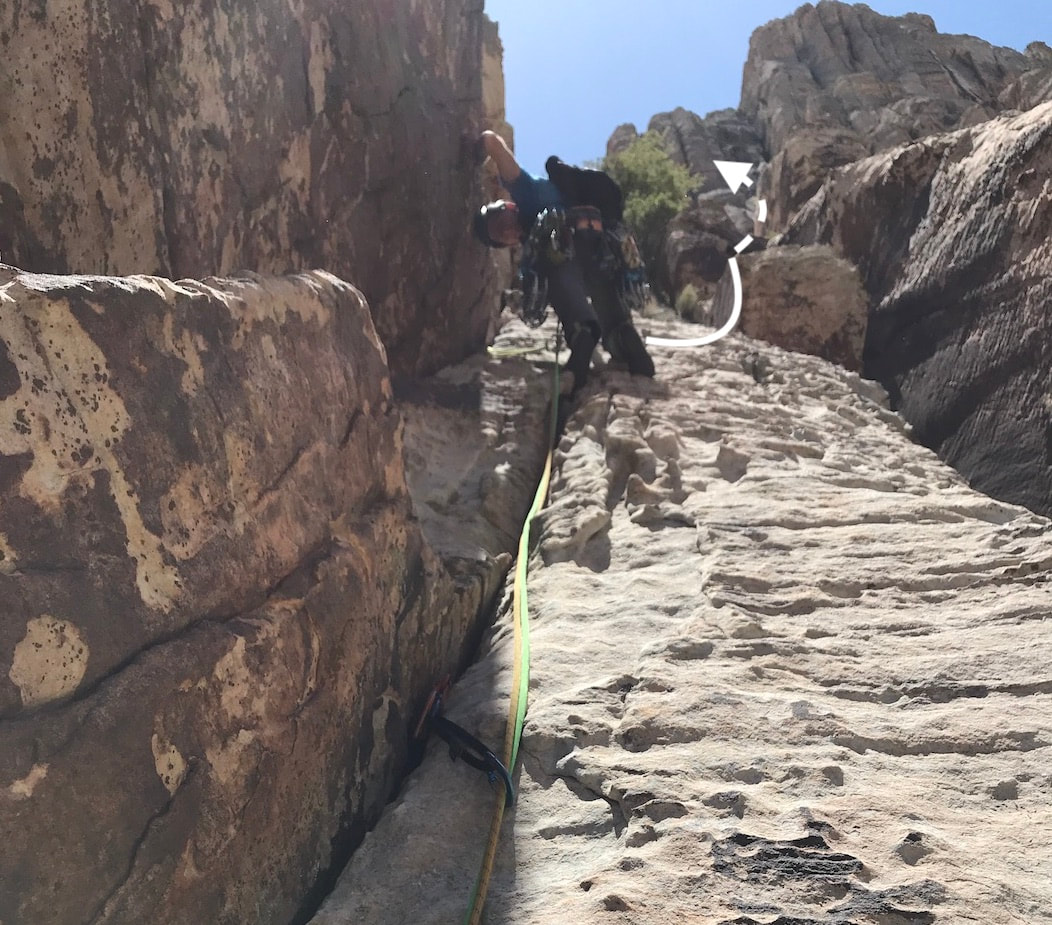
Pitch 3 (or P2 if doing "possibly better way") (~230')

  • Directly above this tree is a big, long wall with two cracks. I took the right crack (which was super fun!). There is a single random bolt on this line that I'm guessing was put there to add protection when that crack gets wide.
  • Guide resources talk about this pitch ending on a ledge. At about 230' I stopped at a small, sloping, ledge-ish feature (but I was like, "Is this a ledge?"). I decided to stop here because rope drag was a bitch and Rick had already been simulclimbing with me for about 30 feet (because we were climbing with twin 60s). Plus, this was a decent spot with a good variety of crack sizes to accommodate the gear I had left after the long pitch. 
    • There may be an actual, "real" ledge at the top of the left crack? I don't know. Either way, this worked and set us up well for the final pitch.
Picture

Final Pitch (~210')

  • From the slopey belay ledge-ish, Rick went up and then right over some blocks. 
  • Near the top of this pitch there are some large, precarious rocks that need to be avoided or carefully climbed around.
  • Because we were climbing with 60m ropes, I had to simul-climb about 10-15 feet before Rick got to the top and a nice spot to belay. (We have walkie talkies that are very helpful in discussing how we want to deal with circumstances like these. I HIGHLY recommend multi-pitch climbing with walkie talkies - we have some Rocky Talkies made for climbing and they have better features than standard walkie talkies - which we've also used,)
Picture
Rick on the final pitch of Algae on Parade.
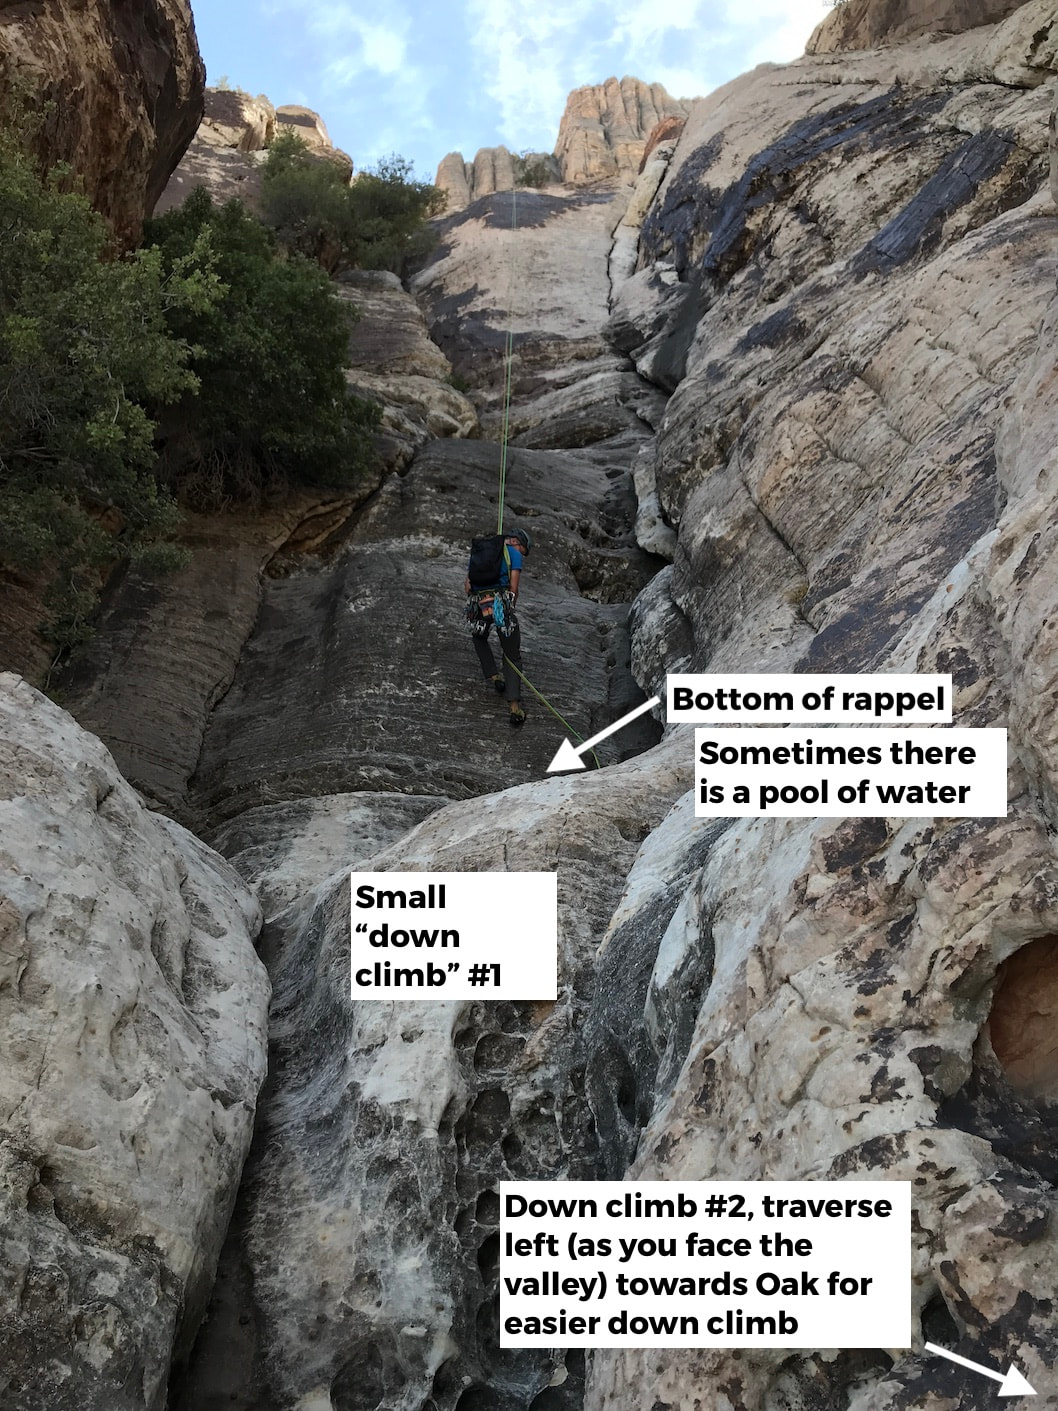
The Descent

  • Bring two ropes for the descent, or you will be doing lots of ugly, exposed down-climbing. Two ropes will get you down in two quick rappels! Sooo worth it!
  • 60m ropes do work -the second rappel is a rope stretcher with a 60, but it drops you off on good footings. (So if you climb with a 70m and rappel with the 70m and a 60m - if you want to save weight and not lug up two 70s - that will work.
  • From the final belay, look for a big pine tree climber's right. Walk past the pine, then turn right and down. You should see a cairn (you can't see the anchors from here). Go to the cairn and you will then see the bolted anchors. There is cordalette with a ring and a sling with a carabiner for backup. 
  • Rappel to the big ledge then pull the ropes and walk climber's left (as you are facing the wall) following some cairns. The next anchor is also hidden from view. You have to drop down to a small ledge near the edge to see it. This is the same anchor that is used for many of the First Creek Slab climbs (including Falling Stars). 
    • If you only have a single rope, you will need to break this into two rappels. Using the tree with tat halfway down. 
    • Doubles are a clean shot down the face to the bottom. 
    • There are two small down climbs. On the second down climb, as you face the valley, traverse left (caution) towards the oak tree (it's an easier down climb.) This gets you to a trail where you continue down, encountering about another 10-15 feet of down climbing to access the main trail to Romper Room (turning right) to retrieve your stuff (if you left anything near the base of the climb)
Picture


​WTF 5.7 Tour: Red Rock Canyon- Climbs By Area

WTF Tour Homepage
General
The Plan
Managing the Desert Heat

Black Velvet Canyon
Day 79: Schaeffers's Delight
Day 83: Ballantine Blast
​Day 86: Lazy Buttress

Calico 1 (1st Pullout) (DONE)
Amusement Park
Day 17: Civilization 
Day 14: The Slab
Day 20: Panty Wall
Day21: Wall of Death & Hamlet
Day 24: Child's Play
Day 49: Ultraman
Day 50: Dog Wall & Fixx Cliff
Day 51: Tuna and Chips
Day 53: Viagra Towers
Day 59: Iron Man - Necco Waif
Day 80: Tuna Cookies
Day 80: The Oasis - Diamond Dance
​Day 81: CarlyQuinn

​Calico 2 (2nd Pullout)
Day 13: Meetup & Black Corridor

Day 28: Retirement Plan
Day 52: The Walrus, Running Man, & Sweet Pain
​Day 54: USS Crag & Tsunami Wall
Day 56: Great Red Book Wall
Day 66: The Gallery


​​First Creek Canyon
Day 40: Falling Stars & Bad Moon Arising
Day 42: Algae on Parade
Day 44: Schoolyard 1

Day 67: Smiley Face
Day 67: Romper Room Wall 2
​Day 77: Schoolyard 2

​Day 78: Escondite
​Day 88: Lotta Brews
Day 89: Schoolyard Bully
​Icebox Canyon
 (DONE)

Day 12: Sunnyside & Frigid Air Buttress
Day 39: Necromancer: Hop Route
Day 57: Tarkus Crack

Juniper Canyon
Day 16: Myster Z

Day 35: Mz. Why
​Day 64: Canola Cracks
Day 87: Olive Oil

Kraft Area
Day 6: Conundrum Crag
Day 7: Caligula Crag
Day 4: Three Peaks and Yin & Yang
Day 10: Winter Heat Wall
Mt. Wilson
Day 41: Limon
​
Day 72: Gentleman's Club (Silicone Sag)

Oak Creek
Day 37: Johnny Vegas
Day 65: Tan Line
Day 68: Byrd Pinnacle
Pine Creek
Day 22: Mescalito E - Too Many Tantrums
Day 23: Mescalito E - Pauligk Pillar
Day 27: Straight Shooter 
Day 31: The Abutment (Robin Trowel)
​Day 32-34: Flight Path
​Day 36: Birdland

Day 38: Diarrhea Dialect (Bullnose Wall)
​
​Day 48: Cat in the Hat
​Stick Gully
  • Day 31: Stick Gully 1 - Unknown L Start to Datura
  • ​Day 34: Stick Gully 2 - Prelude
  • Day 62: Stick Gully 3 - Box of Rain
​Day 63: Cookie Monster​
Day 69: Soloist Crack
​Red Springs (DONE)

Day 1: Red Springs (Cut Your Teeth; Hide and Seek; Happy Acres)
Day 2: Red Springs (Cowlick, Cannibal)
Day 3: Red Springs (Dickies) 
Day 5: Moderate Mecca
​Day 8: The Fringe
​
​Day 9: Reptile Rock & near The Fox
​Day 45: Gnat Man
​Day 45: Gnat Man
Day 55: Coco Crag
Day 58: Riding Hood (In Through the Out Door)
 Sandstone Quarry
Day 29: High Scalin'
Day 47: Man's Best Friend & Americrag

Day 52: The Walrus, Running Man, & Sweet Pain
Day 66: Hall of Fame

Southern Outcrops
Day 70 & 71: Chocolate Rocks 
Day 82: Illusion - Part 1

White Rock Springs Area
Day 11: Angel Food Wall - Group Therapy
Day 25: The Ledger

​Willow Springs (DONE)
​Day 15: Mother's and Outhouse
​
​Day 18: Mossy Ledges - Pussy Nuts
​
​Day 19: Mossy Ledges 2
Day 26: Graduate Cliff - Pre Skool
  • ​Day 46: Pre Skool Part Deux
  • ​Day 60 & 61: Pick Your Poison, Walk to School, & Finished Pre Skool
​Day 30: Gold Digger
Day 60: Ragged Edges - Footloose
​
​Day 61: Case Face - Space Case
​Day 73: Ragged Edges - Dumptruck, Midnight, & Diplomatic Immunity
Day 74: Peaches (Children's Wall)
​Day 75: N-Plus Ultra Part 1 (Lucky Charms & Geezer face)
​Day 76: N-Plus Ultra Part 2 (Pillar Talk & Chocolate Tranquility Fountain)
Day84: N-Plus Ultra Part 3 (Cereal Killer)
Day84: Grey Matter at Lost Creek Canyon
​Day 85: Communist Plan (Lost & Found)

Menu

About
Blog
Buy
Contact/Stay Informed
Environment
Maps
Quality
WTF 5.7 Tour
© COPYRIGHT 2017-2022. ALL RIGHTS RESERVED.
  • Home
  • Buy!
  • Maps
    • Hiking
    • City of Rocks, ID - Climber's Map
    • Joshua Tree, CA - Climber's Map
    • Red Rock Canyon, NV - Climber's Map
    • Smith Rock, OR - Climber's Map
  • Map Details
    • Quality
    • Map Elements
    • Methodology
    • Environment
  • About
  • Blog
    • The 15-minutes from Red Rock Restaurant Tour >
      • Indian
      • Sushi
      • Vietnamese
    • WTF 5..7 Tour - Red Rock >
      • General >
        • The Plan
        • Managing the Desert Heat
      • Black Velvet Canyon >
        • Lazy Buttress/Whisky Peak E >
          • Day 79: Schaeffer's Delight
          • Day 83: Ballantine Blast
          • Day 86: Lazy Buttress (Climb)
      • Calico 1 (1st Pullout) >
        • Amusement Park
        • Day 17: Civilization
        • Day 20: Panty Wall
        • Day 14: The Slab
        • Day 21: Wall of Death & Hamlet
        • Day 24: Child's Play
        • Day 49: Ultraman
        • Day 50: Dog Wall & Fixx Cliff
        • Day 51: Tuna and Chips
        • Day 53: Viagra Towers
        • Day 59 Iron Man - Necco Waif
        • Day 80 - Tuna Cookies
        • Day 80 - Diamond Dance - The Oasis
        • Day 81 - CarlyQuinn Crag
      • Calico 2 (2nd Pullout) >
        • Day 13: Meetup & Black Corridor
        • Day 28: Retirement Plan
        • Day 52: The Walrus, Running Man, & Sweet Pain
        • Day 54: USS Crag & Tsunami
        • Day 56: Great Red Book Wall
        • Day 66: The Gallery
      • First Creek Canyon >
        • First Creek Slabs >
          • Day 40: Falling Stars & Bad Moon Arising
          • Day 67: Smiley Face
        • Lotta Balls Wall >
          • Lotta Brews
        • Romper Room >
          • Day 42: Algae on Parade
          • Day 67: Romper Room 2
        • Schoolyard >
          • Day 44: School Yard 1 - Deja Vu & Short Subject
          • Day 77: School Yard -Sunday School & Dunce's Corner
          • Day 89: Schoolyard Bully
        • Slot Club Area >
          • Day 78: Escondite
        • Strawberry Hill >
          • Day 43: This Ain't the F'n Way!
      • Icebox Canyon >
        • Day 12: Sunnyside & Frigid Air
        • Day 39: Necromancer - Hop Route
        • Day 57: Tarkus Crack (Tiki Cliff)
      • Juniper Canyon >
        • Jackrabbit Buttress >
          • Day 16: Myster Z
          • Day 35: Mz. Why
        • Rose Tower >
          • Day 64: Canola Cracks
          • Day 87: Olive Oil
      • Kraft Mountain >
        • Day 6: Conundrum Crag
        • Day 7: Caligula Crag
        • Day 4: Three Peaks and Yin & Yang
        • Day 10: Winter Heat
      • Mt. Wilson >
        • Day 41: Limon
        • Day 72: Gentleman's Club - Silicone Sag
      • Oak Creek Canyon >
        • Day 37: Johnny Vegas
        • Day 65: Tan Line
        • Day 68: Byrd Pinnacle
      • Pine Creek Canyon >
        • Day 22: Mescalito E - Too Many Tantrums
        • Day 23: Mescalito E - Pauligk Pillar
        • Day 27: Straight Shooter Wall
        • Day 31: Robin Trowel (Abutment) & Stick Gully 1
        • Day 32-34: Flight Path
        • Day 34: Stick Gully 2 - Prelude
        • Day 36: Birdland
        • Day 38: Diarrhea Dialect (Bullnose Wall)
        • Day 48: Cat in the Hat
        • Day 62: Stick Gully - Box of Rain
        • Day 63: Cookie Monster
        • Day 69: Soloist Crack
      • Red Springs >
        • Day 2: Cowlick and Cannibal
        • Day 1: Cut Your Teeth, Hide & Seek, Happy Acres
        • Day 3: Dickies (Seems Like a Butt)
        • Day 8: Fringe
        • Day 5: Moderate Mecca
        • Day 9: Reptile & Fox Walls
        • Day 45: Gnat Man
        • Day 55: Coco Crag
        • Day 58: Ridinghood - In Through the Out Door
      • Sandstone Quarry >
        • Day 29: High Scalin'
        • Day 47: Man's Best Friend & Americrag
        • Day 66: Hall of Fame - Ms. Adventure
      • Southern Outcrops >
        • Day 70 & 71: Chocolate Rocks
        • Day 82: Illusion Crag - Part 1
      • White Rock Springs - Angel Food Wall >
        • Day 11: Group Therapy
        • Day 25: The Ledger
      • Willow Springs >
        • Day 15: Mother's and Outhouse
        • Day 18: Mossy Ledges - Pussy Nuts
        • Day 19: Mossy Ledges 2
        • Day 26: Graduate Cliff - Pre Skool Part 1 >
          • Day 46: Pre Skool Part Deux
        • Day 60 & 61: Graduate Cliff 2
        • Day 30 - Gold Digger
        • Day 61: Ragged Edges - Footloose
        • Day 62: Case Face - Space Case
        • Day 73: Ragged Edges Area
        • Day 74 Peaches (Children's Wall)
        • Day 75 N' Plus Ultra 1 - Geezer Face & Lucky Charms
        • Day 76: N'Plus Ultra 2 - Pillar Talk & Chocolate Tranquility Fountain
        • Day 84: N'Plus Ultra Part 3 - Cereal Killer
        • Day 84: Lost Creek Canyon - Grey Matter
        • Day 85: Communist Plan at Lost & Found
    • Meet Our Tools >
      • GPS Units
      • Lifeproof Phone Cases
      • Van Life: Tankenstein >
        • Tankenstein Gets Gutted
        • Van Life: Rebuilding Tankenstein >
          • Glowing Disco Counter Top
          • Cold Food Storage
          • Bouldering-pad-bench
          • Insulation and Vent Fan
          • Quick Fixes
          • Kingsized Pullout Bed
      • Ultralight Exposure Protection Gear
    • For the Ladies >
      • Cry
      • Getting Women Climbing Outside
      • Women's Resources
    • Red Rock Canyon, NV >
      • Camper Van Epic in Vegas
      • Mapping with Lady Lockoff
      • Vegas-epic-2
      • Vegas Mini-epic 3: Really?!?
    • Joshua Tree, CA >
      • Caterpillars! Van Rescue!
      • Gram Parsons' Logbook
      • Oh Shi*! Bees!
    • Hmmm or Haha >
      • Althea Crag & Mapping Dog
      • Exposure!
      • Realities
      • Silliness
      • Utterly Heinous Approaches
      • Podcast Interview: Ogden OUtdoor Adventure
  • Contact
    • Feedback
  • Retail Stores
  • Media Coverage
  • Calendar