CLIMB-ON MAPS
  • Home
  • Blog
    • WTF 5..7 Tour - Red Rock >
      • General >
        • WTF 5.7 Climbs
        • The Plan
        • Managing the Desert Heat
      • Black Velvet Canyon >
        • Lazy Buttress/Whisky Peak E >
          • Day 79: Schaeffer's Delight
          • Day 83: Ballantine Blast
          • Day 86: Lazy Buttress (Climb)
      • Calico 1 (1st Pullout) >
        • Amusement Park
        • Day 17: Civilization
        • Day 20: Panty Wall
        • Day 14: The Slab
        • Day 21: Wall of Death & Hamlet
        • Day 24: Child's Play
        • Day 49: Ultraman
        • Day 50: Dog Wall & Fixx Cliff
        • Day 51: Tuna and Chips
        • Day 53: Viagra Towers
        • Day 59 Iron Man - Necco Waif
        • Day 80 - Tuna Cookies
        • Day 80 - Diamond Dance - The Oasis
        • Day 81 - CarlyQuinn Crag
      • Calico 2 (2nd Pullout) >
        • Day 13: Meetup & Black Corridor
        • Day 28: Retirement Plan
        • Day 52: The Walrus, Running Man, & Sweet Pain
        • Day 54: USS Crag & Tsunami
        • Day 56: Great Red Book Wall
        • Day 66: The Gallery
      • First Creek Canyon >
        • First Creek Slabs >
          • Day 40: Falling Stars & Bad Moon Arising
          • Day 67: Smiley Face
          • Day 94: Romanian Rib Right
          • Day 95: Romanian Rib Left
        • Lotta Balls Wall >
          • Day 88: Lotta Brews
        • Romper Room >
          • Day 42: Algae on Parade
          • Day 67: Romper Room 2
        • Schoolyard >
          • Day 44: School Yard 1 - Deja Vu & Short Subject
          • Day 77: School Yard -Sunday School & Dunce's Corner
          • Day 89: Schoolyard Bully
        • Slot Club Area >
          • Day 78: Escondite
        • Strawberry Hill >
          • Day 43: This Ain't the F'n Way!
      • Icebox Canyon >
        • Day 12: Sunnyside & Frigid Air
        • Day 39: Necromancer - Hop Route
        • Day 57: Tarkus Crack (Tiki Cliff)
      • Juniper Canyon >
        • Jackrabbit Buttress >
          • Day 16: Myster Z
          • Day 35: Mz. Why
        • Rose Tower >
          • Day 64: Canola Cracks
          • Day 87: Olive Oil
      • Kraft Mountain >
        • Day 6 (and 90): Conundrum Crag
        • Day 7: Caligula Crag
        • Day 4: Three Peaks and Yin & Yang
        • Day 10: Winter Heat
      • Mt. Wilson >
        • Day 41: Limon
        • Day 72: Gentleman's Club - Silicone Sag
      • Oak Creek Canyon >
        • Day 37: Johnny Vegas
        • Day 65: Tan Line
        • Day 68: Byrd Pinnacle
        • Day 92: Beulah's Arete
      • Pine Creek Canyon >
        • Day 22: Mescalito E - Too Many Tantrums
        • Day 23: Mescalito E - Pauligk Pillar
        • Day 27: Straight Shooter Wall
        • Day 31: Robin Trowel (Abutment) & Stick Gully 1
        • Day 32-34: Flight Path
        • Day 34: Stick Gully 2 - Prelude
        • Day 36: Birdland
        • Day 38: Diarrhea Dialect (Bullnose Wall)
        • Day 48: Cat in the Hat
        • Day 62: Stick Gully - Box of Rain
        • Day 63: Cookie Monster
        • Day 69: Soloist Crack
      • Red Springs >
        • Day 2: Cowlick and Cannibal
        • Day 1: Cut Your Teeth, Hide & Seek, Happy Acres
        • Day 3: Dickies (Seems Like a Butt)
        • Day 8: Fringe
        • Day 5: Moderate Mecca
        • Day 9: Reptile & Fox Walls
        • Day 45: Gnat Man
        • Day 55: Coco Crag
        • Day 58: In Through the Out Door (Ridinghood Wall)
        • Day 91: Guys and Ghouls
      • Sandstone Quarry >
        • Day 29: High Scalin'
        • Day 47: Man's Best Friend & Americrag
        • Day 66: Hall of Fame - Ms. Adventure
      • Southern Outcrops >
        • Day 70 & 71: Chocolate Rocks
        • Day 82: Illusion Crag - Part 1
      • White Rock Springs >
        • Angel Food Wall >
          • Day 11: Group Therapy
        • Day 25: The Ledger
        • Seraphim Wall >
          • Day 91: Ride the Wind
      • Willow Springs >
        • Day 15: Mother's and Outhouse
        • Day 18: Mossy Ledges - Pussy Nuts
        • Day 19: Mossy Ledges 2
        • Day 26: Graduate Cliff - Pre Skool Part 1 >
          • Day 46: Pre Skool Part Deux
        • Day 60 & 61: Graduate Cliff 2
        • Day 30 - Gold Digger
        • Day 61: Ragged Edges - Footloose
        • Day 62: Case Face - Space Case
        • Day 73: Ragged Edges Area
        • Day 74 Peaches (Children's Wall)
        • Day 75 N' Plus Ultra 1 - Geezer Face & Lucky Charms
        • Day 76: N'Plus Ultra 2 - Pillar Talk & Chocolate Tranquility Fountain
        • Day 84: N'Plus Ultra Part 3 - Cereal Killer
        • Day 84: Lost Creek Canyon - Grey Matter
        • Day 85: Communist Plan at Lost & Found
        • Day 94: Double Pin-etration N'Plus Ultra
    • Meet Our Tools >
      • GPS Units
      • Van Life: Tankenstein >
        • Tankenstein Gets Gutted
        • Van Life: Rebuilding Tankenstein >
          • Glowing Disco Counter Top
          • Cold Food Storage
          • Bouldering-pad-bench
          • Insulation and Vent Fan
          • Quick Fixes
          • Kingsized Pullout Bed
      • Ultralight Exposure Protection Gear

First Creek Canyon

Wall: Lotta Balls
Climb: Lotta Brews (7+)
CLIMB: Lotta Brews (Trad, 5.7+) - 4 pitches, 420' feet
WALL: Lotta Balls
GEAR: Pro to 4"
FOR A NEW TRAD LEADER? On the last pitch, not 1-3

Conclusion WTF? What the FULL VALUE!
Picture

Excerpts from Climb-On Maps (Red Rock Canyon)

Picture
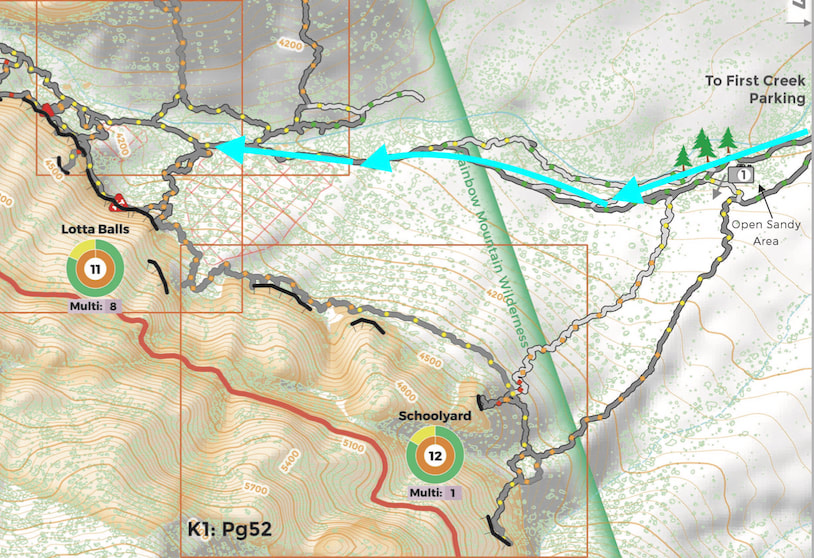
Excerpt from Climb-On Maps. Trails are color-coded to show difficulty of the approach. Black lines show the wall locations. Circles show the wall name, number of climbs, and number of multi-pitch climbs. The orange inner circle is the type of climbs (on Lotta Balls Wall 100% of the climbs are trad - orange). The outer circle shows the distribution of grades (the majority of climbs on this wall are 5.9 and under, three are a couple 5.10s)
Picture
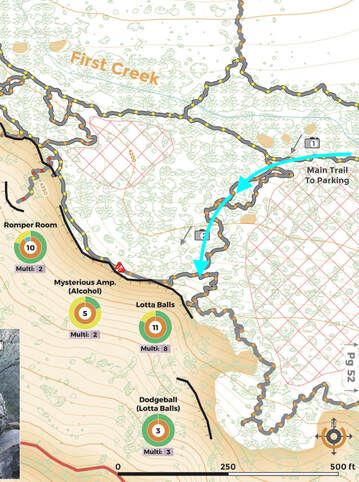
Excerpt from Climb-On Maps for Red Rock Canyon. This is a close-up page showing the multiple walls near the Lotta Balls Wall.
This is a pretty darn cool climb that is definitely full value. Every pitch is different and it has some pucker moments to keep you on your toes. If it weren't for some crispy rock and challenging pro in some key spots, this climb would rise to a level of "What the Fabulous!"

We would recommend doing this climb when the Lotta Balls Wall isn't busy - as it literally crosses the entire wall. Or, conversely, it's a great option if the Lotta Balls climb is busy and no on else is on the other climbs on the wall. We hit it on a hot day at the end of the summer when there were no other people. 

Warning!

This video contains joking references to the male anatomy. We would recommend avoiding if this kind of content is upsetting to you.

Pitch 1

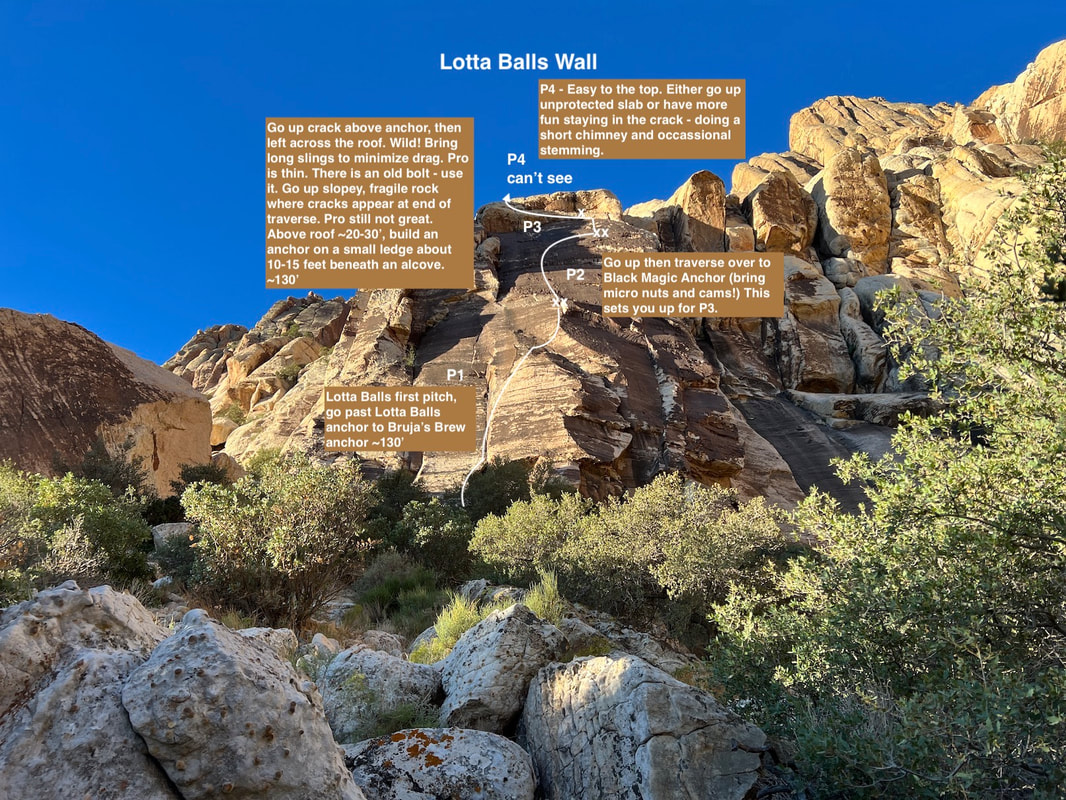
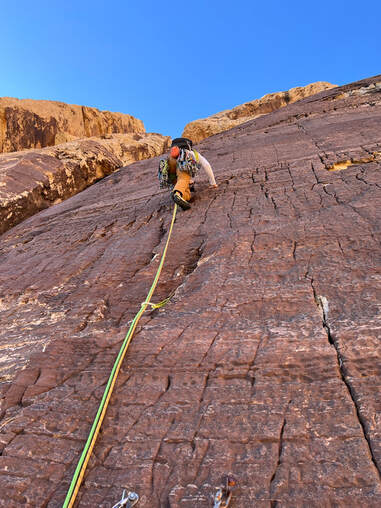
Start on the first pitch of Lotta Balls, going up the flake, to the double crack. Work your way to the Lotta Balls anchor, clip a draw to a bolt (if the anchor isn't occupied) then continue up, angling right to the bolted anchor of Bruja's Brew. 

This is an amazing pitch. But there is a little bit of "crisp" between the Lotta Brews anchor and the Bruja's Brew anchor.
Picture
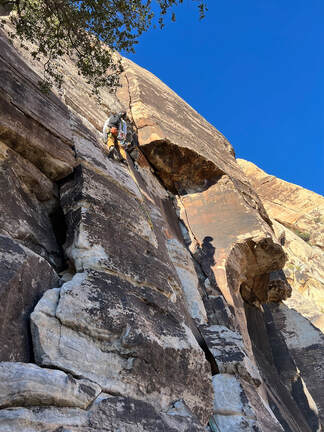
Pitch 1 (Lotta Brews). Photo Credit: Stefani Dawn

Pitch 2

From the bolted anchor head straight up. Just before reaching the next set of anchors on Bruja's Brew, angle/traverse right to the bolted anchors for Black Magic. This sets you up better for the roof traverse to minimize rope drag. 

Definitely bring tiny wires and gear for this pitch and protect where you can. There are occasional small vertical cracks for pro. There is a small continuous finger crack a few feet off to the right of where Rick was in the video for this pitch (where he was having trouble placing a wire.) That might offer more options for protection than what Rick encountered. 

On this pitch, the holds are there, but you sometimes have zig and zag. The rock is solid but can be mildly slick in spots. This is a heady pitch.
Picture
Rick on pitch 2 - bring small wires! Photo credit: Stefani Dawn

Pitch 3

"The improbable roof." 

Go straight up from the bolted anchors then begin traversing  beneath the roof. There is an old 1/4 inch rusted bolt just off to the left.

Tony placed gear in a crack off to the right before starting the traverse because we did not know the bolt was there. This caused a sharp right angle in the rope contributing to a lot of rope drag (which we were trying to avoid by going to the Black Magic anchors).

Clip the bolt then try to place gear where you can to protect both the leader and the second (a fall by the second would result in dangling in free air and be difficult to get out of.) There aren't a lot of options for pro and the rock is not the best. Place where you can.

Just to the left of where Tony is in the photo, go up over a bulge to finish the pitch. The rock isn't the best in this section either. Avoid stepping on the balls in the white rock, they may pop out. 
Picture
Tony finishing up the roof traverse on pitch 3. To the left, go up and over the bulge to the low angle crack. Build an anchor using gear. Photo credit: Rick Momsen
The terrain becomes lower angle once you are above the roof line. Set up a gear belay (there are no bolted anchors) on a small ledge below an alcove. The alcove would be a comfortable belay but requires large gear. (The alcove is where Tony is located in the image below.)
Picture
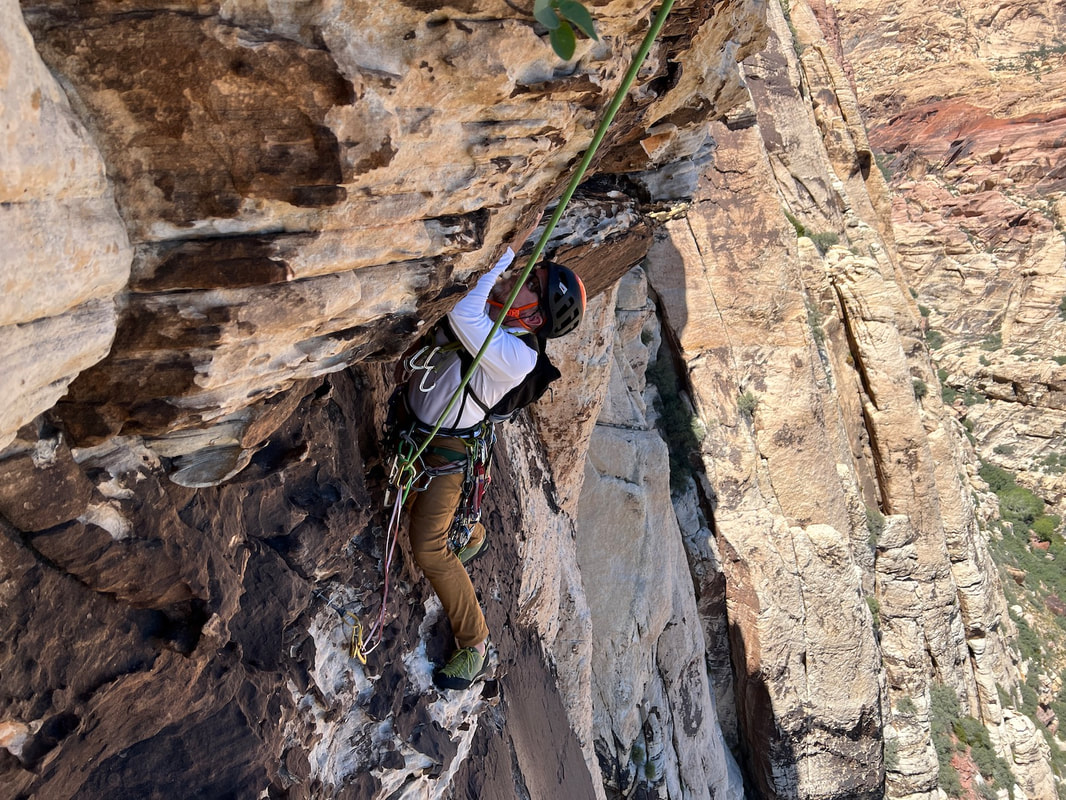
Rick scrunched up under the upper roof. A fall anywhere along this traverse would result in dangling free in the air (because there is very little pro that can be placed to protect a fall). It would be difficult for a person seconding to get out of a fall. Make sure you have chord for prusicking just in case - it's easy but the rock is not the best. Photo credit: Stefani Dawn

Pitch 4

Pitch four is low angle and may be suitable for a new trad leader - as long as they know how to build a gear anchor.

If you stick in the crack it is actually pretty fun and interesting. Get in a small chimney in the alcove where tony is in the photo and stem up the wide crack. 

There are horizontals and spots where you don't need large gear as you go up the wide crack. 

The other option for this pitch is to run it out on the undulating slab off to the right. 

At the top, belay using gear anchors. 
Picture
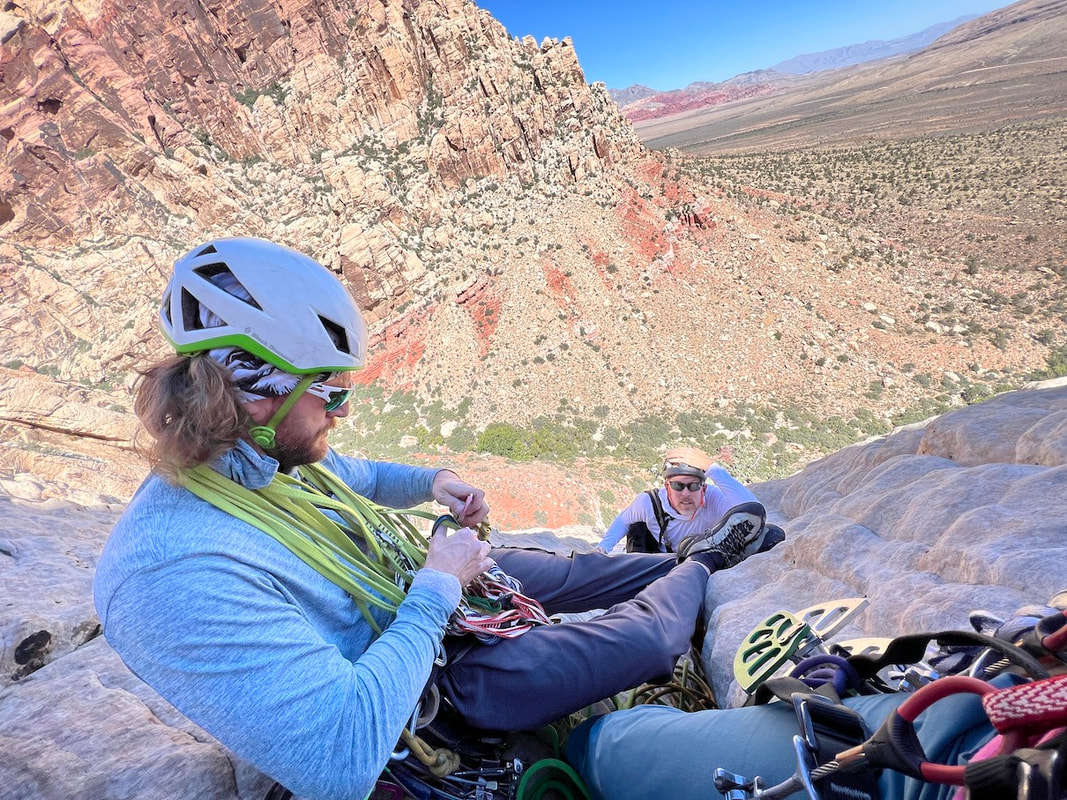
Tony and Rick at the anchors at the top of pitch 3/base of pitch 4. If you have large gear you can set up an anchor in the alcove above this spot (where Tony is in the "chimneying" photo for this pitch.) Photo credit: Stefani Dawn
Picture
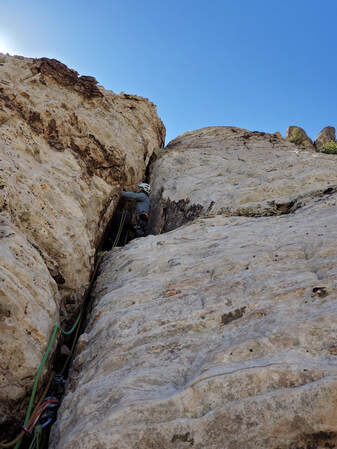
Tony doing some chimney moves in the small alcove on pitch 4. Photo Credit: Rick Momsen
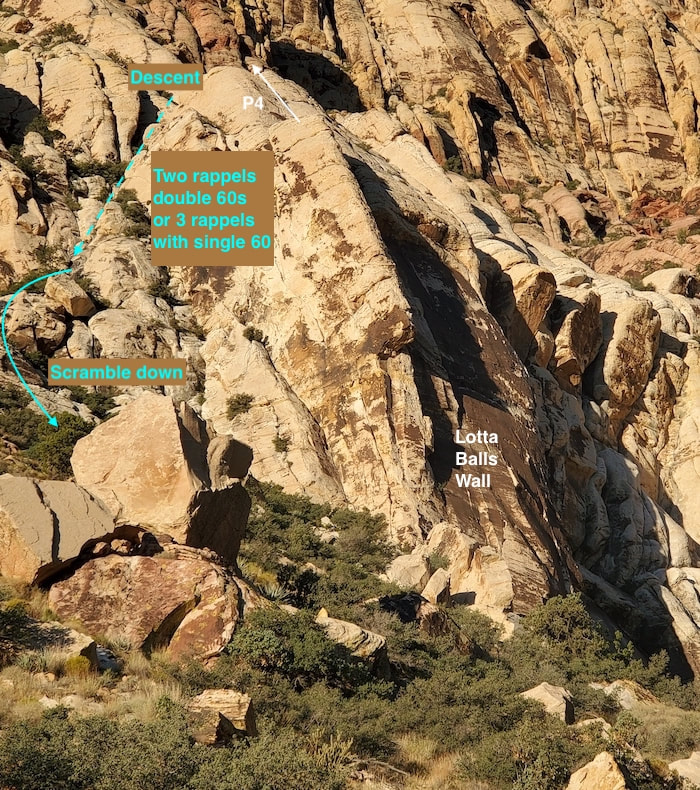
Descent

From the top of pitch 4, head back and go through a slot - we called it the "trolls house" then veer left to a large alcove with a large pine tree with tat for rappelling. 

You can do it in two rappels with double ropes (although you may not want to avoid the risk of a rope getting caught) or three rappels. As a party of three with two ropes, two of us did it in two rappels, and the last person used the set of bolted anchors for the final rappel to prevent the rope from getting stuck on the last pull (which is the worst.) The set of bolted anchors for the last rappel is more directly set up for the line of pulling the rope. Doing it in two rappels for two people and three rappels for one saved time with three people rappelling - and our ropes did not get stuck.

Scramble down after the rappels. 
Picture
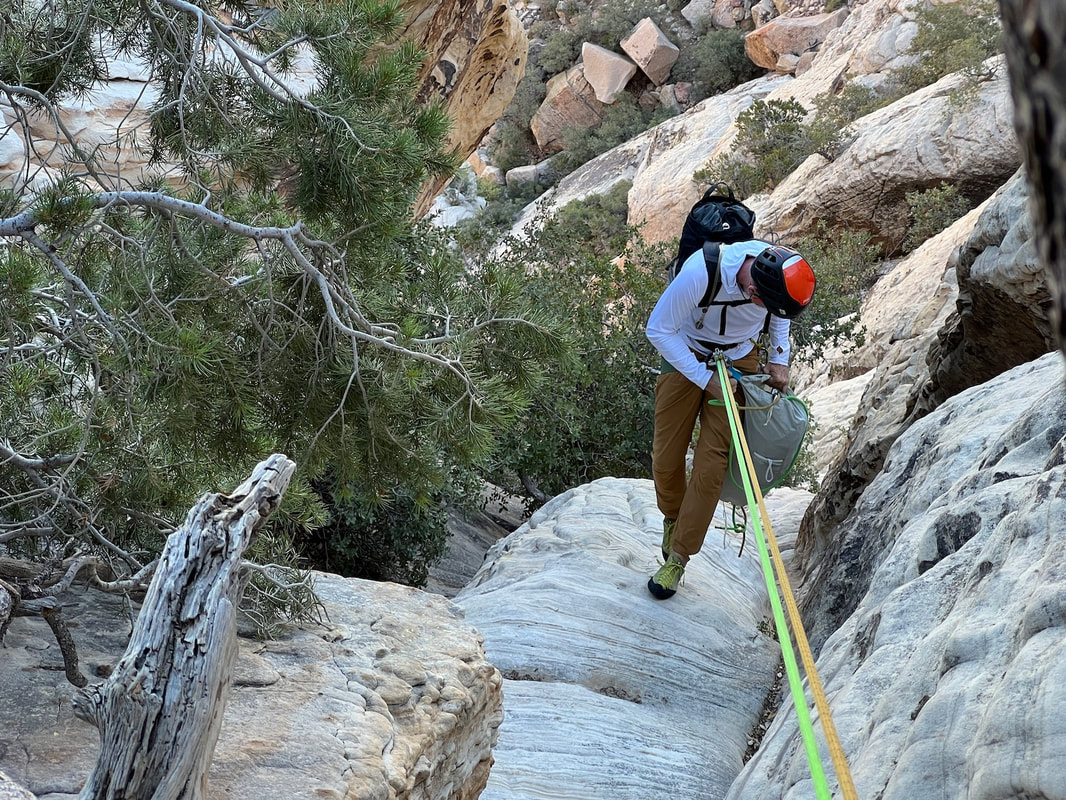
Rappelling Lotta Balls Descent. Photo Credit: Stefani Dawn
Picture

Climb Stats to Date

DATE OF CLIMB: September 27, 2022
​WALLS HIT: 1
NUMBER OF 5.7 CLIMBS: 1
NUMBER OF 5.7 PITCHES: 4
​NUMBER OF FALLS: 0
NUMBER OF TAKES: 0
VERTICAL FEET CLIMBED: 500'
DIRTY UNDERWEAR ENCOUNTERED: 0

​TOTAL CLIMBS SO FAR: 185
TOTAL PITCHES SO FAR: 251

TOTAL 5.7 VERTICAL FEET ON THE TOUR SO FAR: 22,365
NUMBER OF CLIMBS REMAINING: 54 (out of 238)

VERTICAL FEET REMAINING: 28,057'

​​DIRTY UNDERWEAR ENCOUNTERED TO DATE: 
​​​​​​​​​​​8
FALLS SO FAR: 
  • STEF: 2 (By Stef on WTF'r Tarkus Crack)
  • ​RICK: 0
TAKES ON LEAD SO FAR: 
  • Stef – On Lead
    • WTF'r Miniwanka
    • WTF'r Lean & Languid
    • WTF'r Pauligk Pillar
    • WT Freak Out: 5.7 Freak Out
    • WTF'r Unknown left start to Datura
    • WTF'r: Short Subject
    • WT Fua: Ghouls Just Wanna Have Fun
    • WTForget About It: Glue Gun
    • WTFun: Cialis Cleft (took to figure out the moves on start)
    • As a second:
    • WTF'r: Too Many Tantrums
    • WT Fail: Pre Skool (took the first time, not the second she climbed it)
    • WTF'r: Tarkus Crack​
  • Rick - Takes On Lead
    • WTF'r Too Many Tantrums
    • WT Fork: The Ledger
    • WTF'r: Deja Vu
    • WTF'r: Tuna and Chips (he took and rested at the start of pitch 2 to recover from pitch 1 before continuing)
    • WTF'r: Tarkus Crack​
    • WTF'r: Peaches
    • WTF'r: Pillar Talk
  • Guests - Takes on Lead
    • Grant Corley: WTF'r Sunday School


​List of WTF 5.7 Tour: Red Rock Canyon Climbs By Area & Alphabetical

Menu

About
WTF 5.7 Tour
Climb-On Maps is no longer in business. Thank you!
© COPYRIGHT 2017-2025. ALL RIGHTS RESERVED.
  • Home
  • Blog
    • WTF 5..7 Tour - Red Rock >
      • General >
        • WTF 5.7 Climbs
        • The Plan
        • Managing the Desert Heat
      • Black Velvet Canyon >
        • Lazy Buttress/Whisky Peak E >
          • Day 79: Schaeffer's Delight
          • Day 83: Ballantine Blast
          • Day 86: Lazy Buttress (Climb)
      • Calico 1 (1st Pullout) >
        • Amusement Park
        • Day 17: Civilization
        • Day 20: Panty Wall
        • Day 14: The Slab
        • Day 21: Wall of Death & Hamlet
        • Day 24: Child's Play
        • Day 49: Ultraman
        • Day 50: Dog Wall & Fixx Cliff
        • Day 51: Tuna and Chips
        • Day 53: Viagra Towers
        • Day 59 Iron Man - Necco Waif
        • Day 80 - Tuna Cookies
        • Day 80 - Diamond Dance - The Oasis
        • Day 81 - CarlyQuinn Crag
      • Calico 2 (2nd Pullout) >
        • Day 13: Meetup & Black Corridor
        • Day 28: Retirement Plan
        • Day 52: The Walrus, Running Man, & Sweet Pain
        • Day 54: USS Crag & Tsunami
        • Day 56: Great Red Book Wall
        • Day 66: The Gallery
      • First Creek Canyon >
        • First Creek Slabs >
          • Day 40: Falling Stars & Bad Moon Arising
          • Day 67: Smiley Face
          • Day 94: Romanian Rib Right
          • Day 95: Romanian Rib Left
        • Lotta Balls Wall >
          • Day 88: Lotta Brews
        • Romper Room >
          • Day 42: Algae on Parade
          • Day 67: Romper Room 2
        • Schoolyard >
          • Day 44: School Yard 1 - Deja Vu & Short Subject
          • Day 77: School Yard -Sunday School & Dunce's Corner
          • Day 89: Schoolyard Bully
        • Slot Club Area >
          • Day 78: Escondite
        • Strawberry Hill >
          • Day 43: This Ain't the F'n Way!
      • Icebox Canyon >
        • Day 12: Sunnyside & Frigid Air
        • Day 39: Necromancer - Hop Route
        • Day 57: Tarkus Crack (Tiki Cliff)
      • Juniper Canyon >
        • Jackrabbit Buttress >
          • Day 16: Myster Z
          • Day 35: Mz. Why
        • Rose Tower >
          • Day 64: Canola Cracks
          • Day 87: Olive Oil
      • Kraft Mountain >
        • Day 6 (and 90): Conundrum Crag
        • Day 7: Caligula Crag
        • Day 4: Three Peaks and Yin & Yang
        • Day 10: Winter Heat
      • Mt. Wilson >
        • Day 41: Limon
        • Day 72: Gentleman's Club - Silicone Sag
      • Oak Creek Canyon >
        • Day 37: Johnny Vegas
        • Day 65: Tan Line
        • Day 68: Byrd Pinnacle
        • Day 92: Beulah's Arete
      • Pine Creek Canyon >
        • Day 22: Mescalito E - Too Many Tantrums
        • Day 23: Mescalito E - Pauligk Pillar
        • Day 27: Straight Shooter Wall
        • Day 31: Robin Trowel (Abutment) & Stick Gully 1
        • Day 32-34: Flight Path
        • Day 34: Stick Gully 2 - Prelude
        • Day 36: Birdland
        • Day 38: Diarrhea Dialect (Bullnose Wall)
        • Day 48: Cat in the Hat
        • Day 62: Stick Gully - Box of Rain
        • Day 63: Cookie Monster
        • Day 69: Soloist Crack
      • Red Springs >
        • Day 2: Cowlick and Cannibal
        • Day 1: Cut Your Teeth, Hide & Seek, Happy Acres
        • Day 3: Dickies (Seems Like a Butt)
        • Day 8: Fringe
        • Day 5: Moderate Mecca
        • Day 9: Reptile & Fox Walls
        • Day 45: Gnat Man
        • Day 55: Coco Crag
        • Day 58: In Through the Out Door (Ridinghood Wall)
        • Day 91: Guys and Ghouls
      • Sandstone Quarry >
        • Day 29: High Scalin'
        • Day 47: Man's Best Friend & Americrag
        • Day 66: Hall of Fame - Ms. Adventure
      • Southern Outcrops >
        • Day 70 & 71: Chocolate Rocks
        • Day 82: Illusion Crag - Part 1
      • White Rock Springs >
        • Angel Food Wall >
          • Day 11: Group Therapy
        • Day 25: The Ledger
        • Seraphim Wall >
          • Day 91: Ride the Wind
      • Willow Springs >
        • Day 15: Mother's and Outhouse
        • Day 18: Mossy Ledges - Pussy Nuts
        • Day 19: Mossy Ledges 2
        • Day 26: Graduate Cliff - Pre Skool Part 1 >
          • Day 46: Pre Skool Part Deux
        • Day 60 & 61: Graduate Cliff 2
        • Day 30 - Gold Digger
        • Day 61: Ragged Edges - Footloose
        • Day 62: Case Face - Space Case
        • Day 73: Ragged Edges Area
        • Day 74 Peaches (Children's Wall)
        • Day 75 N' Plus Ultra 1 - Geezer Face & Lucky Charms
        • Day 76: N'Plus Ultra 2 - Pillar Talk & Chocolate Tranquility Fountain
        • Day 84: N'Plus Ultra Part 3 - Cereal Killer
        • Day 84: Lost Creek Canyon - Grey Matter
        • Day 85: Communist Plan at Lost & Found
        • Day 94: Double Pin-etration N'Plus Ultra
    • Meet Our Tools >
      • GPS Units
      • Van Life: Tankenstein >
        • Tankenstein Gets Gutted
        • Van Life: Rebuilding Tankenstein >
          • Glowing Disco Counter Top
          • Cold Food Storage
          • Bouldering-pad-bench
          • Insulation and Vent Fan
          • Quick Fixes
          • Kingsized Pullout Bed
      • Ultralight Exposure Protection Gear