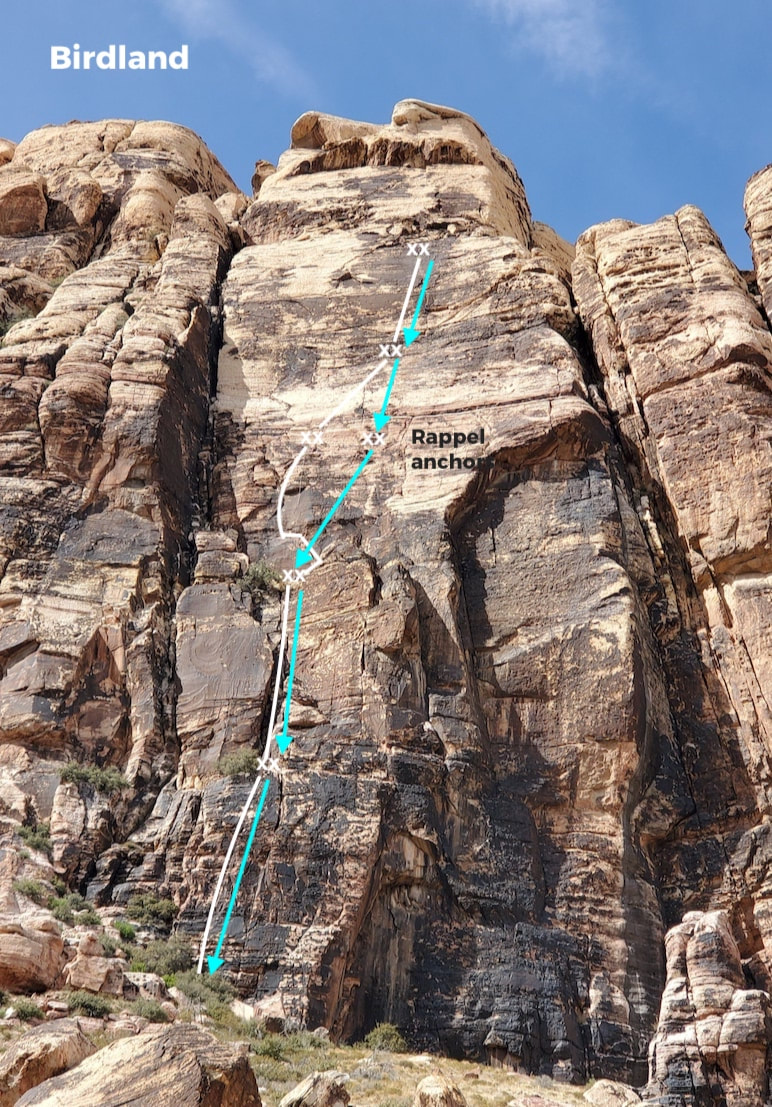
CLIMB-ON MAPS
  • Home
  • Blog
    • WTF 5..7 Tour - Red Rock >
      • General >
        • WTF 5.7 Climbs
        • The Plan
        • Managing the Desert Heat
      • Black Velvet Canyon >
        • Lazy Buttress/Whisky Peak E >
          • Day 79: Schaeffer's Delight
          • Day 83: Ballantine Blast
          • Day 86: Lazy Buttress (Climb)
      • Calico 1 (1st Pullout) >
        • Amusement Park
        • Day 17: Civilization
        • Day 20: Panty Wall
        • Day 14: The Slab
        • Day 21: Wall of Death & Hamlet
        • Day 24: Child's Play
        • Day 49: Ultraman
        • Day 50: Dog Wall & Fixx Cliff
        • Day 51: Tuna and Chips
        • Day 53: Viagra Towers
        • Day 59 Iron Man - Necco Waif
        • Day 80 - Tuna Cookies
        • Day 80 - Diamond Dance - The Oasis
        • Day 81 - CarlyQuinn Crag
      • Calico 2 (2nd Pullout) >
        • Day 13: Meetup & Black Corridor
        • Day 28: Retirement Plan
        • Day 52: The Walrus, Running Man, & Sweet Pain
        • Day 54: USS Crag & Tsunami
        • Day 56: Great Red Book Wall
        • Day 66: The Gallery
      • First Creek Canyon >
        • First Creek Slabs >
          • Day 40: Falling Stars & Bad Moon Arising
          • Day 67: Smiley Face
          • Day 94: Romanian Rib Right
          • Day 95: Romanian Rib Left
        • Lotta Balls Wall >
          • Day 88: Lotta Brews
        • Romper Room >
          • Day 42: Algae on Parade
          • Day 67: Romper Room 2
        • Schoolyard >
          • Day 44: School Yard 1 - Deja Vu & Short Subject
          • Day 77: School Yard -Sunday School & Dunce's Corner
          • Day 89: Schoolyard Bully
        • Slot Club Area >
          • Day 78: Escondite
        • Strawberry Hill >
          • Day 43: This Ain't the F'n Way!
      • Icebox Canyon >
        • Day 12: Sunnyside & Frigid Air
        • Day 39: Necromancer - Hop Route
        • Day 57: Tarkus Crack (Tiki Cliff)
      • Juniper Canyon >
        • Jackrabbit Buttress >
          • Day 16: Myster Z
          • Day 35: Mz. Why
        • Rose Tower >
          • Day 64: Canola Cracks
          • Day 87: Olive Oil
      • Kraft Mountain >
        • Day 6 (and 90): Conundrum Crag
        • Day 7: Caligula Crag
        • Day 4: Three Peaks and Yin & Yang
        • Day 10: Winter Heat
      • Mt. Wilson >
        • Day 41: Limon
        • Day 72: Gentleman's Club - Silicone Sag
      • Oak Creek Canyon >
        • Day 37: Johnny Vegas
        • Day 65: Tan Line
        • Day 68: Byrd Pinnacle
        • Day 92: Beulah's Arete
      • Pine Creek Canyon >
        • Day 22: Mescalito E - Too Many Tantrums
        • Day 23: Mescalito E - Pauligk Pillar
        • Day 27: Straight Shooter Wall
        • Day 31: Robin Trowel (Abutment) & Stick Gully 1
        • Day 32-34: Flight Path
        • Day 34: Stick Gully 2 - Prelude
        • Day 36: Birdland
        • Day 38: Diarrhea Dialect (Bullnose Wall)
        • Day 48: Cat in the Hat
        • Day 62: Stick Gully - Box of Rain
        • Day 63: Cookie Monster
        • Day 69: Soloist Crack
      • Red Springs >
        • Day 2: Cowlick and Cannibal
        • Day 1: Cut Your Teeth, Hide & Seek, Happy Acres
        • Day 3: Dickies (Seems Like a Butt)
        • Day 8: Fringe
        • Day 5: Moderate Mecca
        • Day 9: Reptile & Fox Walls
        • Day 45: Gnat Man
        • Day 55: Coco Crag
        • Day 58: In Through the Out Door (Ridinghood Wall)
        • Day 91: Guys and Ghouls
      • Sandstone Quarry >
        • Day 29: High Scalin'
        • Day 47: Man's Best Friend & Americrag
        • Day 66: Hall of Fame - Ms. Adventure
      • Southern Outcrops >
        • Day 70 & 71: Chocolate Rocks
        • Day 82: Illusion Crag - Part 1
      • White Rock Springs >
        • Angel Food Wall >
          • Day 11: Group Therapy
        • Day 25: The Ledger
        • Seraphim Wall >
          • Day 91: Ride the Wind
      • Willow Springs >
        • Day 15: Mother's and Outhouse
        • Day 18: Mossy Ledges - Pussy Nuts
        • Day 19: Mossy Ledges 2
        • Day 26: Graduate Cliff - Pre Skool Part 1 >
          • Day 46: Pre Skool Part Deux
        • Day 60 & 61: Graduate Cliff 2
        • Day 30 - Gold Digger
        • Day 61: Ragged Edges - Footloose
        • Day 62: Case Face - Space Case
        • Day 73: Ragged Edges Area
        • Day 74 Peaches (Children's Wall)
        • Day 75 N' Plus Ultra 1 - Geezer Face & Lucky Charms
        • Day 76: N'Plus Ultra 2 - Pillar Talk & Chocolate Tranquility Fountain
        • Day 84: N'Plus Ultra Part 3 - Cereal Killer
        • Day 84: Lost Creek Canyon - Grey Matter
        • Day 85: Communist Plan at Lost & Found
        • Day 94: Double Pin-etration N'Plus Ultra
    • Meet Our Tools >
      • GPS Units
      • Van Life: Tankenstein >
        • Tankenstein Gets Gutted
        • Van Life: Rebuilding Tankenstein >
          • Glowing Disco Counter Top
          • Cold Food Storage
          • Bouldering-pad-bench
          • Insulation and Vent Fan
          • Quick Fixes
          • Kingsized Pullout Bed
      • Ultralight Exposure Protection Gear

Pine Creek - Spectrum/Brass Wall

Birdland
Picture
Climb: Birdland
Conclusion WTF? What the FABULOUS!
Does Birdland live up to the hype? Yeah. We'd say so. We loved the climb. What's so awesome about it?
  • Variety - each pitch has it's own distinct personality
  • Great rock - with the exception of some poor quality rock on the traverse on pitch 3, the rock is solid for Red Rock standards (we did not climb pitch 6 - which I explain why below - so can't comment on the quality of rock there)
  • Nice belay ledges - except at the top of pitch 5 (and less so for pitch 4)

Are there any negatives? Sure...
  • Crowds - being a classic, it's a popular route. We climbed it on a Friday in March (nearing peak spring climbing season). We were the first people on the route, by the time we reached the top there were three additional parties. 
    • Rappelling a busy route can be a pain, but it's not too horrible - so long as the traffic jam doesn't converge at the top of pitch 5. Most of the rap stations are shared with the belay stations, with one exception (the pitch 3 station - there is a set of bolts straight below rapping down from pitch 4, you don't have to traverse over to the pitch 3 belay station). The pitch 2 station also has two sets of bolts (tips and details are provided below, the topo above also shows the rappels.)
    • Unfortunately not all of the belay stations have chains (just the bolts and a quick link or a rap ring) so sharing anchors with multiple parties has the potential for cluster fuckage. 

General Tips
  • This is best climbed with a single 70m. The climb wanders and combining pitches is not really an option. 
  • 60's are too short for the rappels and skipping rappels with two 60s is not really an option either. If you are using two 60s you will need to tie the ropes together, but still rappel each pitch.
  • After you've belayed your second up pitch 2, move off the anchors and belay for pitch three closer to the wall. The ledge is HUGE, there is no danger of falling while being off belay (given that you stay away from the edge, of course...). This clears the anchors for other to use, plus gets you closer to your climber for pitch 3. 
  • This climb is rated a 5.7+ and there are a few manageble, somewhat spicy + moves (it's not a 5.7 fucked).

Pitch 1

Easy, juggy, and well-protected fun on this pitch. 

There are two cracks that can be used. The one on the right is much wider. We climbed the left crack. 

This pitch ends at the tree you see at the top of the photo. 

There is a decent sized ledge here. 
Picture
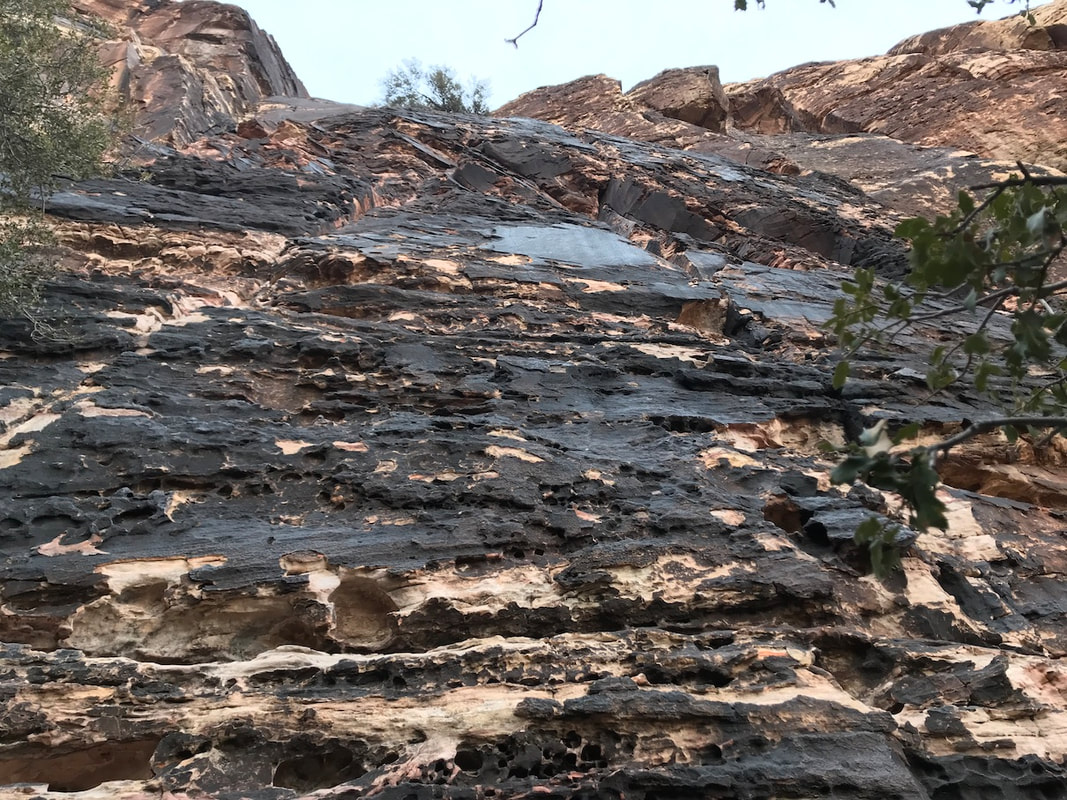
Yes, pitch 1 is as juggy and cruiser as it looks!

Pitch 2

Pitch 2 will wake you up after the cruiser jug-haul of pitch 1. The crack get's wide (I -- Stef-- placed both #4s and probably could've placed a #5 if I had it) and requires some funky, off-widthy types of moves. It's a pitch that requires thinking. It's all there, but it's not a gimmie. It sure is fun though!

​The anchors at the top of this pitch are located off to the right side on a side wall. There are two sets of anchors, presumably so one party can belay up the second, while still allowing another party to rappel down (or I suppose two parties can belay the second - one on each anchor.)
Picture
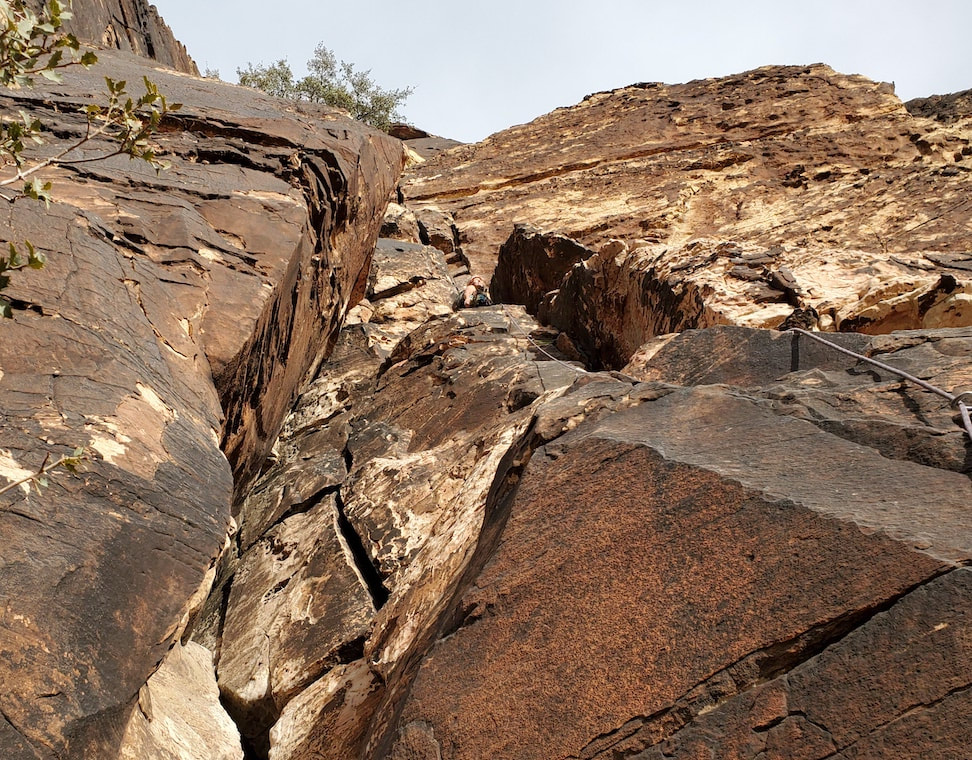
Stef blending into the rock as she leads pitch 2 - a pitch with personality for sure!

​This is a HUGE ledge where you can comfortably cruise around off-belay. When belaying for the second pitch, you can move off the bolted anchors (there is no risk of falling as you move towards the back wall away from the edge.) This does two things, it opens the anchors for other parties, and it gets you closer to the wall to belay the leader for pitch 2 (which is safer.)
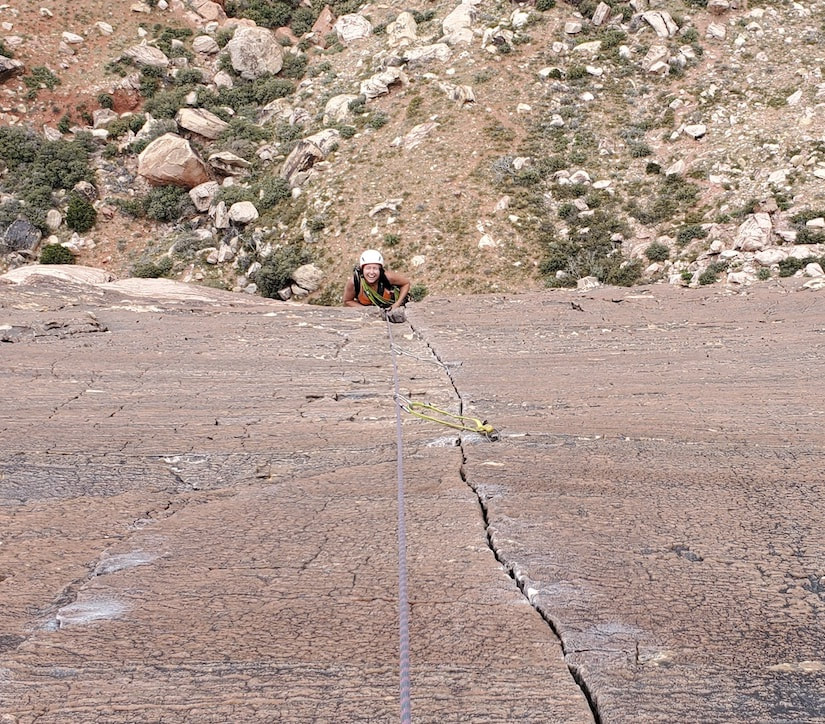
Pitch 3

This is the traverse pitch - which may be the headiest part of the climb. What makes this traverse heady is a little bit of slick rock for the feet and some super-hollow, uninspiring flakes for some undercling holds.

There is a bolt part way across the traverse. It's also a little tricky moving off the traverse up to the "crack" where there are creative placements for protection. 
Picture
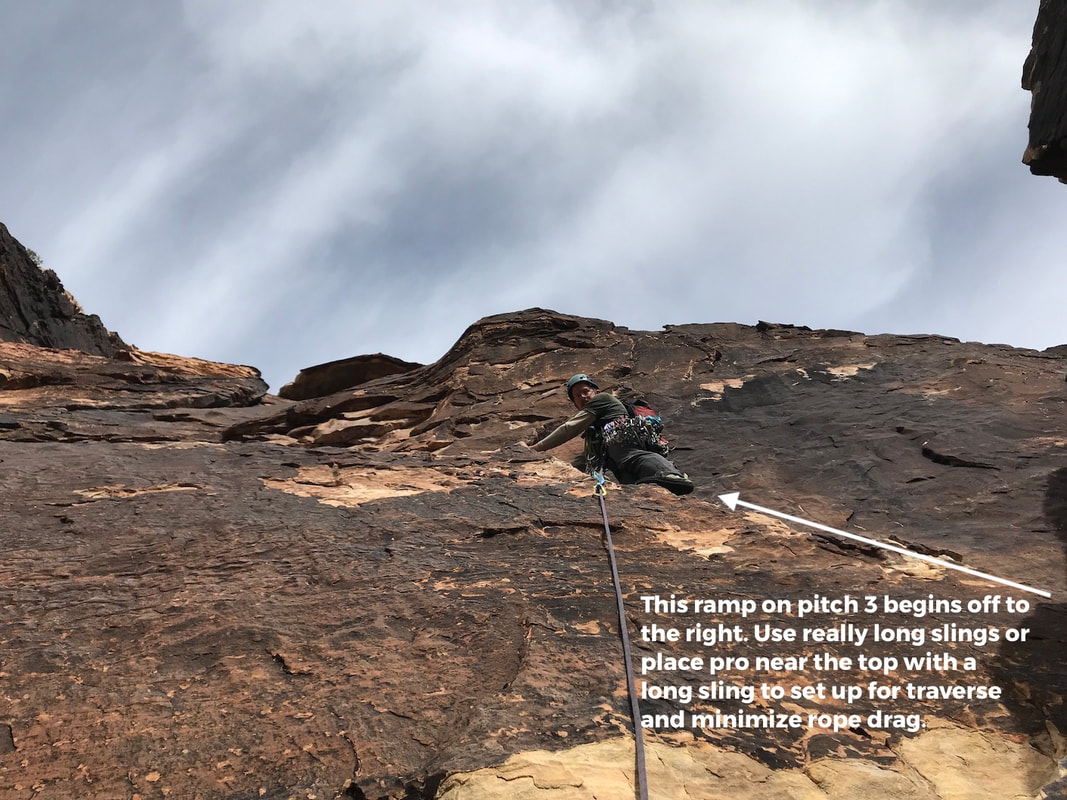
Rick leading pitch 3 - the traverse pitch. The traverse begins at the top of this ramp.
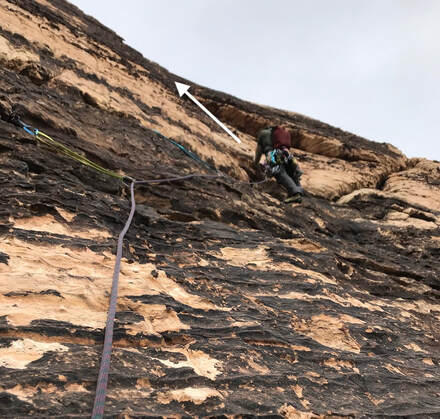
Pitch 4

Although pitch 4 is listed as a 5.6, it's a hair harder than pitch 1 and finding protection is a bit of a treasure hunt (there are some ~15' runouts. 

Angle your way up right across the face until you encounter the next set of anchors about 20-30 feet below the small roof. 

The belay are on a much smaller ledge (getting crowded if there is more than one party.) These belay anchors are to the left of the climb (the climb angles up right). On the descent, when you rappel down from the top of this pitch, you can hit a set of anchors that are more in line with the anchors from which you are rappelling. This is handy because it avoids the likely crowded belay ledge. These alternate anchors are also reasonably aligned with the next set of anchors on the big ledge atop pitch 2 (you will have to angle climbers left a little as you rappel.) 
Picture
Stef leading pitch 4 of Birdland.
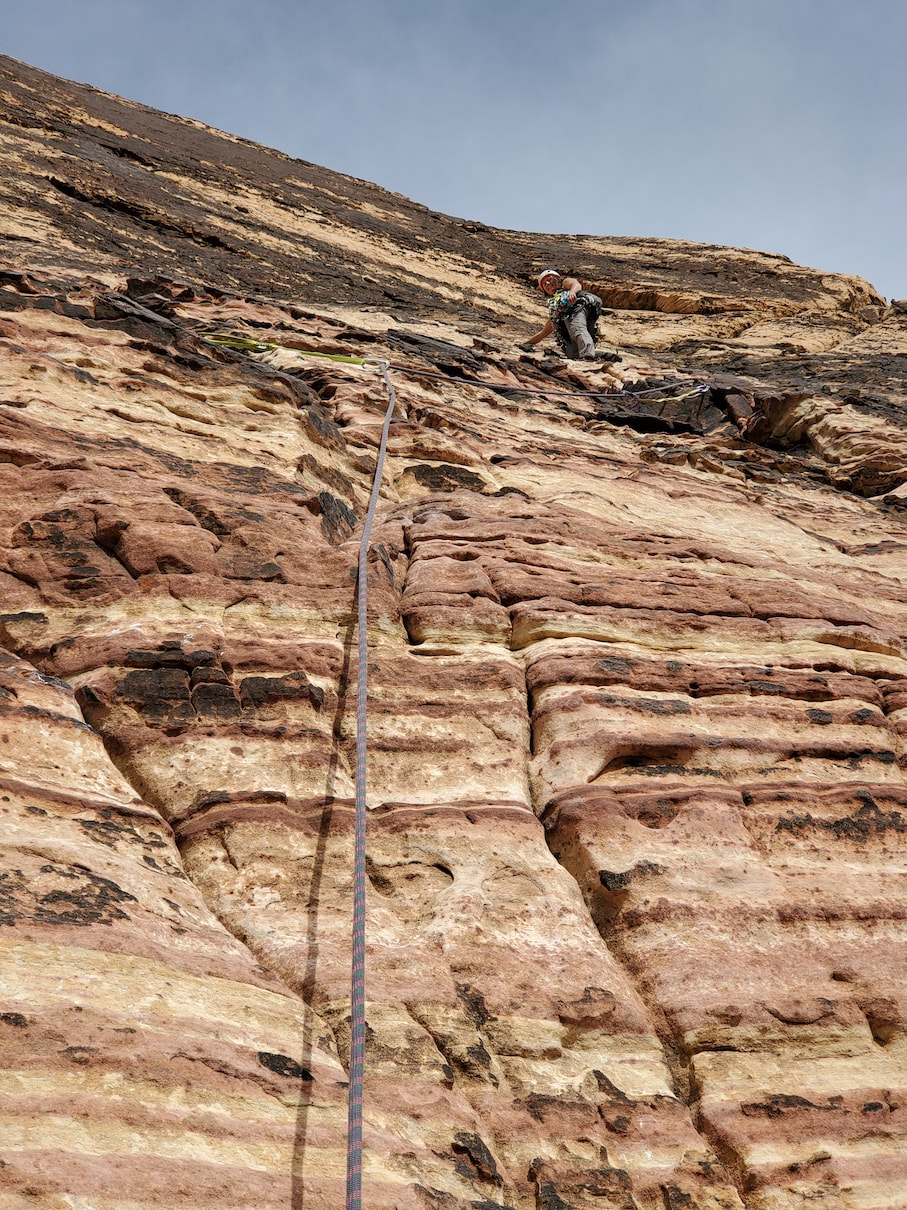
Pitch 5

Picture
Rick leading Pitch 5 - the "finger crack" pitch. Angle up and to the left of the roof.
Picture
Stef popping up over the small lip, transitioning from the featured face to the "finger crack" finale.
Pitch 5 is the "infamous" "finger crack pitch." Navigate some featured face with occasional and random pro where you can find it. Angle up towards the left side of the roof. Above the roof is the dark petina'd "finger crack" finale of the climb. I put "finger crack" in quotes because the crack is quite small in parts and it opens and closes, making it difficult to actually place pro or your fingers in the crack. The face has decent holds until the last ~10 feet, which forces you a bit more into the crack. The crux of this pitch is this last 10 or so feet.

The anchors are basically a hanging belay and they don't have chains thereby limiting the number of people at this station. Be prepared to move quickly and efficiently to transition into rappel mode if there are parties hot on your tail. Or if you are climbing up, you may need to communicate with anyone already at the anchor before getting into those committing moves at the top of this pitch! You will want to have ready access to the anchor as you finish out the crack.

Pitch 6

There is one more pitch to this climb, that apparently most people avoid. I've read disparaging accounts of this pitch, and others that say it wasn't too terrible. We thought it looked kind of interesting, but decided not to do it. The reason? We didn't want to risk ruining a perfectly fabulous climb :-). On this tour we have been on some truly shitty climbs (we encountered several in a row before we hit Birdland) and we just wanted some pure, unadulterated climbing goodness. 

The Descent

Rappel the route with a 70m (a 60 won't cut it and double 60s are overkill because, you still wont have the length to combine raps since every pitch is nearly 35 meters) - you will basically be doing single raps with double ropes. You could combine rappels with double 70s.)

You will be rappelling using all of the belay anchors except one. As mentioned in the Pitch 4 description above, the rappel from station 4 (to 3) will go down to a separate set of anchors more in line with station 4. Then from 3 to 2, you will angle slightly climbers-left to reach the huge belay ledge above pitch 2. 

Status of Tour to Date

DATE OF CLIMB: February 28, 2020
​WALLS HIT: 1 (Spectrum)
NUMBER OF CLIMBS HIT: 1
NUMBER OF PITCHES: 5
VERTICAL 5.7 FEET CLIMBED HERE: 560'
​NUMBER OF FALLS: 0
TAKES HERE: 0

DIRTY UNDERWEAR ENCOUNTERED: 0

​​DIRTY UNDERWEAR ENCOUNTERED TO DATE: 3

TOTAL CLIMBS SO FAR: 96
TOTAL PITCHES SO FAR: 125

TOTAL 5.7 VERTICAL FEET ON THE TOUR SO FAR: 10,170'
NUMBER OF CLIMBS REMAINING: 141 (out of 237 - although we may redo Pre-Skool)

VERTICAL FEET REMAINING: ~40,127
FALLS SO FAR: 0
TAKES ON LEAD SO FAR:
  • Stef – On Lead
    • WTF'r Miniwanka
    • WTF'r Lean & Languid
    • WTF'r Pauligk Pillar
    • WT Freak Out: 5.7 Freak Out
    • WTF'r Unknown left start to Datura
    • As a second:
    • WTF'r Too Many Tantrums
    • WT Fail: Pre Skool
  • Rick - On Lead
    • WTF'r Too Many Tantrums
    • WT Fork: The Ledger
​​​​​​​​​​​​


WTF 5.7 Tour: Red Rock Canyon- Climbs By Area & Alphabetically

Menu

About
WTF 5.7 Tour
Climb-On Maps is no longer in business. Thank you!
© COPYRIGHT 2017-2025. ALL RIGHTS RESERVED.
  • Home
  • Blog
    • WTF 5..7 Tour - Red Rock >
      • General >
        • WTF 5.7 Climbs
        • The Plan
        • Managing the Desert Heat
      • Black Velvet Canyon >
        • Lazy Buttress/Whisky Peak E >
          • Day 79: Schaeffer's Delight
          • Day 83: Ballantine Blast
          • Day 86: Lazy Buttress (Climb)
      • Calico 1 (1st Pullout) >
        • Amusement Park
        • Day 17: Civilization
        • Day 20: Panty Wall
        • Day 14: The Slab
        • Day 21: Wall of Death & Hamlet
        • Day 24: Child's Play
        • Day 49: Ultraman
        • Day 50: Dog Wall & Fixx Cliff
        • Day 51: Tuna and Chips
        • Day 53: Viagra Towers
        • Day 59 Iron Man - Necco Waif
        • Day 80 - Tuna Cookies
        • Day 80 - Diamond Dance - The Oasis
        • Day 81 - CarlyQuinn Crag
      • Calico 2 (2nd Pullout) >
        • Day 13: Meetup & Black Corridor
        • Day 28: Retirement Plan
        • Day 52: The Walrus, Running Man, & Sweet Pain
        • Day 54: USS Crag & Tsunami
        • Day 56: Great Red Book Wall
        • Day 66: The Gallery
      • First Creek Canyon >
        • First Creek Slabs >
          • Day 40: Falling Stars & Bad Moon Arising
          • Day 67: Smiley Face
          • Day 94: Romanian Rib Right
          • Day 95: Romanian Rib Left
        • Lotta Balls Wall >
          • Day 88: Lotta Brews
        • Romper Room >
          • Day 42: Algae on Parade
          • Day 67: Romper Room 2
        • Schoolyard >
          • Day 44: School Yard 1 - Deja Vu & Short Subject
          • Day 77: School Yard -Sunday School & Dunce's Corner
          • Day 89: Schoolyard Bully
        • Slot Club Area >
          • Day 78: Escondite
        • Strawberry Hill >
          • Day 43: This Ain't the F'n Way!
      • Icebox Canyon >
        • Day 12: Sunnyside & Frigid Air
        • Day 39: Necromancer - Hop Route
        • Day 57: Tarkus Crack (Tiki Cliff)
      • Juniper Canyon >
        • Jackrabbit Buttress >
          • Day 16: Myster Z
          • Day 35: Mz. Why
        • Rose Tower >
          • Day 64: Canola Cracks
          • Day 87: Olive Oil
      • Kraft Mountain >
        • Day 6 (and 90): Conundrum Crag
        • Day 7: Caligula Crag
        • Day 4: Three Peaks and Yin & Yang
        • Day 10: Winter Heat
      • Mt. Wilson >
        • Day 41: Limon
        • Day 72: Gentleman's Club - Silicone Sag
      • Oak Creek Canyon >
        • Day 37: Johnny Vegas
        • Day 65: Tan Line
        • Day 68: Byrd Pinnacle
        • Day 92: Beulah's Arete
      • Pine Creek Canyon >
        • Day 22: Mescalito E - Too Many Tantrums
        • Day 23: Mescalito E - Pauligk Pillar
        • Day 27: Straight Shooter Wall
        • Day 31: Robin Trowel (Abutment) & Stick Gully 1
        • Day 32-34: Flight Path
        • Day 34: Stick Gully 2 - Prelude
        • Day 36: Birdland
        • Day 38: Diarrhea Dialect (Bullnose Wall)
        • Day 48: Cat in the Hat
        • Day 62: Stick Gully - Box of Rain
        • Day 63: Cookie Monster
        • Day 69: Soloist Crack
      • Red Springs >
        • Day 2: Cowlick and Cannibal
        • Day 1: Cut Your Teeth, Hide & Seek, Happy Acres
        • Day 3: Dickies (Seems Like a Butt)
        • Day 8: Fringe
        • Day 5: Moderate Mecca
        • Day 9: Reptile & Fox Walls
        • Day 45: Gnat Man
        • Day 55: Coco Crag
        • Day 58: In Through the Out Door (Ridinghood Wall)
        • Day 91: Guys and Ghouls
      • Sandstone Quarry >
        • Day 29: High Scalin'
        • Day 47: Man's Best Friend & Americrag
        • Day 66: Hall of Fame - Ms. Adventure
      • Southern Outcrops >
        • Day 70 & 71: Chocolate Rocks
        • Day 82: Illusion Crag - Part 1
      • White Rock Springs >
        • Angel Food Wall >
          • Day 11: Group Therapy
        • Day 25: The Ledger
        • Seraphim Wall >
          • Day 91: Ride the Wind
      • Willow Springs >
        • Day 15: Mother's and Outhouse
        • Day 18: Mossy Ledges - Pussy Nuts
        • Day 19: Mossy Ledges 2
        • Day 26: Graduate Cliff - Pre Skool Part 1 >
          • Day 46: Pre Skool Part Deux
        • Day 60 & 61: Graduate Cliff 2
        • Day 30 - Gold Digger
        • Day 61: Ragged Edges - Footloose
        • Day 62: Case Face - Space Case
        • Day 73: Ragged Edges Area
        • Day 74 Peaches (Children's Wall)
        • Day 75 N' Plus Ultra 1 - Geezer Face & Lucky Charms
        • Day 76: N'Plus Ultra 2 - Pillar Talk & Chocolate Tranquility Fountain
        • Day 84: N'Plus Ultra Part 3 - Cereal Killer
        • Day 84: Lost Creek Canyon - Grey Matter
        • Day 85: Communist Plan at Lost & Found
        • Day 94: Double Pin-etration N'Plus Ultra
    • Meet Our Tools >
      • GPS Units
      • Van Life: Tankenstein >
        • Tankenstein Gets Gutted
        • Van Life: Rebuilding Tankenstein >
          • Glowing Disco Counter Top
          • Cold Food Storage
          • Bouldering-pad-bench
          • Insulation and Vent Fan
          • Quick Fixes
          • Kingsized Pullout Bed
      • Ultralight Exposure Protection Gear