Climb: Romanian Rib Right (5.7 - but more like a 5.5, trad, ~1200' feet)
(NOTE: Romanian Rib Right shares the last 900 feet and the same descent with Romanian Rib Left)
Wall: First Creek Slabs
Rope Used: twin 60s (highly recommended to bring two ropes for double rope rappels, otherwise you will be doing a ton of rappels combined with exposed, steep, downclimbing between rap stations. If you want to maximize the pitches without simulclimbing consider using a 70m and bring a tagline for the rappels.)
Gear: Pro to 4" double rack - the climb is low angle, pretty consistently easy, and has lots of options for pro. I (Stef) don't usually say this kind of thing because I'm a "bring the kitchen sink" climber, but a confident leader could easily go light with a single rack because you may not place much gear.
Good Lead for a New Trad Climber? Yes. The one caveat is that this is a BIG, committing climb and you need to start super early and/or move quickly. Many new trad leaders (naturally and understandably) move slowly. There are no bolted anchors and once you are on, you need to finish unless you want to donate tons of gear to get off. Ideally you want to do the complex descent in the light.
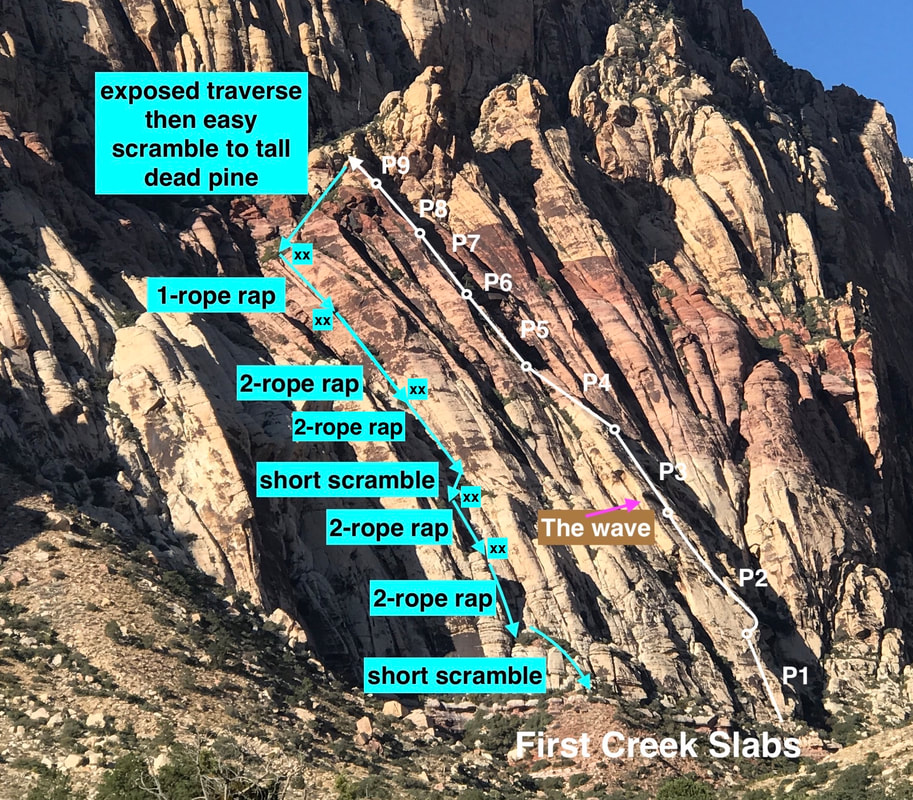
Summary: This is an amazing, high-quality, super fun, beautiful climb that has multiple changes in rock color and style as you ascent. The climb is significantly easier than the rating of 5.7 in Handren. Mountain Project gives it a 5.5 and I would put a few parts at 5.6 and most of it at 5.4-5.5. It is also listed as 1000' and many agree it is closer to 1300' (I concur, my calculations put it at about 1250'. The descent is complex with 1 single rope rappel and 3 double rope rappels and scrambling (NOTE: There is an "easy" but death exposure 20-30 foot traverse immediately after you get off the climb. It is a thin lip you face the wall and shuffle your feet across.) Doing this climb is a big, committing day no matter how you slice it, so start early and don't mess around - get on it and move!
Conclusion WTF? What the FABULOUS!
(NOTE: Romanian Rib Right shares the last 900 feet and the same descent with Romanian Rib Left)
Wall: First Creek Slabs
Rope Used: twin 60s (highly recommended to bring two ropes for double rope rappels, otherwise you will be doing a ton of rappels combined with exposed, steep, downclimbing between rap stations. If you want to maximize the pitches without simulclimbing consider using a 70m and bring a tagline for the rappels.)
Gear: Pro to 4" double rack - the climb is low angle, pretty consistently easy, and has lots of options for pro. I (Stef) don't usually say this kind of thing because I'm a "bring the kitchen sink" climber, but a confident leader could easily go light with a single rack because you may not place much gear.
Good Lead for a New Trad Climber? Yes. The one caveat is that this is a BIG, committing climb and you need to start super early and/or move quickly. Many new trad leaders (naturally and understandably) move slowly. There are no bolted anchors and once you are on, you need to finish unless you want to donate tons of gear to get off. Ideally you want to do the complex descent in the light.
Summary: This is an amazing, high-quality, super fun, beautiful climb that has multiple changes in rock color and style as you ascent. The climb is significantly easier than the rating of 5.7 in Handren. Mountain Project gives it a 5.5 and I would put a few parts at 5.6 and most of it at 5.4-5.5. It is also listed as 1000' and many agree it is closer to 1300' (I concur, my calculations put it at about 1250'. The descent is complex with 1 single rope rappel and 3 double rope rappels and scrambling (NOTE: There is an "easy" but death exposure 20-30 foot traverse immediately after you get off the climb. It is a thin lip you face the wall and shuffle your feet across.) Doing this climb is a big, committing day no matter how you slice it, so start early and don't mess around - get on it and move!
Conclusion WTF? What the FABULOUS!
Romanian Rib Right at the First Creek Slabs, Red Rock Canyon
|
|
Pitch By Pitch
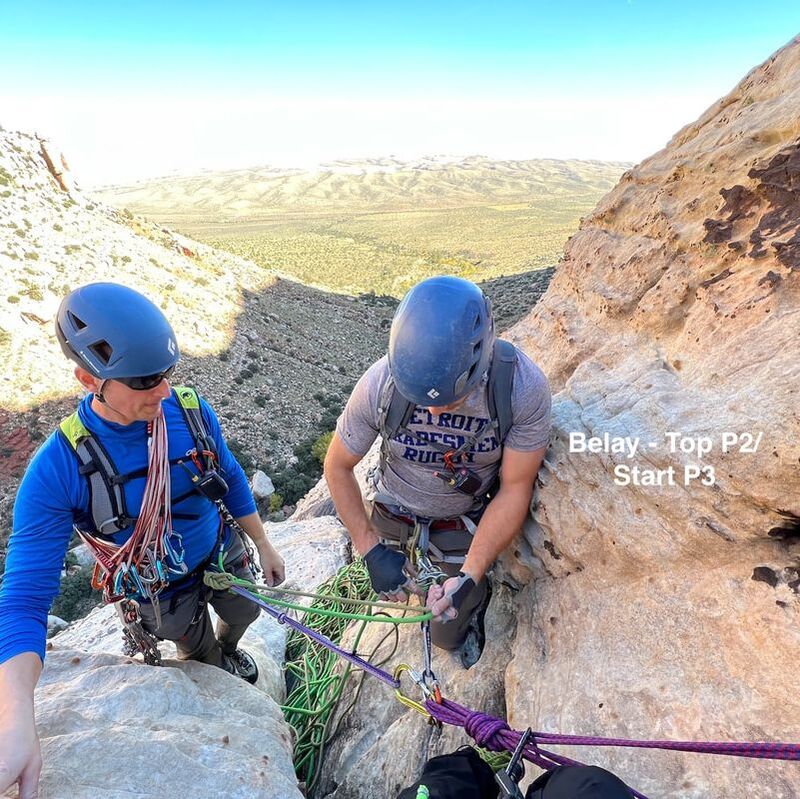
NOTE: With a big climb like this there will be lots of options for how you break up the pitches that will be dictated by your length of rope, comfort with simulclimbing, rope drag, gear, finding ledges, and other factors. We were climbing with three people and twin 60m ropes. It was also extremely (dangerously) windy when we were climbing - gusts bad enough to blow a climber off the rock (yes we checked the weather, it was predicted to be windy but not as bad as it ended up being). We originally planned to swing leads, but when the wind kicked up, we opted for one leader (Mike Pucci) to take over, move quickly, place minimal gear (Mike had climbed this climb multiple times, including soling it, and was very familiar with the route and terrain). We also opted to NOT simulclimb because of the wind-initiated falling risk - if one of the two of us down low fell, we could make Mike P. fall - who was placing minimal gear to move fast. Mike also selected belay stations that were as protected from the wind as much as possible, so they might not be the locations people would normally stop (although they were nice with large ledges.) Here I share the pitches we did, but chances are you might end up doing something different.
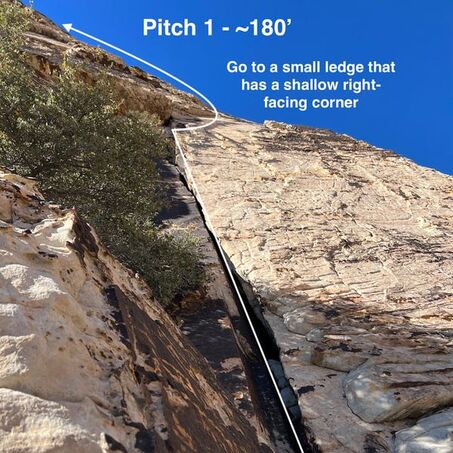
Pitch 1 (5.4, ~180')
|
Follow the crack, go slightly right of a small roof. Continue up the crack on the face, go past a second small roof/bulge (avoid by going right). Stop at a small ledge that has a shallow right-facing corner (this is P2), build a gear anchor. Fun and featured all the way. Rock is great.
|
|
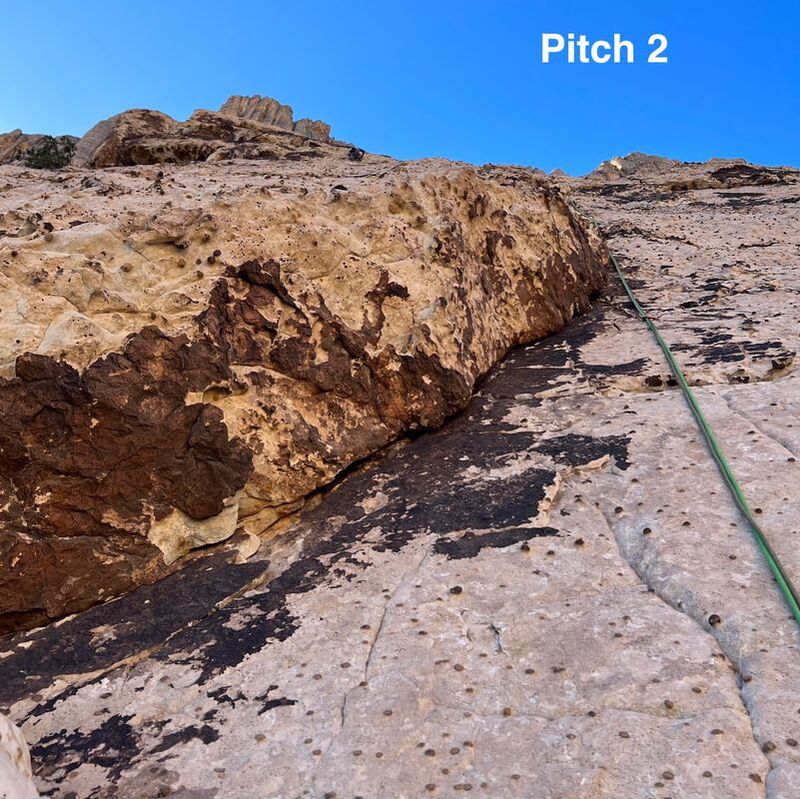
Pitch 2 (5.4, ~196' - full 60m rope)
This face is low-angle slab with "lotta balls." The balls are mostly solid, but be aware they can sometimes break off. From the belay, go up the shallow, right-facing corner. Then veer slightly left up the face, going to the right side of a roof onto bulgy terrain. Follow easy lines in between bulges trying to minimize zig-zagging to reduce rope drag). Find gear in horizontals and varied cracks (there is not a clear crack to follow on much of this pitch.) You will be able to start seeing "the wave" which will guide your direction so you can set up a belay to hit the wave on P3. We stopped at a small ledge in a protected alcove (reprieve from the wind!). But the gear was pretty spread out here to set up the anchor.
|
|
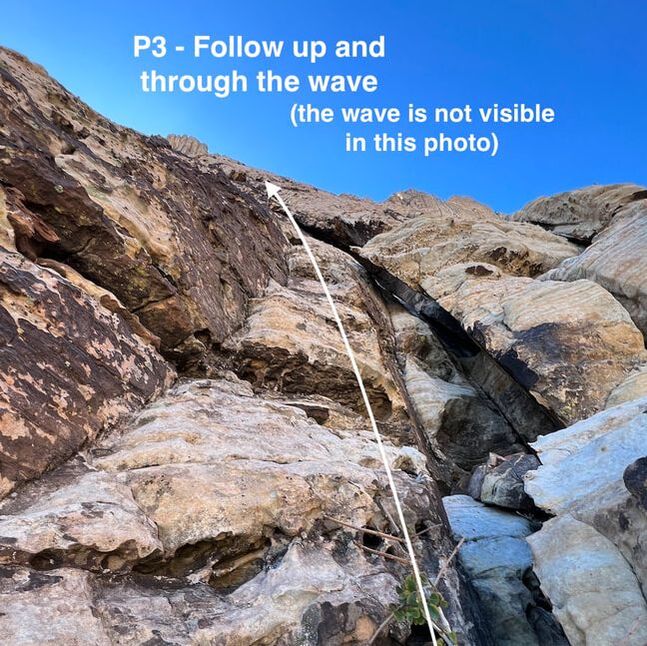
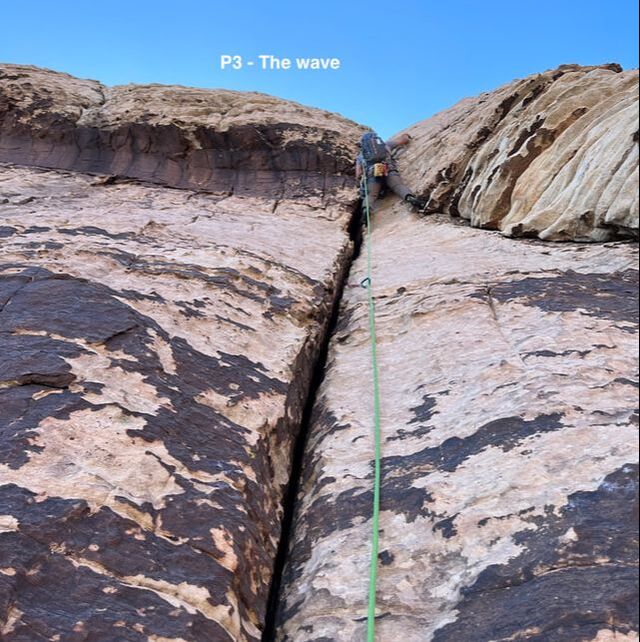
Pitch 3 - The Wave (5.5, ~190')
This is the wave pitch. The wave is a long roof that looks like a large cresting wave. There is a crack you follow up the right side of the wave. It is vertical but juggy, easy, and protectable. Over "the wave" build an anchor at a small ledge with an oak bush at the base of a long, clear, vertical crack.
|
|
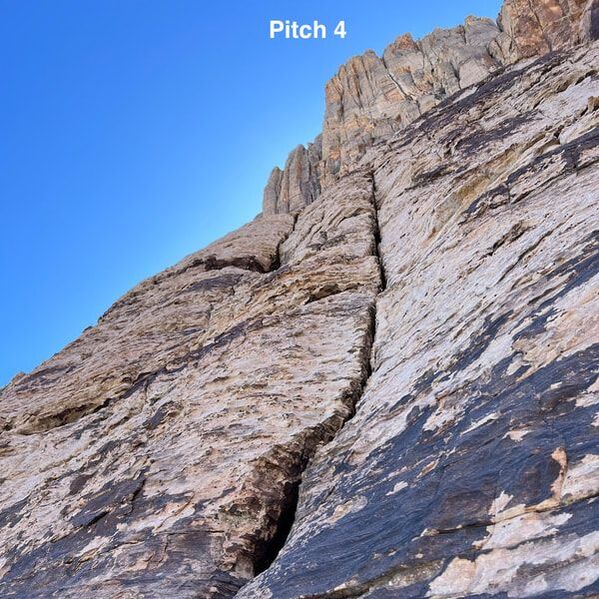
Pitch 4 - Shorter pitch for alcove belay (5.5, ~100')
|
Go up the vertical crack. We stopped early at a ledgy alcove to get some protection fro the wind. Normally you keep going until you hit the ruby-colored varnished rock.
|
|
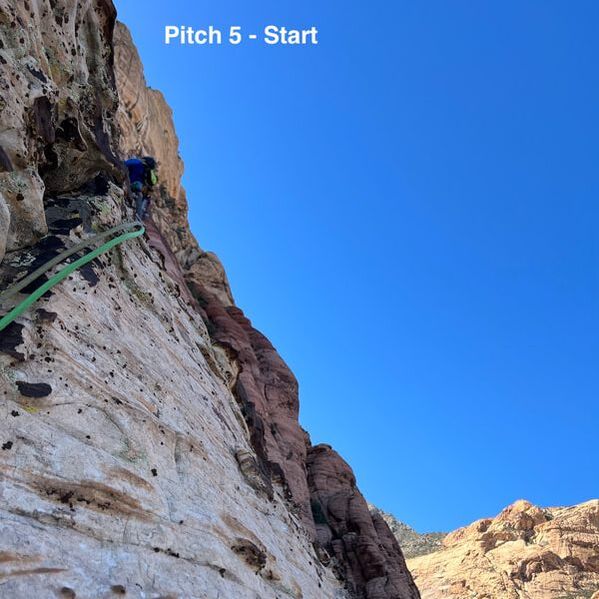
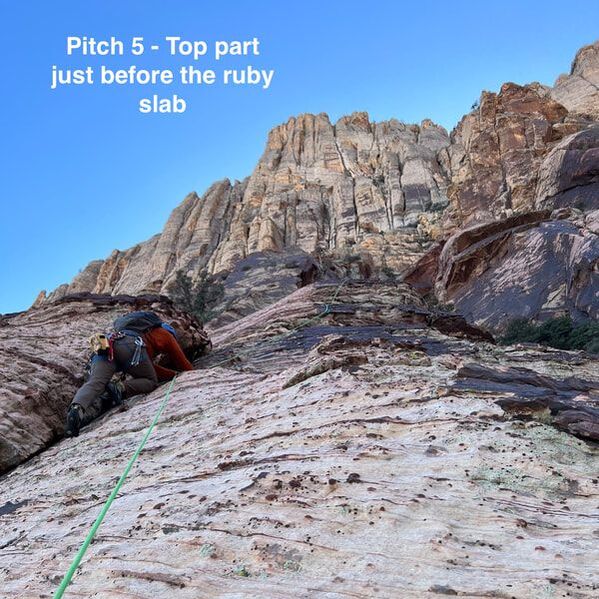
Pitch 5 - Shorter pitch - might want to string together 4 & 5 (5.4, ~100')
From the belay follow the right angled crack up then veer slightly left going over low angled slab that starts becoming varnished and featured. You will see another "rib" coming up from the left. On pitch 6 you will join up with that left rib. Up and ahead are bushes, you will be able to see a large dead pine tree in the distance, use this pine tree as a bearing. Head in that direction and set up a belay below the large, lichen-covered, ruby-red and black low-angled slab that has a crack up the center and a bunch of scrub oak growing out of the crack. This is an obvious line.
|
|
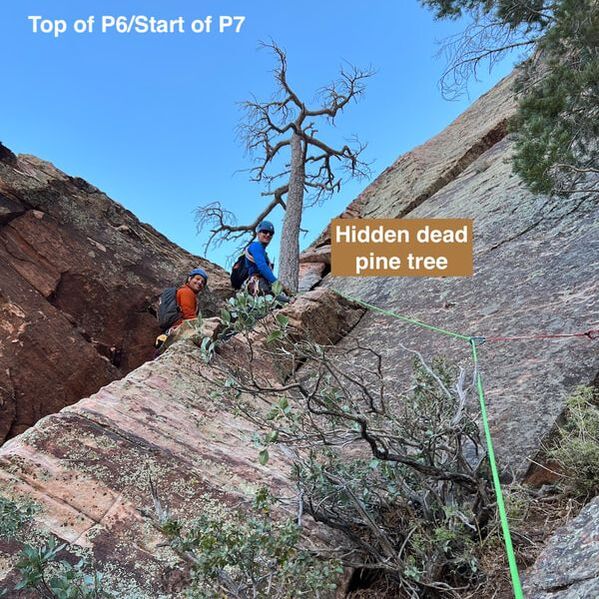
Pitch 6 (5.5, ~180')
Go up the ruby-red and petina-covered slab placing pro in the crack but avoiding the bushes. At the top of the slab, head left through the shrubs towards a smaller dead pine tree at the base of the next rib. (Now ignore the tallest, most obvious dead pine tree you've been use a a bearing.) Set up the next belay here.

|
|
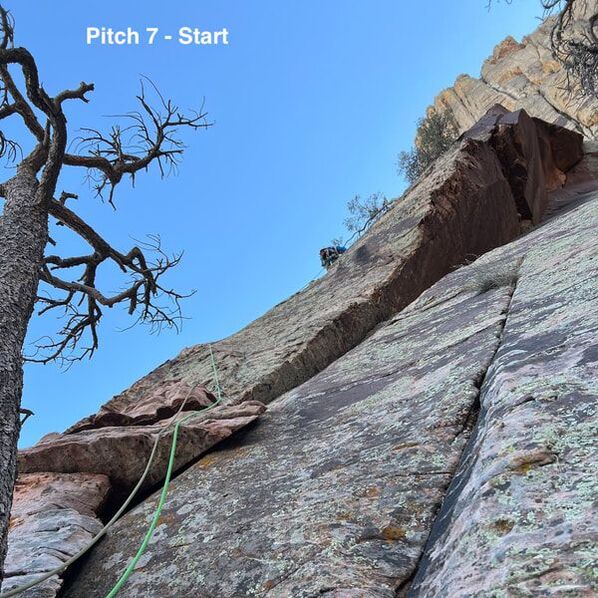
Pitch 7 (5.5, 70')
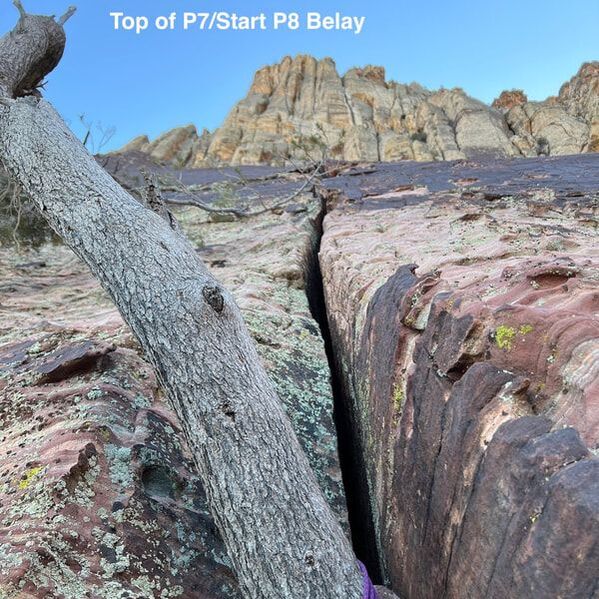
From the dead pine tree, go left up the lichen covered slab following weaknesses (you are going left and above a large, dark-petina right facing corner). There aren't many cracks in the first section, so get creative slinging horns, etc. Eventually you will get to a crack that splits the face and has a descent-sized pine tree growing out it. Sling the tree for a belay.
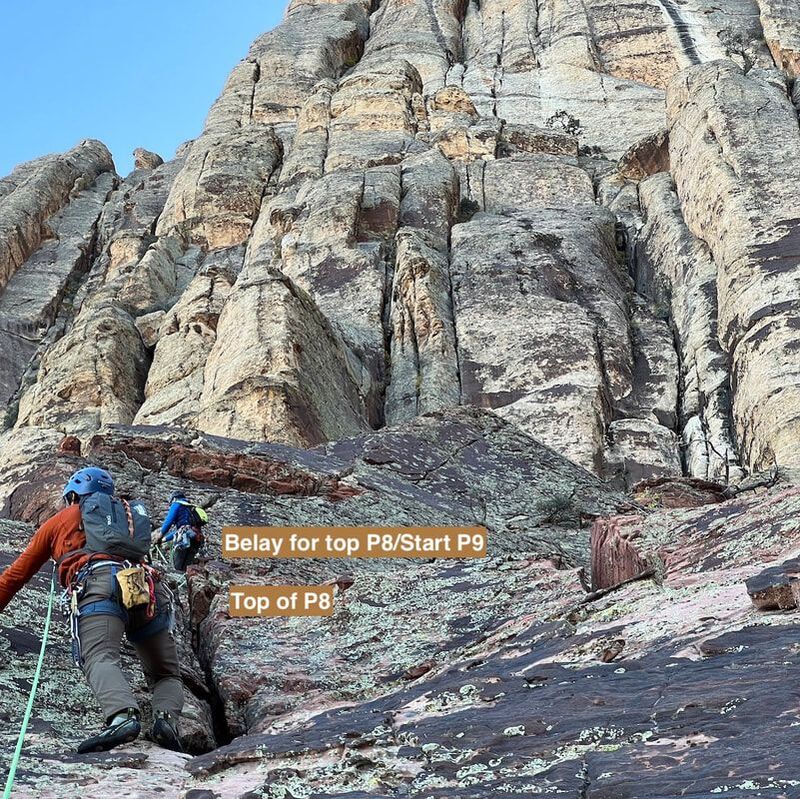
Pitch 8 (5.5, 190')
From the pine tree, follow the crack up through the varnished face (#4 is good for the lower part of this crack). The crack continues but gets more "garbled." Keep climbing until you run out of rope or decide you are ready to stop. We stopped at a ledge at the base of a crack that splits the left side of the rib, there is a petina-covered vertical drop-off on the left side.
|
|
|
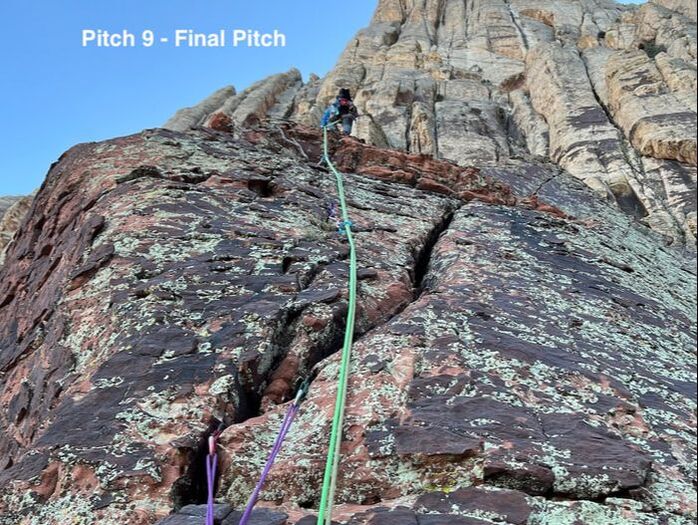
Pitch 9 (5.4, 150')
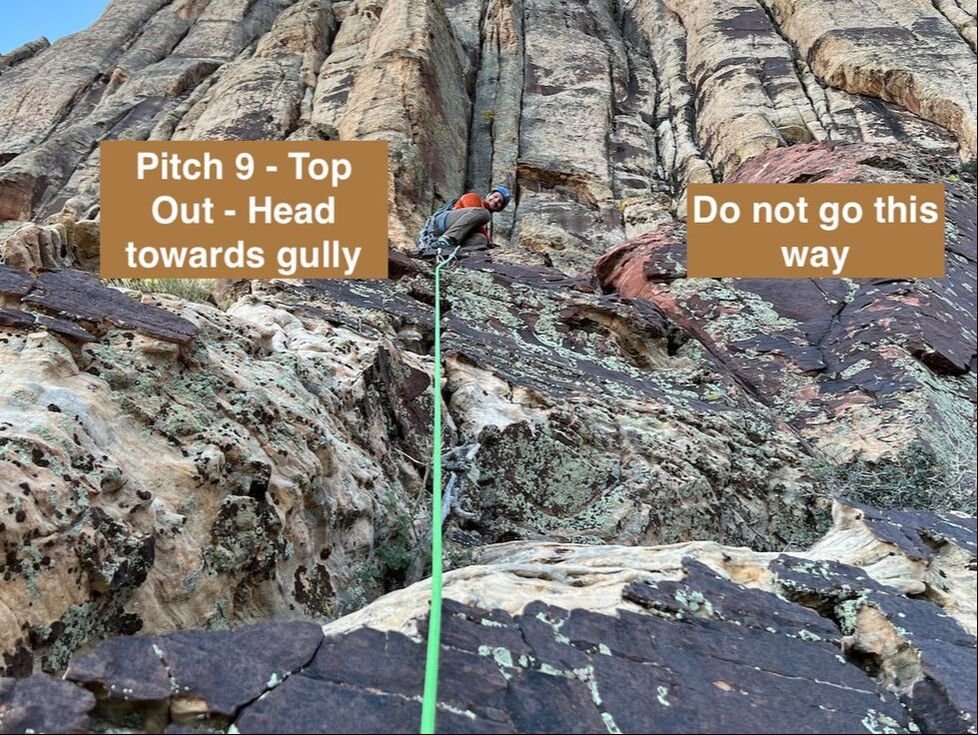
Go straight up the face, towards the very small red-colored roof-like feature, ignoring the large crack that angles off to the right. Pro can be found in the featured face, and the small red "roof/bulge" is like stair steps. Keep climbing until you reach a large ledge at the top (a portion of the rib continues off to the right.) There aren't a lot of options for pro to set up an anchor. From here scramble down into the gully to start the descent.
|
|
The Descent
The descent is long and complex. Plan for at least 4 hours from when you get off the climb and back at your car. There is a way to do the descent using a single rope - you would have to scramble between rappel stations. We have only done the descent using doubles, so that is what we share here.
Scramble to the Rappel
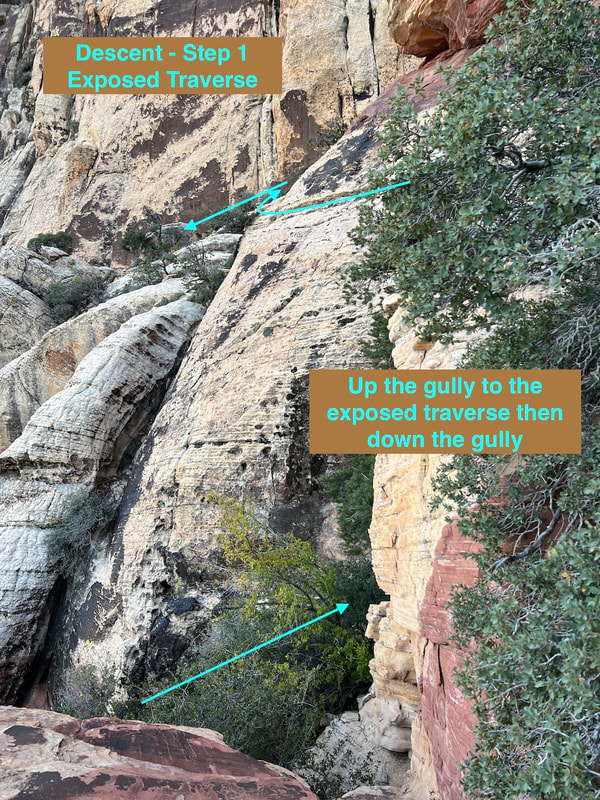
When you get off the climb, you will see some cairns stacked near white rock marking the exposed traverse. You will go up the gully a short ways to access the traverse. Getting onto and off the traverse are the most awkward moves. There are spots for protection, so you can belay for safety.
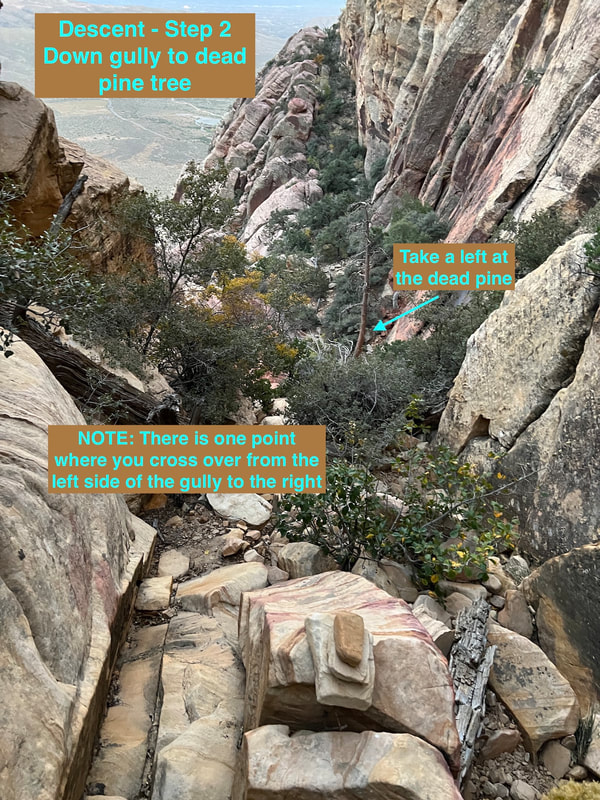
After the exposed traverse, it is easy scrambling. You will see some cairns marking a cross over point moving from the gully you are in, climbing over and down into another gully. From this gully scramble down to a large dead pine tree. Go left below this pine tree to the bolted anchors on hiker's left (rappeler's right).
After the exposed traverse, it is easy scrambling. You will see some cairns marking a cross over point moving from the gully you are in, climbing over and down into another gully. From this gully scramble down to a large dead pine tree. Go left below this pine tree to the bolted anchors on hiker's left (rappeler's right).
|
|
Rappel 1 - Chains below dead pine tree - Single Rope
The first rappel is a single rope rap. As you rappel, you are looking for chains that will be on your left side (rappeler's left).
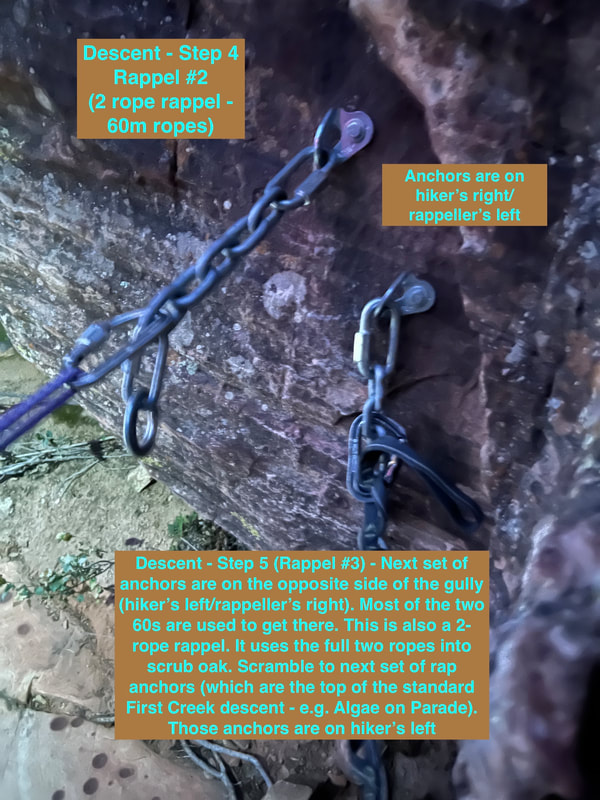
Rappel 2 - Double Rope
Rappel using double ropes. Follow the slabby-V to the next set of chains. These are on rappeler's right.

Rappel 3 - Double RopeFrom the chains, rappel down to the shrubs. This uses almost the full 60 meters of double ropes. Walk about 100 feet down through the shrubs to the the upper standard First Creek Slabs descent (e.g. this is the first rap station for Algae on Parade). Look for the anchors at a drop off on hiker's left (rappeler's right).
|
|
Rappel 4 - Double Rope
The natural line for this rappel is following down the gully, but about 1/2 to 3/4 of the way down, you want to bring the rappel over onto the slabby face and aim for the pine tree in the middle of the ledge. This will set you up for a clean pull and make get you closer to the next rappel station.
Rappel 5 - Double Rope
From the pine tree, scramble off hiker's right/rappeller's left over some loose blocks. Look for the next set of anchors on hiker's left side. These are exposed and awkward to access because of the loose blocks (you can avoid the blocks by going right around them, but it is exposed), be ready to clip in with your PAS. This rappel will use 100% of your 60m doubles - depending on rope stretch, sometimes you have to untie the knots at the end and rappel off of the ends. There is usually a small, smelly pool of muck at the bottom of this rappel. Good luck not getting your ropes wet in the nastiness :-). Sometimes we have celebratory success. Other times, womp womp. (For those doing single rope rappels, there is a mid-point rappel at a slung tree on rappeller's left.)

|
|
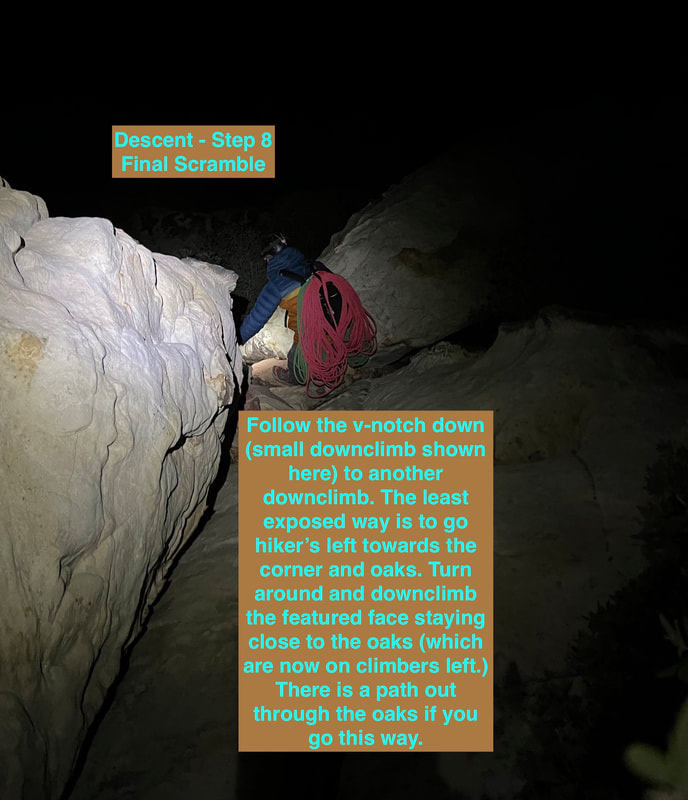
Downclimb or Short Rappel to Bottom
Below the nasty pool is a v-notch where you can do two short down-climbs to reach the base. On the second down-climb, I go hiker's left of the oak trees (if facing the wall it is to the right of the oak trees) and then turn around, face the wall and down-climb close to the oak trees (which would be on climber's left as you face the wall, basically hugging the trees on your left side.) There seems to be a few more features here and the mental security of the trees.
If you are tired and want to play it safe, you could place your rope around (or sling with a leave-behind carabiner) the small tree for a short single rope rappel. The best line for this goes to the opposite side of the oak trees than the downclimb (when rappelling/facing the wall the oak trees would be on your right). This would give a cleaner pull for the rope.
You are now near the base of the climb of Rising Moons. There is more scrambling/down climbing needed to reach the trails. There are numerous options for this, all ending up in similar places. In one section, if I'm tired and feeling clumsy, I opt to booty-scoot and stem down a low-angled chimney then exit left on a small ledge. This avoids the 15-foot down-climb on the left side of the block that forms the "chimney." The down-climb on the left side is featured, just awkward getting into.
Climb Stats to Date
|
DATE OF CLIMB: November 6, 2023
WALLS HIT: 1 NUMBER OF 5.7 CLIMBS: 1 NUMBER OF PITCHES: 9 NUMBER OF FALLS: 0 NUMBER OF TAKES: 0 VERTICAL FEET CLIMBED: ~1250' DIRTY UNDERWEAR ENCOUNTERED: 0 TOTAL CLIMBS SO FAR: 191 TOTAL PITCHES SO FAR: 256* TOTAL 5.7 VERTICAL FEET ON THE TOUR SO FAR: 25,155 NUMBER OF CLIMBS REMAINING: 71 (out of 262) VERTICAL FEET REMAINING: 29,422' DIRTY UNDERWEAR ENCOUNTERED TO DATE: 8 |
FALLS SO FAR:
|
|