CLIMB-ON MAPS
  • Home
  • Blog
    • WTF 5..7 Tour - Red Rock >
      • General >
        • WTF 5.7 Climbs
        • The Plan
        • Managing the Desert Heat
      • Black Velvet Canyon >
        • Lazy Buttress/Whisky Peak E >
          • Day 79: Schaeffer's Delight
          • Day 83: Ballantine Blast
          • Day 86: Lazy Buttress (Climb)
      • Calico 1 (1st Pullout) >
        • Amusement Park
        • Day 17: Civilization
        • Day 20: Panty Wall
        • Day 14: The Slab
        • Day 21: Wall of Death & Hamlet
        • Day 24: Child's Play
        • Day 49: Ultraman
        • Day 50: Dog Wall & Fixx Cliff
        • Day 51: Tuna and Chips
        • Day 53: Viagra Towers
        • Day 59 Iron Man - Necco Waif
        • Day 80 - Tuna Cookies
        • Day 80 - Diamond Dance - The Oasis
        • Day 81 - CarlyQuinn Crag
      • Calico 2 (2nd Pullout) >
        • Day 13: Meetup & Black Corridor
        • Day 28: Retirement Plan
        • Day 52: The Walrus, Running Man, & Sweet Pain
        • Day 54: USS Crag & Tsunami
        • Day 56: Great Red Book Wall
        • Day 66: The Gallery
      • First Creek Canyon >
        • First Creek Slabs >
          • Day 40: Falling Stars & Bad Moon Arising
          • Day 67: Smiley Face
          • Day 94: Romanian Rib Right
          • Day 95: Romanian Rib Left
        • Lotta Balls Wall >
          • Day 88: Lotta Brews
        • Romper Room >
          • Day 42: Algae on Parade
          • Day 67: Romper Room 2
        • Schoolyard >
          • Day 44: School Yard 1 - Deja Vu & Short Subject
          • Day 77: School Yard -Sunday School & Dunce's Corner
          • Day 89: Schoolyard Bully
        • Slot Club Area >
          • Day 78: Escondite
        • Strawberry Hill >
          • Day 43: This Ain't the F'n Way!
      • Icebox Canyon >
        • Day 12: Sunnyside & Frigid Air
        • Day 39: Necromancer - Hop Route
        • Day 57: Tarkus Crack (Tiki Cliff)
      • Juniper Canyon >
        • Jackrabbit Buttress >
          • Day 16: Myster Z
          • Day 35: Mz. Why
        • Rose Tower >
          • Day 64: Canola Cracks
          • Day 87: Olive Oil
      • Kraft Mountain >
        • Day 6 (and 90): Conundrum Crag
        • Day 7: Caligula Crag
        • Day 4: Three Peaks and Yin & Yang
        • Day 10: Winter Heat
      • Mt. Wilson >
        • Day 41: Limon
        • Day 72: Gentleman's Club - Silicone Sag
      • Oak Creek Canyon >
        • Day 37: Johnny Vegas
        • Day 65: Tan Line
        • Day 68: Byrd Pinnacle
        • Day 92: Beulah's Arete
      • Pine Creek Canyon >
        • Day 22: Mescalito E - Too Many Tantrums
        • Day 23: Mescalito E - Pauligk Pillar
        • Day 27: Straight Shooter Wall
        • Day 31: Robin Trowel (Abutment) & Stick Gully 1
        • Day 32-34: Flight Path
        • Day 34: Stick Gully 2 - Prelude
        • Day 36: Birdland
        • Day 38: Diarrhea Dialect (Bullnose Wall)
        • Day 48: Cat in the Hat
        • Day 62: Stick Gully - Box of Rain
        • Day 63: Cookie Monster
        • Day 69: Soloist Crack
      • Red Springs >
        • Day 2: Cowlick and Cannibal
        • Day 1: Cut Your Teeth, Hide & Seek, Happy Acres
        • Day 3: Dickies (Seems Like a Butt)
        • Day 8: Fringe
        • Day 5: Moderate Mecca
        • Day 9: Reptile & Fox Walls
        • Day 45: Gnat Man
        • Day 55: Coco Crag
        • Day 58: In Through the Out Door (Ridinghood Wall)
        • Day 91: Guys and Ghouls
      • Sandstone Quarry >
        • Day 29: High Scalin'
        • Day 47: Man's Best Friend & Americrag
        • Day 66: Hall of Fame - Ms. Adventure
      • Southern Outcrops >
        • Day 70 & 71: Chocolate Rocks
        • Day 82: Illusion Crag - Part 1
      • White Rock Springs >
        • Angel Food Wall >
          • Day 11: Group Therapy
        • Day 25: The Ledger
        • Seraphim Wall >
          • Day 91: Ride the Wind
      • Willow Springs >
        • Day 15: Mother's and Outhouse
        • Day 18: Mossy Ledges - Pussy Nuts
        • Day 19: Mossy Ledges 2
        • Day 26: Graduate Cliff - Pre Skool Part 1 >
          • Day 46: Pre Skool Part Deux
        • Day 60 & 61: Graduate Cliff 2
        • Day 30 - Gold Digger
        • Day 61: Ragged Edges - Footloose
        • Day 62: Case Face - Space Case
        • Day 73: Ragged Edges Area
        • Day 74 Peaches (Children's Wall)
        • Day 75 N' Plus Ultra 1 - Geezer Face & Lucky Charms
        • Day 76: N'Plus Ultra 2 - Pillar Talk & Chocolate Tranquility Fountain
        • Day 84: N'Plus Ultra Part 3 - Cereal Killer
        • Day 84: Lost Creek Canyon - Grey Matter
        • Day 85: Communist Plan at Lost & Found
        • Day 94: Double Pin-etration N'Plus Ultra
    • Meet Our Tools >
      • GPS Units
      • Van Life: Tankenstein >
        • Tankenstein Gets Gutted
        • Van Life: Rebuilding Tankenstein >
          • Glowing Disco Counter Top
          • Cold Food Storage
          • Bouldering-pad-bench
          • Insulation and Vent Fan
          • Quick Fixes
          • Kingsized Pullout Bed
      • Ultralight Exposure Protection Gear

Mescalito

Cookie Monster
SUMMARY HAIKU

Mini epic here
Vomit and snagged ropes to start
Then a new day - FAB!
​
Picture
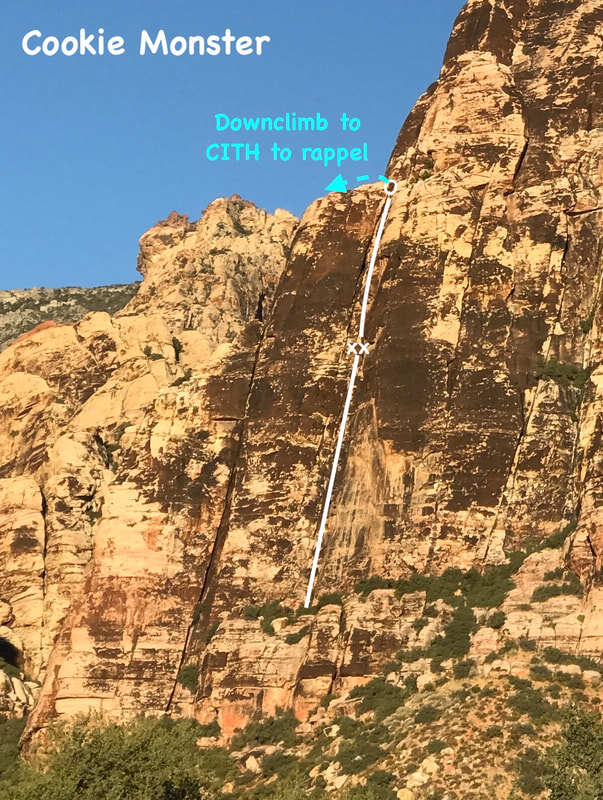
Climb: Cookie Monster (Trad, 340 feet, 2 pitches - Handren breaks it up into three)
Wall: Mescalito
Rope & Gear: 
We used twin 60s (needed for the rappel), pro to #5
Good Lead for a New Trad Climber? Marginal. May be a bit much for a newer trad leader, depending on how the climb is broken up.
Conclusion WTF? What the FABULOUS!
  • This is a fabulous climb - one that we would put amongst the top 10 so far of the 141 climbs we have done. It is FAR superior to Cat in the Hat.
  • You will need two ropes to do either decent. Having gotten our rope caught multiple times on the Cookie Monster decent, we recommend the Cat in the Hat decent.
  • Be sure to not leave anything at the base of Cookie Monster because the Cat in the Hat decent drops you off on the other side of Mescalito. 

Pitch 1 (170 feet)

Although the Handren guidebook rates pitch 1 a 5.6, I feel like P1 is harder than P2 (at least the way we broke up the pitches.)

The protection is mostly there, but can require some searching in spots and/or needs long slings because you have to reach deep to place a piece. There are a couple of spots with no pro for at least 15 or more feet - although vertical, the terrain is very juggy in those sections. 

On this pitch you will pass a tat anchor with a rap ring in a hole. Further up you will go under and then bypass a roof. About 20-25 feet past the roof, there are bolted anchors. These anchors are difficult to see - the first time I did this pitch (during the vomit-fest - see video for details...), I completely missed the bolted anchors and stopped at some tat wrapped around a boulder (there is also a rap ring on this tat.).

To locate the bolted anchors look for streaked tan rock and a roof up and right. 
Picture
Picture
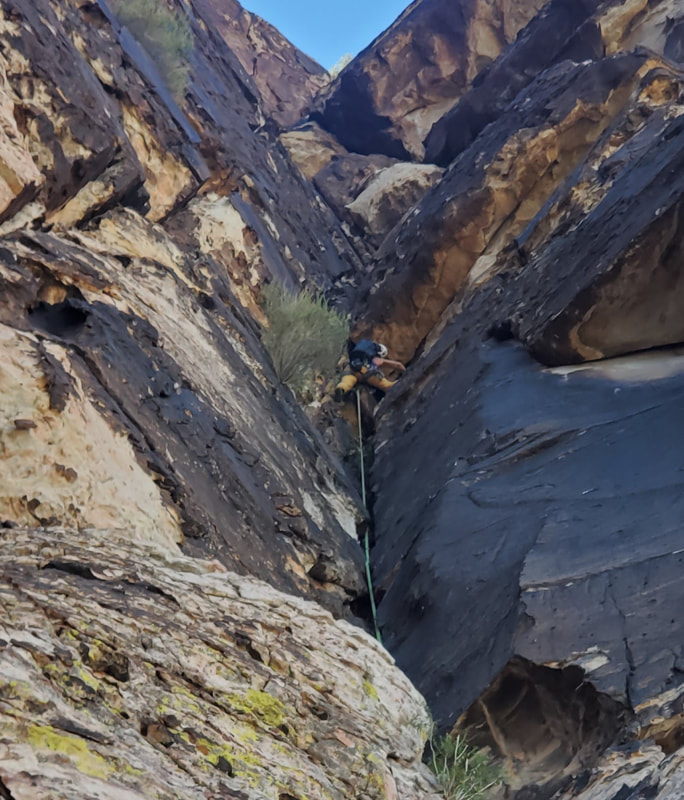
Stef pitch 1 Cat in the Hat
Picture
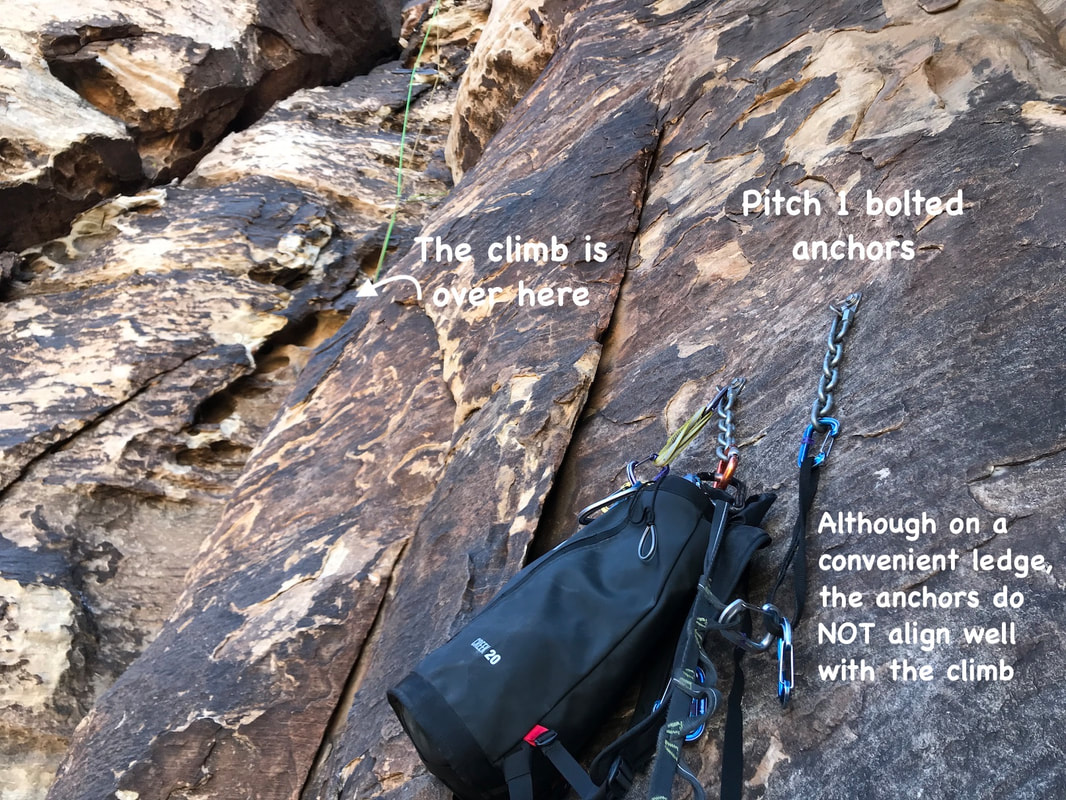
Bolted anchor at the top of pitch 1.

​Although on a big ledge, these anchors are actually in a really weird spot - both awkward to access and difficult to protect while getting there. The anchor location also makes things weird for the pitch 2 leader (more on that in a bit,) If I did this climb again, I would NOT use these bolted anchors. I'd probably build an anchor in the vicinity on the actual climb. 

There is a second tat/rappelling anchor about another 40-50 feet up. If the P1 leader tried to get to that and you are using a 60 m rope, the belayer needs to be prepared to simul-climb for about 20 feet and then secure him or herself once the lead is taken off belay. If you use a 70m rope you won't need to simulclimb, but be sure to bring a tag line for the two-rope rappel down Cat in the Hat. 

Pitch 2 (170 feet)

Rick and I were swinging leads and we saw that it didn't make sense for him to come over to the bolted anchor. So ,he put in a couple of pieces to secure himself just below where you'd cut across to access the anchors. I kept him on belay, tightened the rope, then attached the remaining gear to the rope and slid it down to him. 

​Because the bolted anchor is so far off route, Rick had to NOT place any gear for the first 15-20 feet or so,and then use an extra-long sling in the first piece to ensure that the rope would not bind itself around the rock between the anchor and the actual climb (i.e. so it would swing freely and go upwards in a straighter fashion.) Needless to say, a lack of protection "on purpose" like this was non-ideal.

The crux of pitch 2 is near a permanently stuck cam (which you can clip), then you go past the tat rappel anchor, and up into an alcove. From the alcove, go right up the smaller crack (don't go left up the chimney). The pitch ends at a tree.

After pitch 2 we wanted to continue up and finish the last pitch that you can rappel down (and not have to do the walk-off) of Cat in the Hat (this was the pitch we skipped when we did Cat in the Hat because it was too dang hot...). However, there was a party in front of us on Cookie Monster (which we initially needed to wait for) AND there was a party on Cat in the Hat. We could hear voices above us, but because there is not a clear line of sight, we weren't sure if there was a congo line on that last pitch. Since we had chosen to do this climb in the afternoon (because the temps were still warm and we wanted to climb in the shade), we were concerned about more waiting and losing daylight. So, we decided to stop there and head over to the Cat in the Hat Anchors for the rappel.

The Decent

Throughout this write-up I mentioned multiple rappel anchors on Cookie Monster. Yes, you can rappel this route (you need two ropes), but considering our rope got stuck not just once but twice on this route (again see video), we opted to do the "traditional" decent - rappelling Cat in the Hat (which also requires two ropes.)

To get to the Cat in the Hat anchors from the top of P2 Cookie Monster, go climbers left at the tree (thorough an opening in the rock). There is about 30 feet of down climbing, some of it spicy, so we stayed roped up and placed gear accordingly to protect the follower. There are several bushes, but keep down-climbing until you see a small tree with multiple tat. This is the first rappel spot. Rappel down with two ropes to a very large ledge.

To locate the next set of anchors, from the rappel turn left, then go back, then left towards some large boulders. Scramble down those boulders following the line of least resistance. This is not really exposed climbing, so if you encounter dangerous exposure, that is probably not the correct way. This scrambling will take you down to a second ledge where you will veer right (skier's right) and then see bolted anchors about head-high on a small wall. From here is a two-rope rappel to the ground.

Having descended this way multiple times, so far we have not yet had our rope get caught.

Climb Stats to Date

DATE OF CLIMB: October 16, 2020
​WALLS HIT: 1
NUMBER OF 5.7 CLIMBS TODAY: 1
NUMBER OF 5.7 PITCHES TODAY: 2
​NUMBER OF FALLS: 0
NUMBER OF TAKES: 0
5.7 VERTICAL FEET CLIMBED TODAY: 340'

DIRTY UNDERWEAR ENCOUNTERED TODAY: 0
​TOTAL CLIMBS SO FAR: 141

TOTAL PITCHES SO FAR: 187
TOTAL 5.7 VERTICAL FEET ON THE TOUR SO FAR: 16,375' 
NUMBER OF CLIMBS REMAINING: 97 (out of 237)

VERTICAL FEET REMAINING: 34,292'

​​DIRTY UNDERWEAR ENCOUNTERED TO DATE: 
​​​​​​​​​​​5
FALLS SO FAR:
  • STEF: 2 (By Stef on WTF'r Tarkus Crack)
  • ​RICK: 0
TAKES ON LEAD SO FAR: 
  • Stef – On Lead
    • WTF'r Miniwanka
    • WTF'r Lean & Languid
    • WTF'r Pauligk Pillar
    • WT Freak Out: 5.7 Freak Out
    • WTF'r Unknown left start to Datura
    • WTF'r: Short Subject
    • WT Fua: Ghouls Just Wanna Have Fun
    • WTForget About It: Glue Gun
    • WTFun: Cialis Cleft (took to figure out the moves on start)
    • WTF'r: Guys and Ghouls
    • Takes As a second:
    • WTF'r: Too Many Tantrums
    • WT Fail: Pre Skool (took the first time, not the second she climbed it)
    • WTF'r: Tarkus Crack
  • Rick - Takes On Lead
    • WTF'r Too Many Tantrums
    • WT Fork: The Ledger
    • WTF'r: Deja Vu
    • WTF'r: Tuna and Chips (he took and rested at the start of pitch 2 to recover from pitch 1 before continuing)
    • WTF'r: Tarkus Crack​


WTF 5.7 Tour: Red Rock Canyon- Climbs By Area & Alphabetically

Menu

About
WTF 5.7 Tour
Climb-On Maps is no longer in business. Thank you!
© COPYRIGHT 2017-2025. ALL RIGHTS RESERVED.
  • Home
  • Blog
    • WTF 5..7 Tour - Red Rock >
      • General >
        • WTF 5.7 Climbs
        • The Plan
        • Managing the Desert Heat
      • Black Velvet Canyon >
        • Lazy Buttress/Whisky Peak E >
          • Day 79: Schaeffer's Delight
          • Day 83: Ballantine Blast
          • Day 86: Lazy Buttress (Climb)
      • Calico 1 (1st Pullout) >
        • Amusement Park
        • Day 17: Civilization
        • Day 20: Panty Wall
        • Day 14: The Slab
        • Day 21: Wall of Death & Hamlet
        • Day 24: Child's Play
        • Day 49: Ultraman
        • Day 50: Dog Wall & Fixx Cliff
        • Day 51: Tuna and Chips
        • Day 53: Viagra Towers
        • Day 59 Iron Man - Necco Waif
        • Day 80 - Tuna Cookies
        • Day 80 - Diamond Dance - The Oasis
        • Day 81 - CarlyQuinn Crag
      • Calico 2 (2nd Pullout) >
        • Day 13: Meetup & Black Corridor
        • Day 28: Retirement Plan
        • Day 52: The Walrus, Running Man, & Sweet Pain
        • Day 54: USS Crag & Tsunami
        • Day 56: Great Red Book Wall
        • Day 66: The Gallery
      • First Creek Canyon >
        • First Creek Slabs >
          • Day 40: Falling Stars & Bad Moon Arising
          • Day 67: Smiley Face
          • Day 94: Romanian Rib Right
          • Day 95: Romanian Rib Left
        • Lotta Balls Wall >
          • Day 88: Lotta Brews
        • Romper Room >
          • Day 42: Algae on Parade
          • Day 67: Romper Room 2
        • Schoolyard >
          • Day 44: School Yard 1 - Deja Vu & Short Subject
          • Day 77: School Yard -Sunday School & Dunce's Corner
          • Day 89: Schoolyard Bully
        • Slot Club Area >
          • Day 78: Escondite
        • Strawberry Hill >
          • Day 43: This Ain't the F'n Way!
      • Icebox Canyon >
        • Day 12: Sunnyside & Frigid Air
        • Day 39: Necromancer - Hop Route
        • Day 57: Tarkus Crack (Tiki Cliff)
      • Juniper Canyon >
        • Jackrabbit Buttress >
          • Day 16: Myster Z
          • Day 35: Mz. Why
        • Rose Tower >
          • Day 64: Canola Cracks
          • Day 87: Olive Oil
      • Kraft Mountain >
        • Day 6 (and 90): Conundrum Crag
        • Day 7: Caligula Crag
        • Day 4: Three Peaks and Yin & Yang
        • Day 10: Winter Heat
      • Mt. Wilson >
        • Day 41: Limon
        • Day 72: Gentleman's Club - Silicone Sag
      • Oak Creek Canyon >
        • Day 37: Johnny Vegas
        • Day 65: Tan Line
        • Day 68: Byrd Pinnacle
        • Day 92: Beulah's Arete
      • Pine Creek Canyon >
        • Day 22: Mescalito E - Too Many Tantrums
        • Day 23: Mescalito E - Pauligk Pillar
        • Day 27: Straight Shooter Wall
        • Day 31: Robin Trowel (Abutment) & Stick Gully 1
        • Day 32-34: Flight Path
        • Day 34: Stick Gully 2 - Prelude
        • Day 36: Birdland
        • Day 38: Diarrhea Dialect (Bullnose Wall)
        • Day 48: Cat in the Hat
        • Day 62: Stick Gully - Box of Rain
        • Day 63: Cookie Monster
        • Day 69: Soloist Crack
      • Red Springs >
        • Day 2: Cowlick and Cannibal
        • Day 1: Cut Your Teeth, Hide & Seek, Happy Acres
        • Day 3: Dickies (Seems Like a Butt)
        • Day 8: Fringe
        • Day 5: Moderate Mecca
        • Day 9: Reptile & Fox Walls
        • Day 45: Gnat Man
        • Day 55: Coco Crag
        • Day 58: In Through the Out Door (Ridinghood Wall)
        • Day 91: Guys and Ghouls
      • Sandstone Quarry >
        • Day 29: High Scalin'
        • Day 47: Man's Best Friend & Americrag
        • Day 66: Hall of Fame - Ms. Adventure
      • Southern Outcrops >
        • Day 70 & 71: Chocolate Rocks
        • Day 82: Illusion Crag - Part 1
      • White Rock Springs >
        • Angel Food Wall >
          • Day 11: Group Therapy
        • Day 25: The Ledger
        • Seraphim Wall >
          • Day 91: Ride the Wind
      • Willow Springs >
        • Day 15: Mother's and Outhouse
        • Day 18: Mossy Ledges - Pussy Nuts
        • Day 19: Mossy Ledges 2
        • Day 26: Graduate Cliff - Pre Skool Part 1 >
          • Day 46: Pre Skool Part Deux
        • Day 60 & 61: Graduate Cliff 2
        • Day 30 - Gold Digger
        • Day 61: Ragged Edges - Footloose
        • Day 62: Case Face - Space Case
        • Day 73: Ragged Edges Area
        • Day 74 Peaches (Children's Wall)
        • Day 75 N' Plus Ultra 1 - Geezer Face & Lucky Charms
        • Day 76: N'Plus Ultra 2 - Pillar Talk & Chocolate Tranquility Fountain
        • Day 84: N'Plus Ultra Part 3 - Cereal Killer
        • Day 84: Lost Creek Canyon - Grey Matter
        • Day 85: Communist Plan at Lost & Found
        • Day 94: Double Pin-etration N'Plus Ultra
    • Meet Our Tools >
      • GPS Units
      • Van Life: Tankenstein >
        • Tankenstein Gets Gutted
        • Van Life: Rebuilding Tankenstein >
          • Glowing Disco Counter Top
          • Cold Food Storage
          • Bouldering-pad-bench
          • Insulation and Vent Fan
          • Quick Fixes
          • Kingsized Pullout Bed
      • Ultralight Exposure Protection Gear