CLIMB-ON MAPS
  • Home
  • Blog
    • WTF 5..7 Tour - Red Rock >
      • General >
        • WTF 5.7 Climbs
        • The Plan
        • Managing the Desert Heat
      • Black Velvet Canyon >
        • Lazy Buttress/Whisky Peak E >
          • Day 79: Schaeffer's Delight
          • Day 83: Ballantine Blast
          • Day 86: Lazy Buttress (Climb)
      • Calico 1 (1st Pullout) >
        • Amusement Park
        • Day 17: Civilization
        • Day 20: Panty Wall
        • Day 14: The Slab
        • Day 21: Wall of Death & Hamlet
        • Day 24: Child's Play
        • Day 49: Ultraman
        • Day 50: Dog Wall & Fixx Cliff
        • Day 51: Tuna and Chips
        • Day 53: Viagra Towers
        • Day 59 Iron Man - Necco Waif
        • Day 80 - Tuna Cookies
        • Day 80 - Diamond Dance - The Oasis
        • Day 81 - CarlyQuinn Crag
      • Calico 2 (2nd Pullout) >
        • Day 13: Meetup & Black Corridor
        • Day 28: Retirement Plan
        • Day 52: The Walrus, Running Man, & Sweet Pain
        • Day 54: USS Crag & Tsunami
        • Day 56: Great Red Book Wall
        • Day 66: The Gallery
      • First Creek Canyon >
        • First Creek Slabs >
          • Day 40: Falling Stars & Bad Moon Arising
          • Day 67: Smiley Face
          • Day 94: Romanian Rib Right
          • Day 95: Romanian Rib Left
        • Lotta Balls Wall >
          • Day 88: Lotta Brews
        • Romper Room >
          • Day 42: Algae on Parade
          • Day 67: Romper Room 2
        • Schoolyard >
          • Day 44: School Yard 1 - Deja Vu & Short Subject
          • Day 77: School Yard -Sunday School & Dunce's Corner
          • Day 89: Schoolyard Bully
        • Slot Club Area >
          • Day 78: Escondite
        • Strawberry Hill >
          • Day 43: This Ain't the F'n Way!
      • Icebox Canyon >
        • Day 12: Sunnyside & Frigid Air
        • Day 39: Necromancer - Hop Route
        • Day 57: Tarkus Crack (Tiki Cliff)
      • Juniper Canyon >
        • Jackrabbit Buttress >
          • Day 16: Myster Z
          • Day 35: Mz. Why
        • Rose Tower >
          • Day 64: Canola Cracks
          • Day 87: Olive Oil
      • Kraft Mountain >
        • Day 6 (and 90): Conundrum Crag
        • Day 7: Caligula Crag
        • Day 4: Three Peaks and Yin & Yang
        • Day 10: Winter Heat
      • Mt. Wilson >
        • Day 41: Limon
        • Day 72: Gentleman's Club - Silicone Sag
      • Oak Creek Canyon >
        • Day 37: Johnny Vegas
        • Day 65: Tan Line
        • Day 68: Byrd Pinnacle
        • Day 92: Beulah's Arete
      • Pine Creek Canyon >
        • Day 22: Mescalito E - Too Many Tantrums
        • Day 23: Mescalito E - Pauligk Pillar
        • Day 27: Straight Shooter Wall
        • Day 31: Robin Trowel (Abutment) & Stick Gully 1
        • Day 32-34: Flight Path
        • Day 34: Stick Gully 2 - Prelude
        • Day 36: Birdland
        • Day 38: Diarrhea Dialect (Bullnose Wall)
        • Day 48: Cat in the Hat
        • Day 62: Stick Gully - Box of Rain
        • Day 63: Cookie Monster
        • Day 69: Soloist Crack
      • Red Springs >
        • Day 2: Cowlick and Cannibal
        • Day 1: Cut Your Teeth, Hide & Seek, Happy Acres
        • Day 3: Dickies (Seems Like a Butt)
        • Day 8: Fringe
        • Day 5: Moderate Mecca
        • Day 9: Reptile & Fox Walls
        • Day 45: Gnat Man
        • Day 55: Coco Crag
        • Day 58: In Through the Out Door (Ridinghood Wall)
        • Day 91: Guys and Ghouls
      • Sandstone Quarry >
        • Day 29: High Scalin'
        • Day 47: Man's Best Friend & Americrag
        • Day 66: Hall of Fame - Ms. Adventure
      • Southern Outcrops >
        • Day 70 & 71: Chocolate Rocks
        • Day 82: Illusion Crag - Part 1
      • White Rock Springs >
        • Angel Food Wall >
          • Day 11: Group Therapy
        • Day 25: The Ledger
        • Seraphim Wall >
          • Day 91: Ride the Wind
      • Willow Springs >
        • Day 15: Mother's and Outhouse
        • Day 18: Mossy Ledges - Pussy Nuts
        • Day 19: Mossy Ledges 2
        • Day 26: Graduate Cliff - Pre Skool Part 1 >
          • Day 46: Pre Skool Part Deux
        • Day 60 & 61: Graduate Cliff 2
        • Day 30 - Gold Digger
        • Day 61: Ragged Edges - Footloose
        • Day 62: Case Face - Space Case
        • Day 73: Ragged Edges Area
        • Day 74 Peaches (Children's Wall)
        • Day 75 N' Plus Ultra 1 - Geezer Face & Lucky Charms
        • Day 76: N'Plus Ultra 2 - Pillar Talk & Chocolate Tranquility Fountain
        • Day 84: N'Plus Ultra Part 3 - Cereal Killer
        • Day 84: Lost Creek Canyon - Grey Matter
        • Day 85: Communist Plan at Lost & Found
        • Day 94: Double Pin-etration N'Plus Ultra
    • Meet Our Tools >
      • GPS Units
      • Van Life: Tankenstein >
        • Tankenstein Gets Gutted
        • Van Life: Rebuilding Tankenstein >
          • Glowing Disco Counter Top
          • Cold Food Storage
          • Bouldering-pad-bench
          • Insulation and Vent Fan
          • Quick Fixes
          • Kingsized Pullout Bed
      • Ultralight Exposure Protection Gear

Wall: Solar Slab - Lower Tier

Climb: Beulah's Arete

SUMMARY HAIKU

This one is SPICY!
It's not like Johnny Vegas
Got caught in a hail storm


Climb: Beulah's Arete (Trad) (5.7)(445')
Wall: Solar Slab - Lower Tier
Beginner Lead: No
Pro: To 3" - small cams, micros, lots of nuts and tricams

Conclusion WTF? What the FEISTY!


In Mountain Project William Thiry's February 21, 2021 comments said, "Comparable in quality, difficulty and length to Johnny Vegas..." Rick and I were excited to do this climb based upon that description because we both really enjoyed Johnny Vegas!

Although there was some runout on Johnny Vegas, it was on easy terrain. There was no point on Johnny Vegas where it felt "intense" or I was "concerned," the climbing was easy and mostly well protected. That was not the case for Beulah's Arete. 


Beulah's Arete has consequential run out (i.e. decking potential) on not-that-easy terrain. It also zig zags around on pitches 2 and 3 making rope drag a bitch.

​I even tried to reduce rope drag by alternating my twin ropes and using long runners. (We climbed with twin 60s to maximize the efficiency of the rappel down Solar Slab Gully.) It's not a bad climb, in fact the rock is good (thankfully), it has some variety, the arete section on Pitch 2 is neat, it's just not a cruiser walk in the park, so do not go in expecting that. I would not recommend this climb for a new trad leader. 
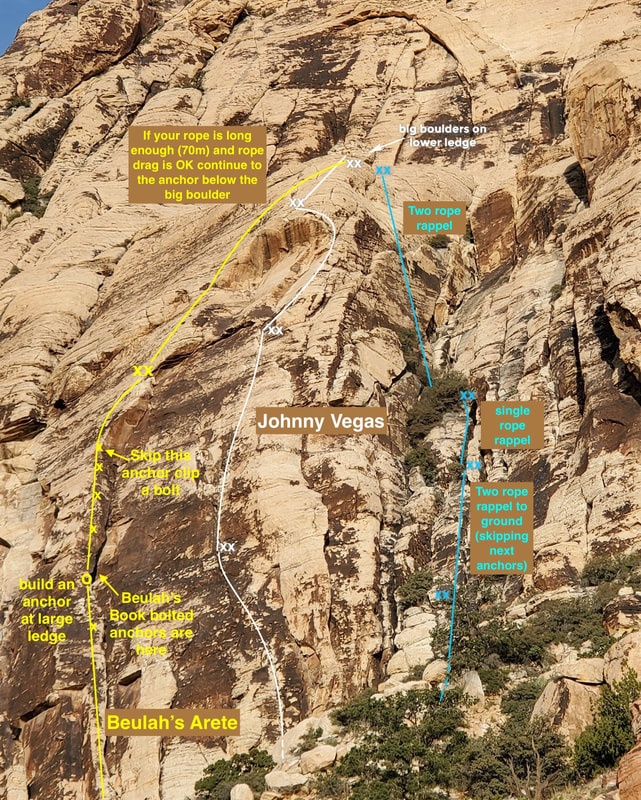
​
Picture

Pitch 1 - 110 feet

There is intermittent protection with this pitch with some consequential runout (i.e. decking potential with falls.) Some list this as 5.6 but I don't think any of the pitches are 5.6, they are solid old school-style 5.7 or even in the 5.8/5.9 range in spots (not easy 5.7 like Johnny Vegas). 

My first piece (you can see it in the photo) is about 20+ feet up and it is the only place for pro. You can sneak something in on the ledge (where I am about to stand up on) which will help protect from having a bigger fall after bouncing on the ledge if you eat it before you reach the bolt on the next face (about 55-feet up). I was happy for this bolt.

At the second ledge (large) you will see a two-bolt anchor off to the right. That is the anchor for Beulah's Book and it is not advised to use it, as it won't set up the rope well for the leader on pitch 2 (rope drag is already a problem towards the top, this anchor would likely add more rope drag).

I built an anchor on the large ledge (to climber's left of the Beulah's Book anchor) to set up a direct shot up the arete on the next pitch.

Belaying from the large ledge is also probably more comfortable than the bolted anchor.
Picture
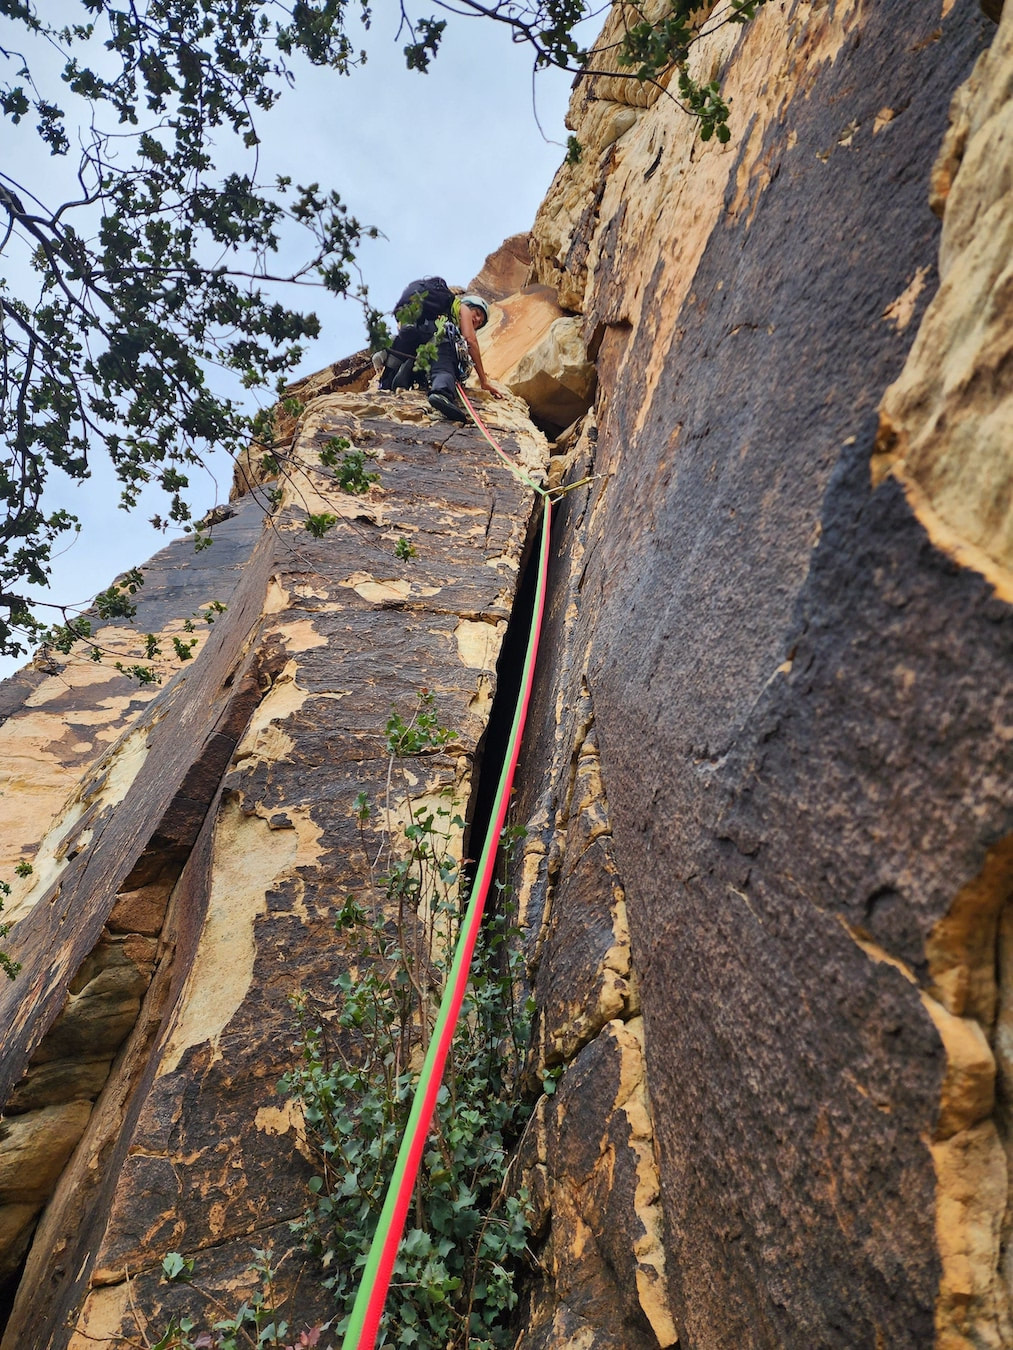
Stefani Dawn leading pitch 1 of Beulah's Arete.

Pitch 2 - 135 feet

The photo to the right shows where I built the anchor at the top of P1. I tried to go high, making this a little awkward and tricky to build. There are more options a little lower that are actually easier to access and belay from. 

Other than clipping one of the pieces in the anchor, the next piece of pro is a bolt about 20+ feet up. It's not super "cruiser" climbing to get there. It eases up a little bit to get to the next bolt, another 15+ feet up. There is a third bolt, that I did not use, because I found good gear off to the left side of the arete. Clipping the third bolt would have forced me to stay on the face and I wanted to climb the edge of the arete - which was probably the funnest part of the climb!

There is a two bolt anchor further up, which I clipped one bolt and skipped. Because pitch 3 is so long, I wanted to get to the bolted anchor that is at the top of Beulah's Book pitch 2. 

You have to curve right across the rock to get to the anchors. I used a bunch of nuts and tricams on this pitch. Rope drag was getting bad by the time I reached the anchors. 
Picture
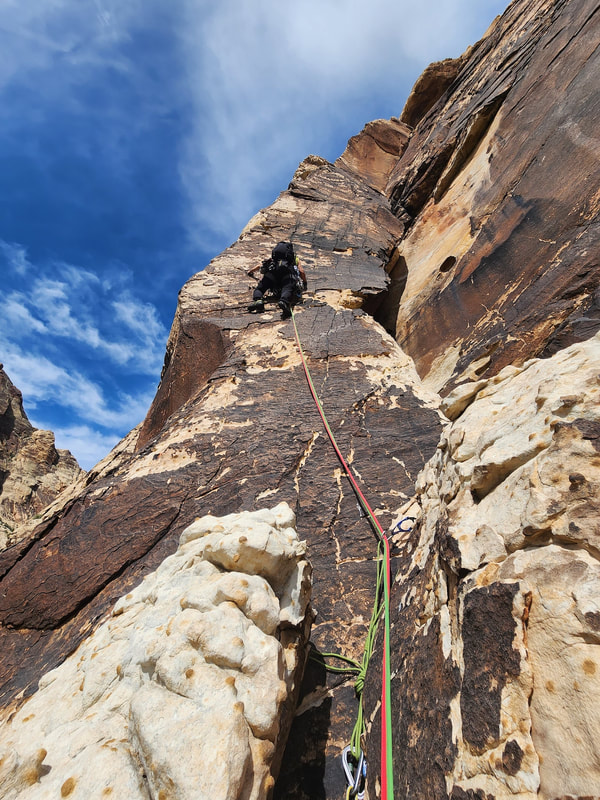
Stefani Dawn leading pitch 2 of Beulah's Arete. The first bolt is about where she is in the photo. We built an anchor to allow a direct line up the arete to minimize rope drag. Rope drag can become a problem because this pitch is long and curves up right.

Pitch 3 - 200 feet

This pitch shares the same pitch 3 with Beulah's Book.

Clip one of the anchor bolts then clip the single bolt about another 8-10 feet up. That is about all the solid pro you will get for a while (you may be able to get a janky nut in somewhere or a tiny cam... if you zig zag and really search...)

The entire pitch is slabby with occasional balls and lips for toes or a pinch. One comment on the Mountain Project description for Beulah's Book calls this pitch a 5.5 - maybe after the first 40 feet it is. The first 40 feet was surprisingly heady and was not a gimmie. 

The goal if this pitch is to keep angling right as you go up. There are a couple small vertical faces, bit mostly go up the weaknesses. Be sure to extend slings to minimize rope drag - the slab grabs onto that rope!

​ Because I was climbing with twins, I alternated clipping my ropes to try to minimize the drag. Even so, I was cussing up a storm trying to get to those damn anchors. 
Picture
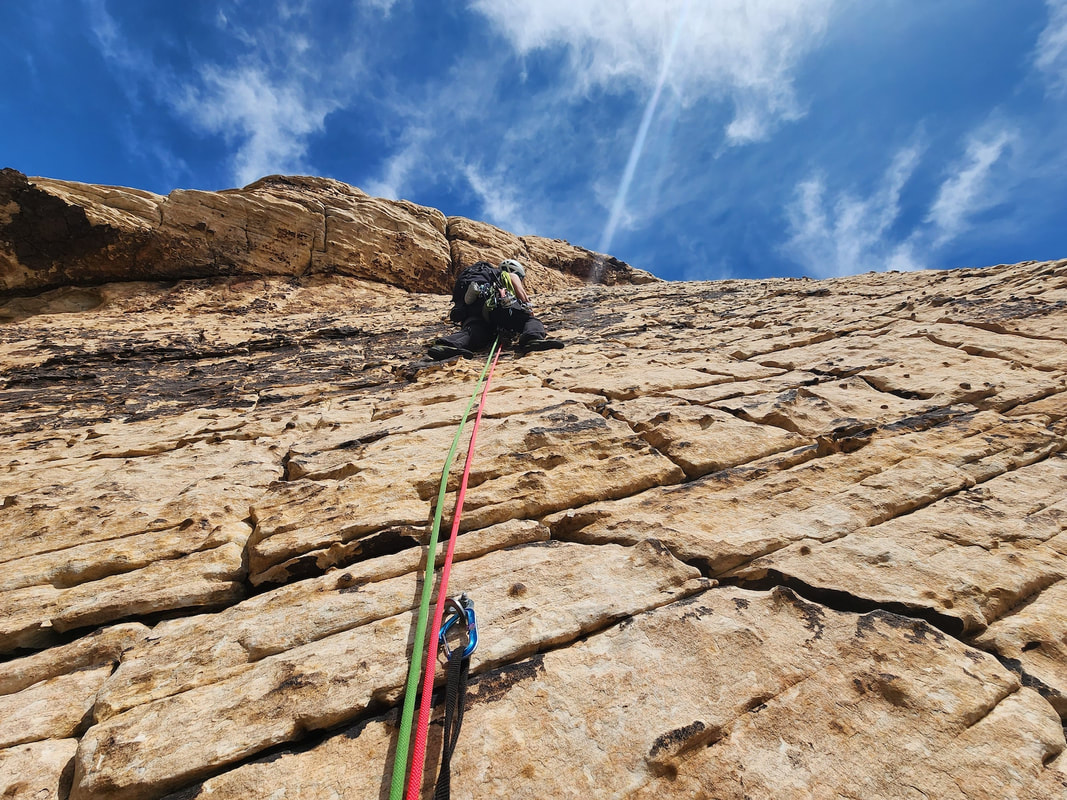
Pitch 3 of Beulah's Arete is shared with Beulah's Book. The clipped bolt you see in the photo is about 8-10 feet above the bolted anchor - finding reliable pro above this point is challenging for another 30-40 feet... you might be able to find a creative nut slot in a horizontal, but not much leaves you with confidence. Keep angling right with occasional vertical spurts in weaknesses.
Speaking of a storm, rain was predicted for the afternoon and I could see clouds building behind us towards Mt. Charleston - I could also hear rumbling. The pressure was on to finish and get down. 

There is a set of bolted anchors on Johnny Vegas, but those were too far right to access. Keep going up the now lower grade slab to reach a set of  bolted anchors just below where there is a large boulder and the rock starts flattening off. Have the follower continue past the anchors and get to the flat spot adjacent to the large boulder. The follower can do a quick short rope belay for safety. 

The Decent

Go around the climber's left side of the large boulder and look for a set of bolted anchors on a vertical wall beneath/next to the boulder. This requires two ropes to rappel - taking you into Solar Slab gully. If you don't have two ropes you will need to go up past the boulder to solar slab ledge and locate the solar slab gully rappel. (See our description for the Tan Line descent. Note that Tan Line comes in from the other side on Soalr Slab ledge.)

For details on this 2-rope rappel descent down the gully see the topo above and read our descent description in Johnny Vegas.


WTF 5.7 Tour: Red Rock Canyon- Climbs By Area & Alphabetically

Menu

About
WTF 5.7 Tour
Climb-On Maps is no longer in business. Thank you!
© COPYRIGHT 2017-2025. ALL RIGHTS RESERVED.
  • Home
  • Blog
    • WTF 5..7 Tour - Red Rock >
      • General >
        • WTF 5.7 Climbs
        • The Plan
        • Managing the Desert Heat
      • Black Velvet Canyon >
        • Lazy Buttress/Whisky Peak E >
          • Day 79: Schaeffer's Delight
          • Day 83: Ballantine Blast
          • Day 86: Lazy Buttress (Climb)
      • Calico 1 (1st Pullout) >
        • Amusement Park
        • Day 17: Civilization
        • Day 20: Panty Wall
        • Day 14: The Slab
        • Day 21: Wall of Death & Hamlet
        • Day 24: Child's Play
        • Day 49: Ultraman
        • Day 50: Dog Wall & Fixx Cliff
        • Day 51: Tuna and Chips
        • Day 53: Viagra Towers
        • Day 59 Iron Man - Necco Waif
        • Day 80 - Tuna Cookies
        • Day 80 - Diamond Dance - The Oasis
        • Day 81 - CarlyQuinn Crag
      • Calico 2 (2nd Pullout) >
        • Day 13: Meetup & Black Corridor
        • Day 28: Retirement Plan
        • Day 52: The Walrus, Running Man, & Sweet Pain
        • Day 54: USS Crag & Tsunami
        • Day 56: Great Red Book Wall
        • Day 66: The Gallery
      • First Creek Canyon >
        • First Creek Slabs >
          • Day 40: Falling Stars & Bad Moon Arising
          • Day 67: Smiley Face
          • Day 94: Romanian Rib Right
          • Day 95: Romanian Rib Left
        • Lotta Balls Wall >
          • Day 88: Lotta Brews
        • Romper Room >
          • Day 42: Algae on Parade
          • Day 67: Romper Room 2
        • Schoolyard >
          • Day 44: School Yard 1 - Deja Vu & Short Subject
          • Day 77: School Yard -Sunday School & Dunce's Corner
          • Day 89: Schoolyard Bully
        • Slot Club Area >
          • Day 78: Escondite
        • Strawberry Hill >
          • Day 43: This Ain't the F'n Way!
      • Icebox Canyon >
        • Day 12: Sunnyside & Frigid Air
        • Day 39: Necromancer - Hop Route
        • Day 57: Tarkus Crack (Tiki Cliff)
      • Juniper Canyon >
        • Jackrabbit Buttress >
          • Day 16: Myster Z
          • Day 35: Mz. Why
        • Rose Tower >
          • Day 64: Canola Cracks
          • Day 87: Olive Oil
      • Kraft Mountain >
        • Day 6 (and 90): Conundrum Crag
        • Day 7: Caligula Crag
        • Day 4: Three Peaks and Yin & Yang
        • Day 10: Winter Heat
      • Mt. Wilson >
        • Day 41: Limon
        • Day 72: Gentleman's Club - Silicone Sag
      • Oak Creek Canyon >
        • Day 37: Johnny Vegas
        • Day 65: Tan Line
        • Day 68: Byrd Pinnacle
        • Day 92: Beulah's Arete
      • Pine Creek Canyon >
        • Day 22: Mescalito E - Too Many Tantrums
        • Day 23: Mescalito E - Pauligk Pillar
        • Day 27: Straight Shooter Wall
        • Day 31: Robin Trowel (Abutment) & Stick Gully 1
        • Day 32-34: Flight Path
        • Day 34: Stick Gully 2 - Prelude
        • Day 36: Birdland
        • Day 38: Diarrhea Dialect (Bullnose Wall)
        • Day 48: Cat in the Hat
        • Day 62: Stick Gully - Box of Rain
        • Day 63: Cookie Monster
        • Day 69: Soloist Crack
      • Red Springs >
        • Day 2: Cowlick and Cannibal
        • Day 1: Cut Your Teeth, Hide & Seek, Happy Acres
        • Day 3: Dickies (Seems Like a Butt)
        • Day 8: Fringe
        • Day 5: Moderate Mecca
        • Day 9: Reptile & Fox Walls
        • Day 45: Gnat Man
        • Day 55: Coco Crag
        • Day 58: In Through the Out Door (Ridinghood Wall)
        • Day 91: Guys and Ghouls
      • Sandstone Quarry >
        • Day 29: High Scalin'
        • Day 47: Man's Best Friend & Americrag
        • Day 66: Hall of Fame - Ms. Adventure
      • Southern Outcrops >
        • Day 70 & 71: Chocolate Rocks
        • Day 82: Illusion Crag - Part 1
      • White Rock Springs >
        • Angel Food Wall >
          • Day 11: Group Therapy
        • Day 25: The Ledger
        • Seraphim Wall >
          • Day 91: Ride the Wind
      • Willow Springs >
        • Day 15: Mother's and Outhouse
        • Day 18: Mossy Ledges - Pussy Nuts
        • Day 19: Mossy Ledges 2
        • Day 26: Graduate Cliff - Pre Skool Part 1 >
          • Day 46: Pre Skool Part Deux
        • Day 60 & 61: Graduate Cliff 2
        • Day 30 - Gold Digger
        • Day 61: Ragged Edges - Footloose
        • Day 62: Case Face - Space Case
        • Day 73: Ragged Edges Area
        • Day 74 Peaches (Children's Wall)
        • Day 75 N' Plus Ultra 1 - Geezer Face & Lucky Charms
        • Day 76: N'Plus Ultra 2 - Pillar Talk & Chocolate Tranquility Fountain
        • Day 84: N'Plus Ultra Part 3 - Cereal Killer
        • Day 84: Lost Creek Canyon - Grey Matter
        • Day 85: Communist Plan at Lost & Found
        • Day 94: Double Pin-etration N'Plus Ultra
    • Meet Our Tools >
      • GPS Units
      • Van Life: Tankenstein >
        • Tankenstein Gets Gutted
        • Van Life: Rebuilding Tankenstein >
          • Glowing Disco Counter Top
          • Cold Food Storage
          • Bouldering-pad-bench
          • Insulation and Vent Fan
          • Quick Fixes
          • Kingsized Pullout Bed
      • Ultralight Exposure Protection Gear